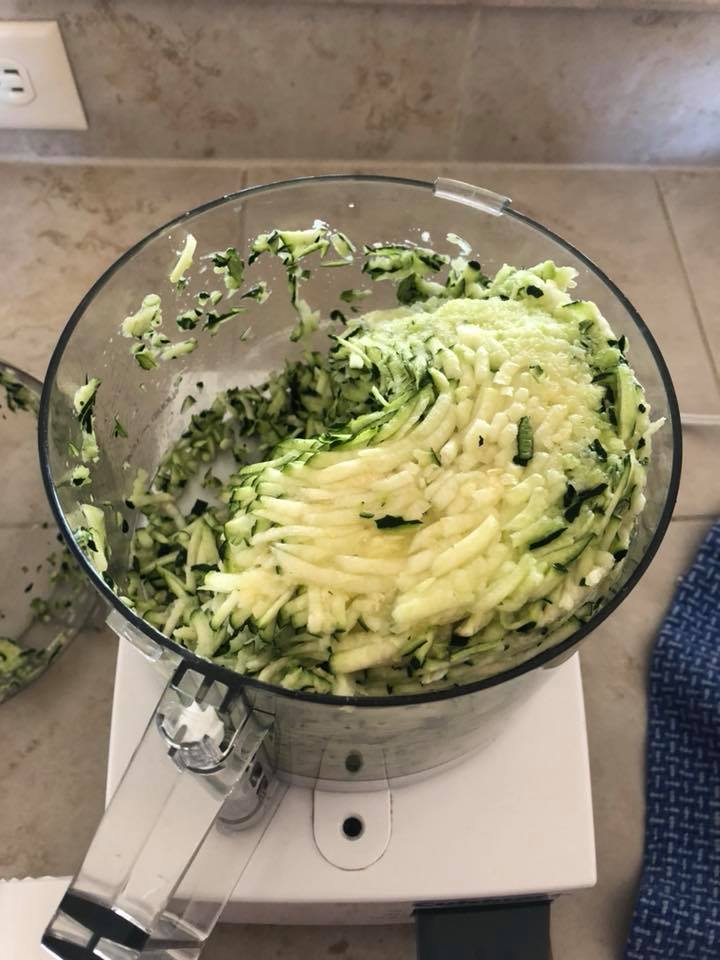
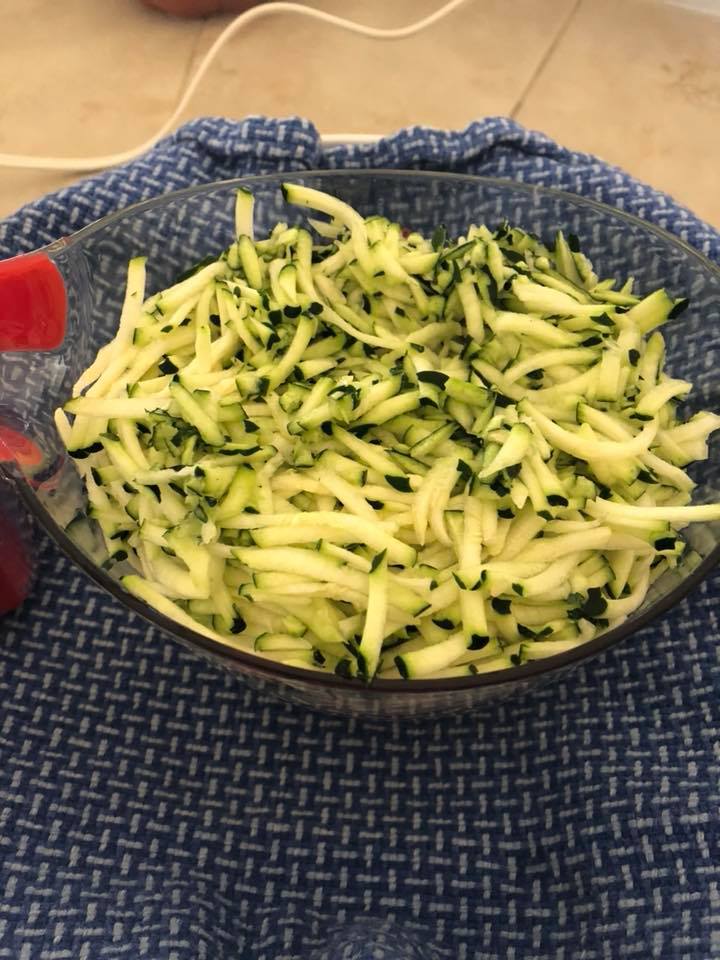
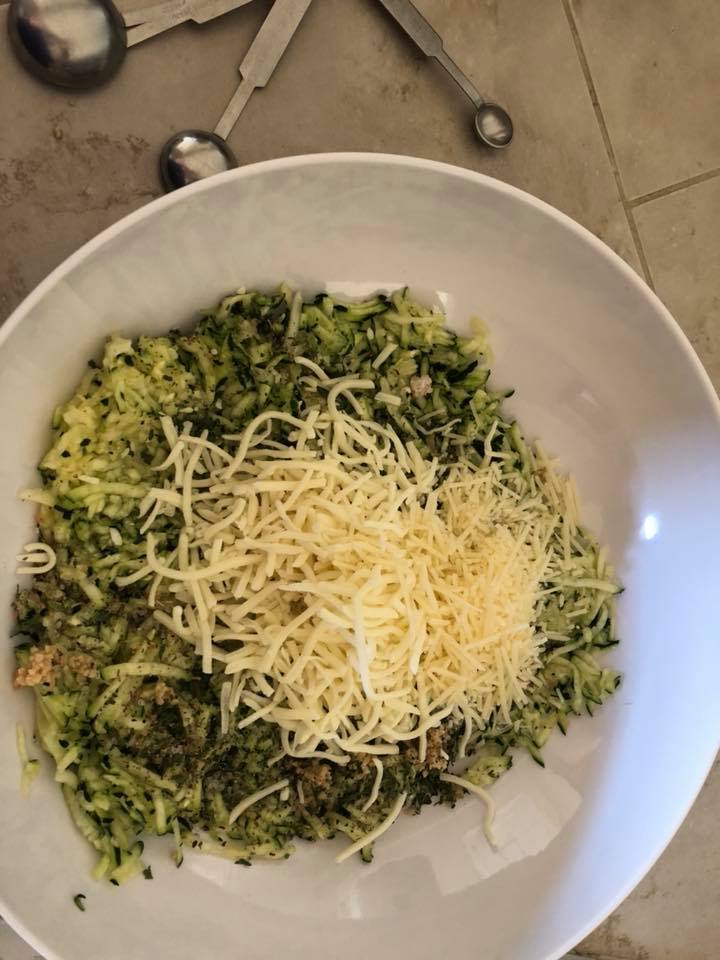
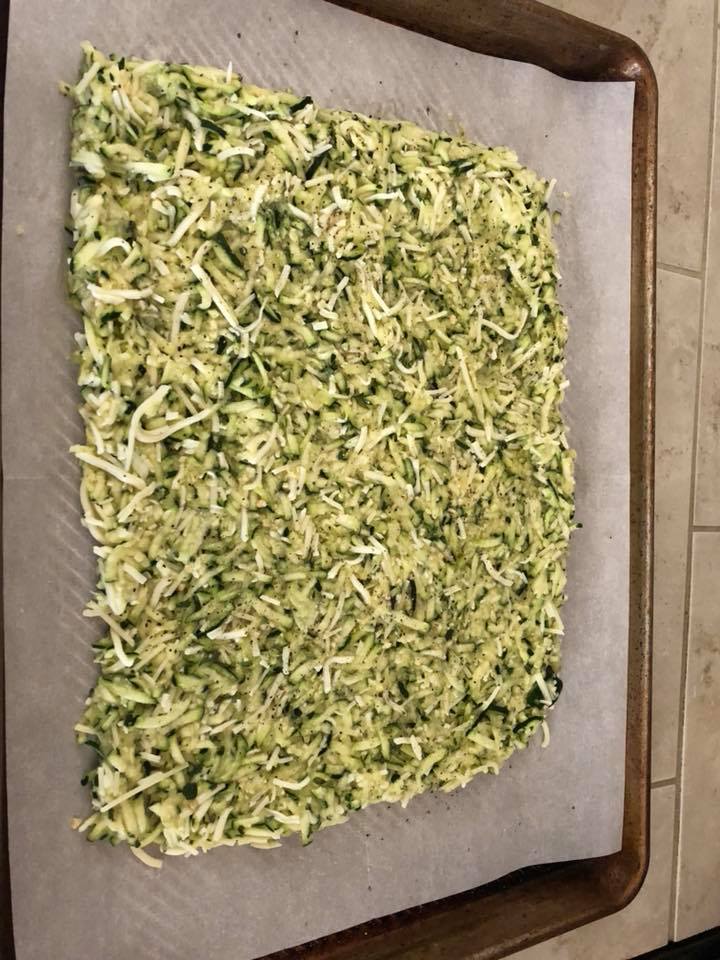
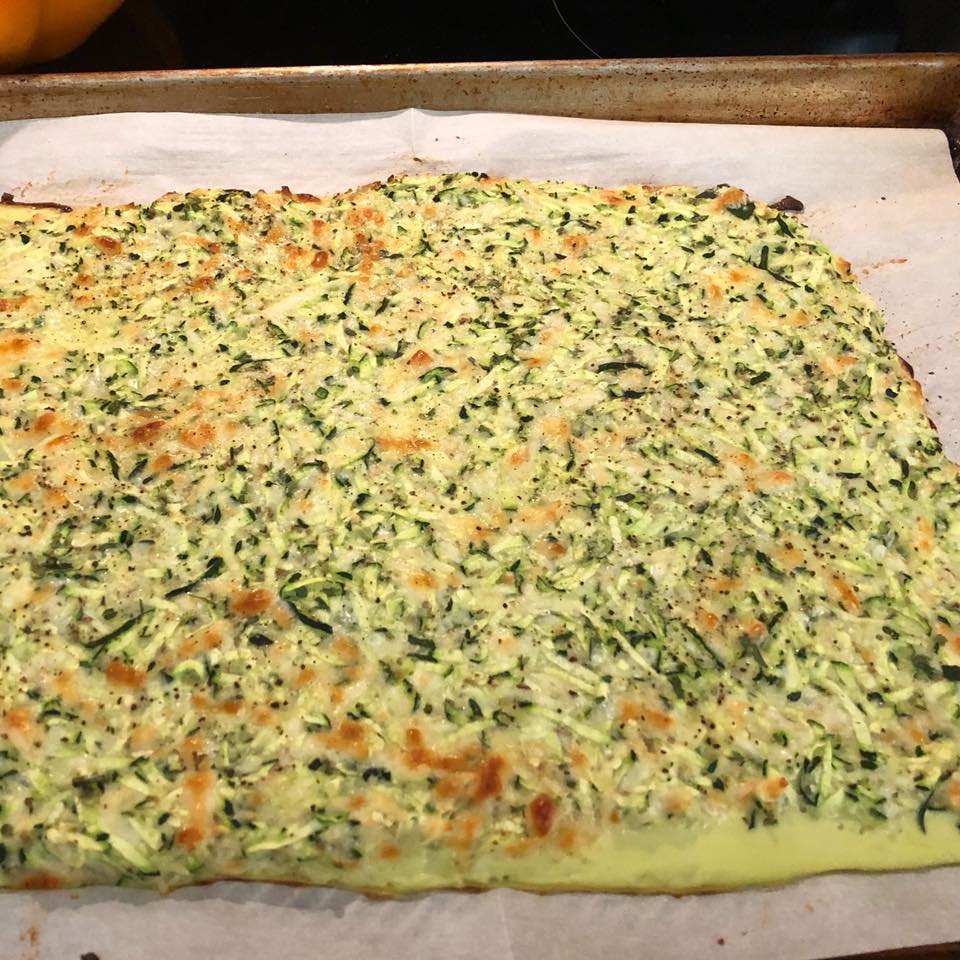
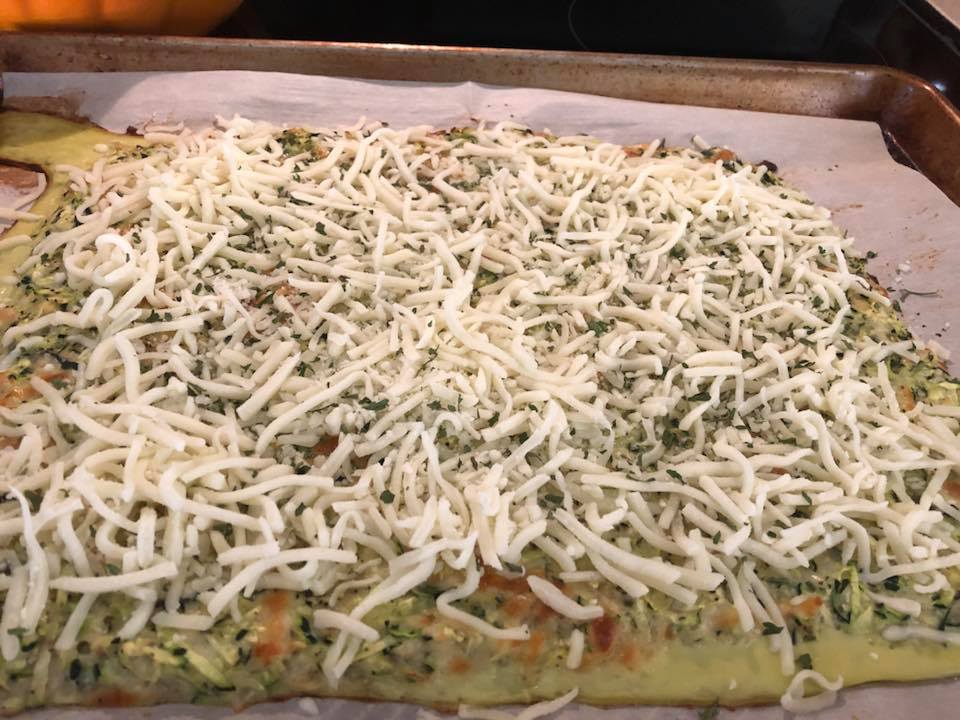
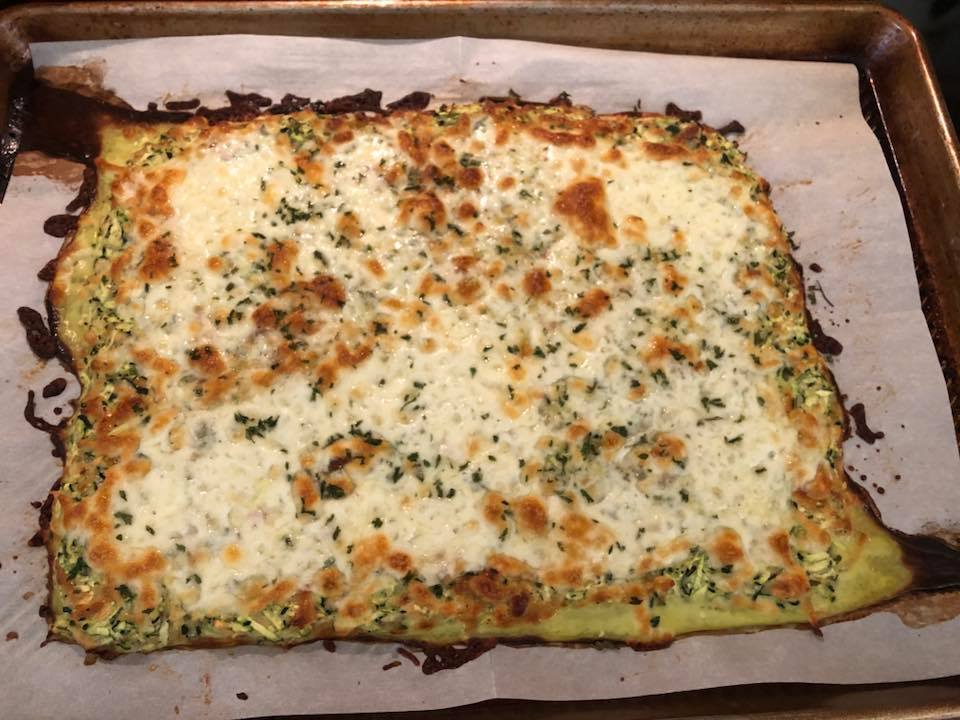
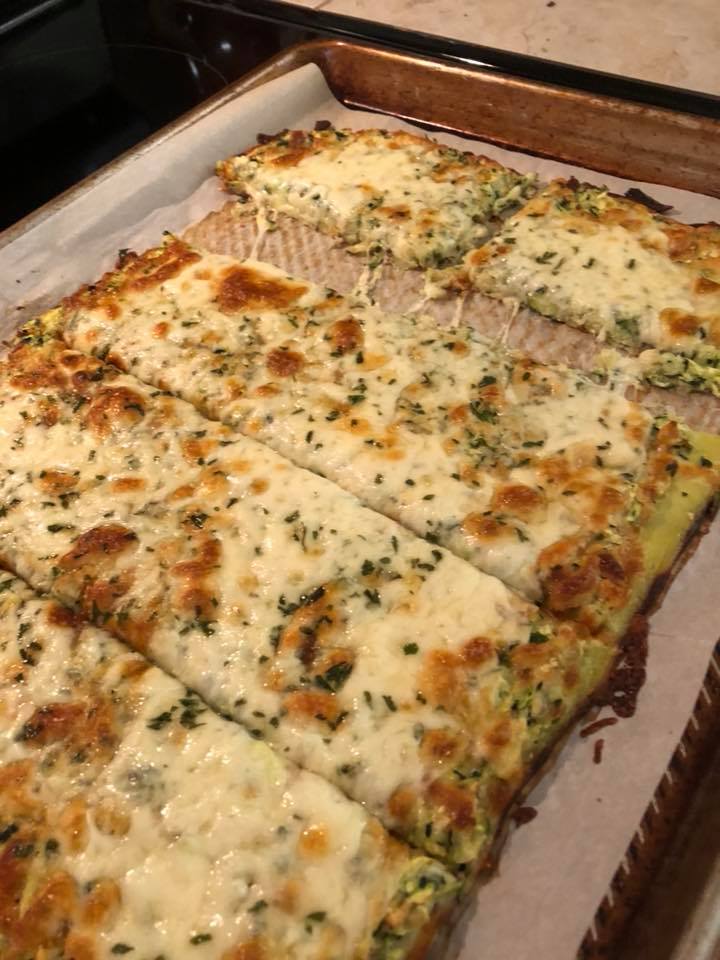
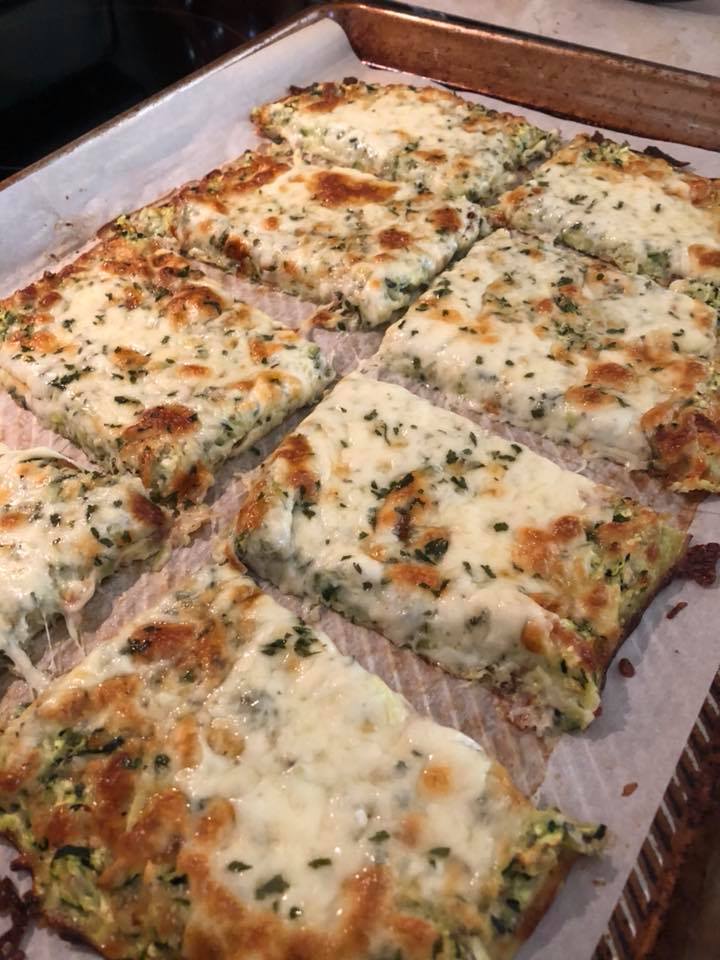
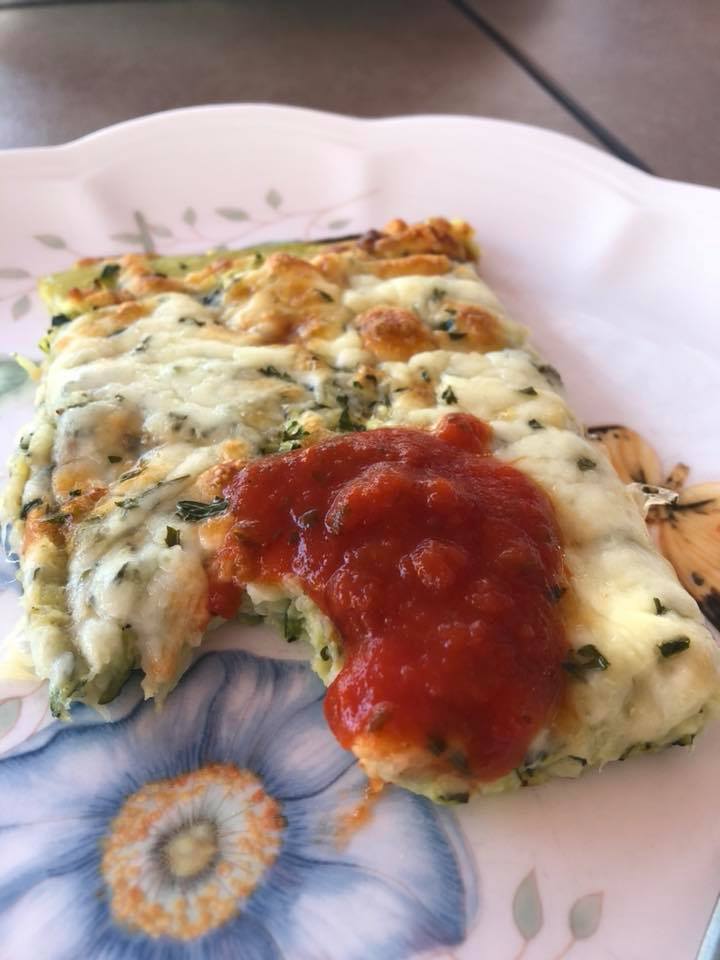
 Zucchini Pizza! I wish I could take credit for this recipe but, I cannot! My husband saw this one day and sent the recipe to me, it was from there that I gathered the ingredients and set out to bake one up - doubting the entire way that this would turn out - at all. This zucchini pizza not only turned out beautiful - its fantastic! The two of us at this for dinner and were fully satiated and enjoyed each bite thoroughly. I have always shred my garden zucchini in 2 cup portions for zucchini bread but, now I will be adding 4 cup portions to my freezer for this recipe needs to be made on a more consistent basis!! It's 'guilt-free' and again - its TASTY!!!!!!! Don't forget you can add your own twists to the ingredients but, important note: always use parchment paper to bake this on, and always wring your zucchini out really well!! I use my jelly bag in place of a kitchen towel to wring out all the excess water from my zucchini - works like a charm! Enjoy! Diane Ingredients 4 cups grated zucchini, about 3-4 medium zucchini 2 large eggs, lightly beaten 2 cloves garlic, minced 1/2 teaspoon dried oregano 3 cups shredded mozzarella, divided: reserve 2 cups for topping pizza 1/2 cup finely shred Parmesan 1/4 cup cornstarch 1 teaspoon kosher salt, or adjust to your liking 1/2 teaspoon ground black pepper, or adjust to your liking 2 teaspoons dried parsley flake: to top pizza Marinara sauce for dipping bake pizza Preheat oven to 425F Line a baking sheet with parchment paper. Using a clean kitchen towel, wring out excess water/moisture from the zucchini *important step to get a good bake! Place zucchini in a large mixing bowl, add eggs, garlic, oregano, 1 cup of the mozzarella, the parmesan, cornstarch, salt & pepper. Stir until well combined. Spread out zucchini mixture onto the prepared baking sheet and pat into a 'crust'. Bake until golden and dried out, approximately 25 minutes. Remove from oven and top with remaining mozzarella cheese, and sprinkle on the parsley. Bake once again until cheese is melted, approximately 8-10 minutes. Slice and serve with marinara. Enjoy! Diane Baker for Canning and Cooking at Home
0 Comments
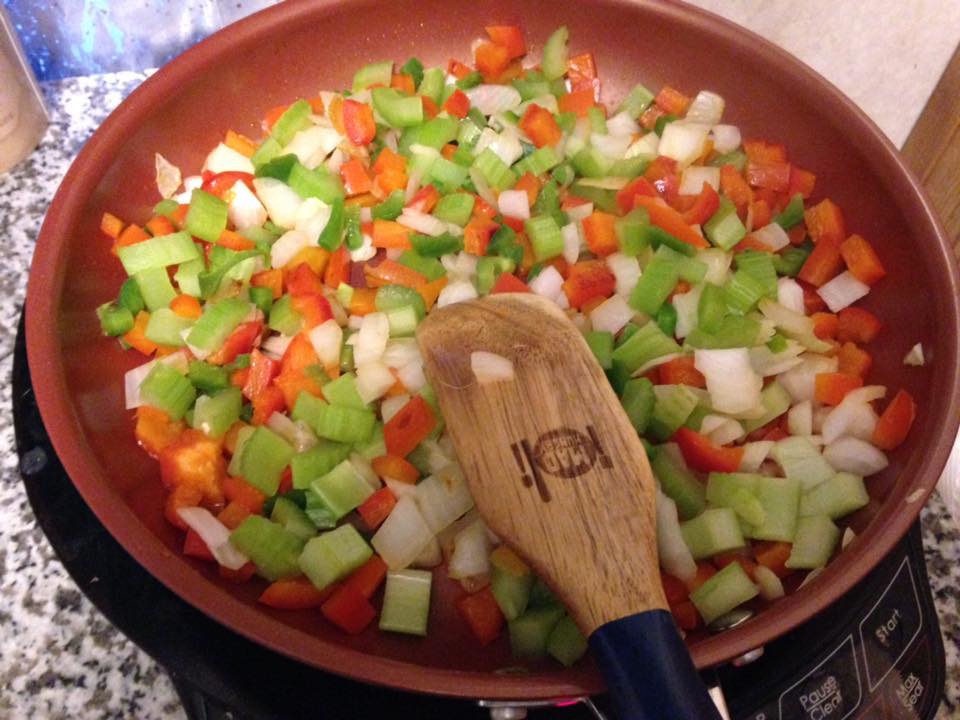
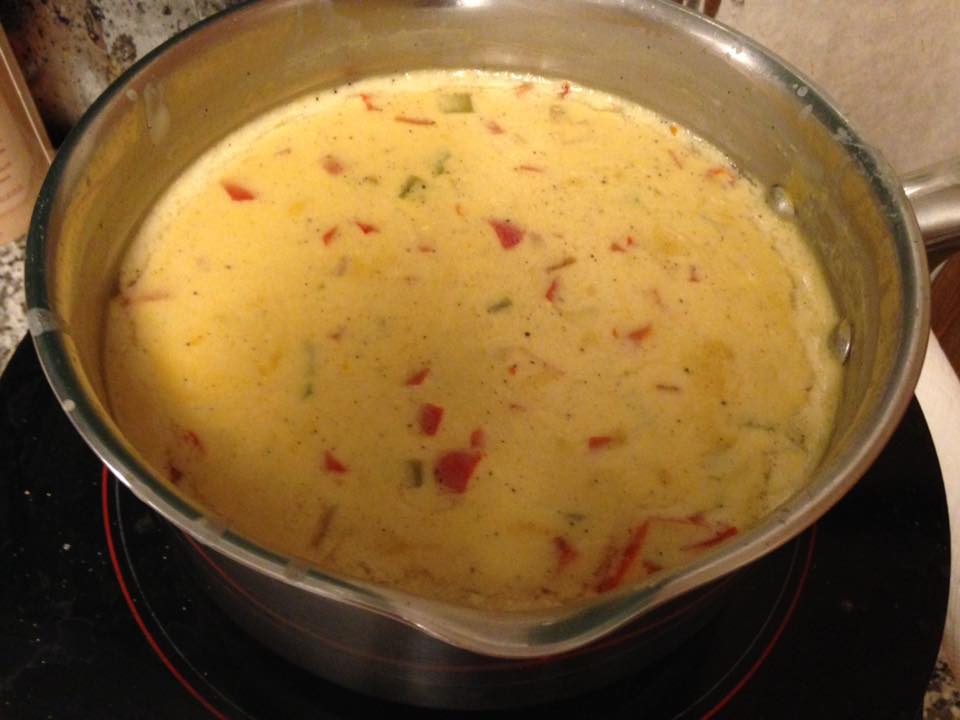
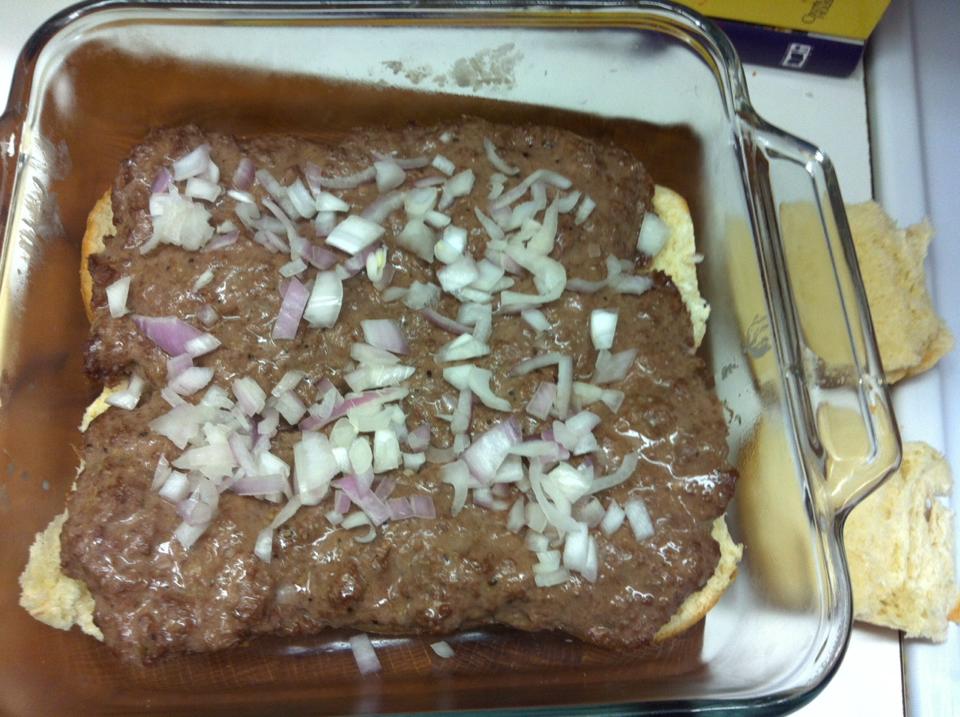
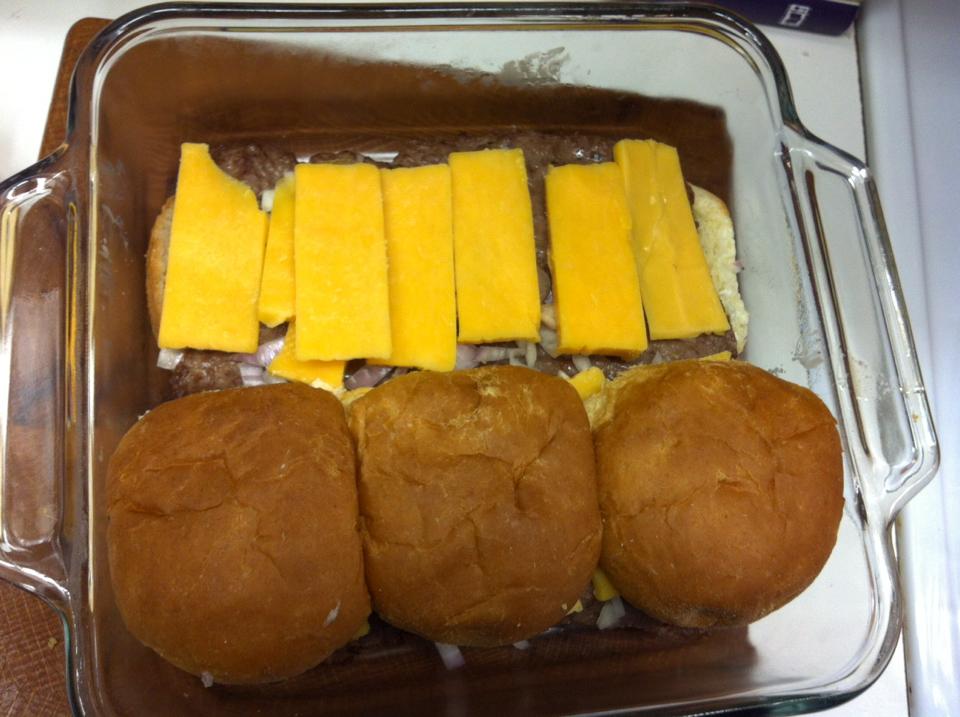
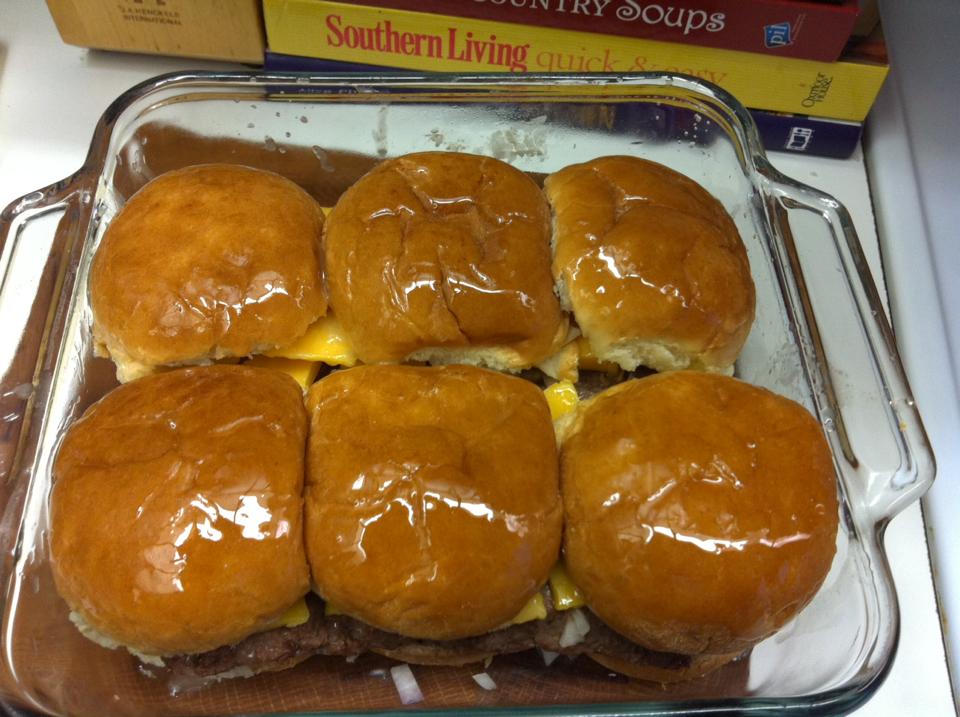
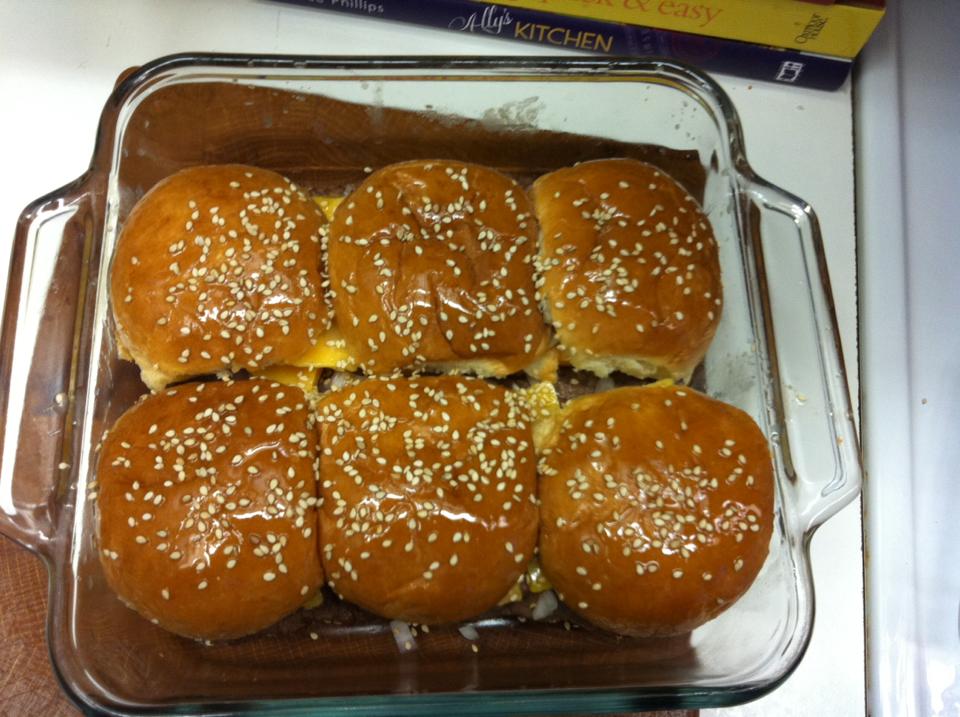
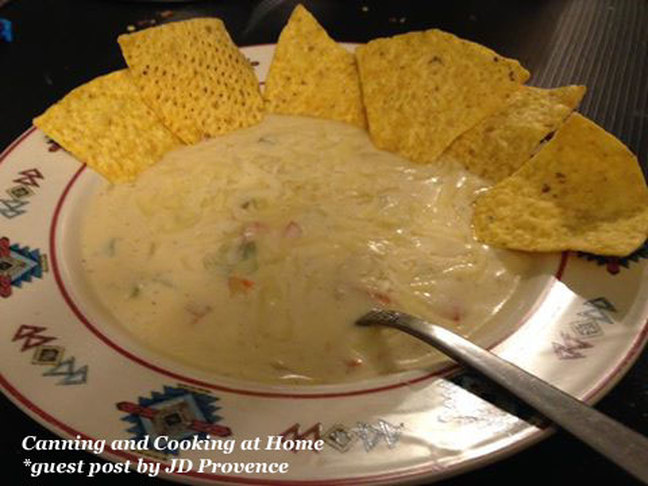 This is totally on my "to make list" - thanks to JD for sharing his 'kicked up a notch' Cheese Soup. ~Enjoy! Diane Tequila Cheese Soup *guest post by JD Provence Ingredients: 1 quart milk (4 cups) 2 cups of chicken broth 8 ounces Velveeta, cubed 1 large red bell pepper, diced 1 medium sweet onion, peeled & diced 3 stalks celery, diced 1 to 2 jalapenos, sliced (optional) 1/4 cup cooking oil 3 Tbsp butter 3 Tbsp all purpose flour 1/2 cup tequila (optional) 1 tsp black pepper Salt to taste Directions: Heat oil and saute vegetables until onions are translucent, about 10 minutes. Add broth and continue cooking, over medium high heat, until all vegetables are tender. Meanwhile, in separate pan, melt butter and add in the flour to make a roux. Slow!y add milk and simmer until all roux is absorbed, then add cheese and broth/vegetable mix, continue simmering over medium heat, constantly stirring, until all cheese is melted. Add tequila and black pepper, simmer over medium low heat 10-15 minutes. Garnish with grated cheddar cheese and diced tomatoes. Serve with tortilla chips or crackers Recipe & Photos by: JD Provence for Canning and Cooking at Home 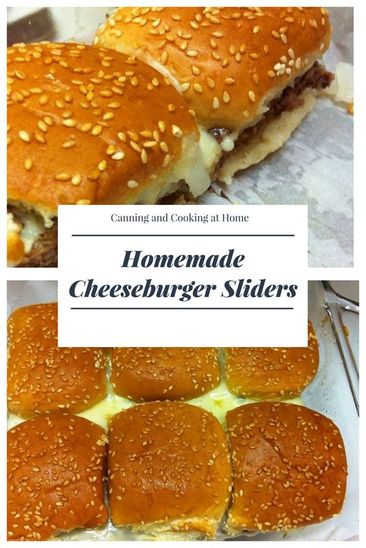 This recipe is for a quick and easy dinner. We like doing this when we don't have access to our outdoor grill but, craving a burger. You can make the hamburger patty as thick or as thin as you want but, if you do go thicker then increase your first 'bake time' accordingly. The second 'bake time' is to melt the cheese, warm up the onion and toast the buns. You can double this recipe completely by using 2 pounds of ground beef and spreading into a 9x13 baking dish. I use two 8x8 baking dishes (one to bake the ground beef and one to finish the recipe.) IF you don't have two equal sized baking dishes, just be extra careful wiping out the dish between the first and second 'bake time". I will admit, these remind me of "Home" and our ole ' White Castle' Burgers! ~Enjoy! Diane Easy Cheeseburger Oven Sliders 1 pound of lean ground beef 1/2 tsp garlic powder 1/2 tsp salt 1/4 tsp ground black pepper 1/4 onion, small dice 4-6 slices of cheddar cheese (enough to cover ground beef patties) 6 slider hamburger buns 2 Tbs melted butter sesame seeds, if needed, optional Directions: Preheat oven to 350F.
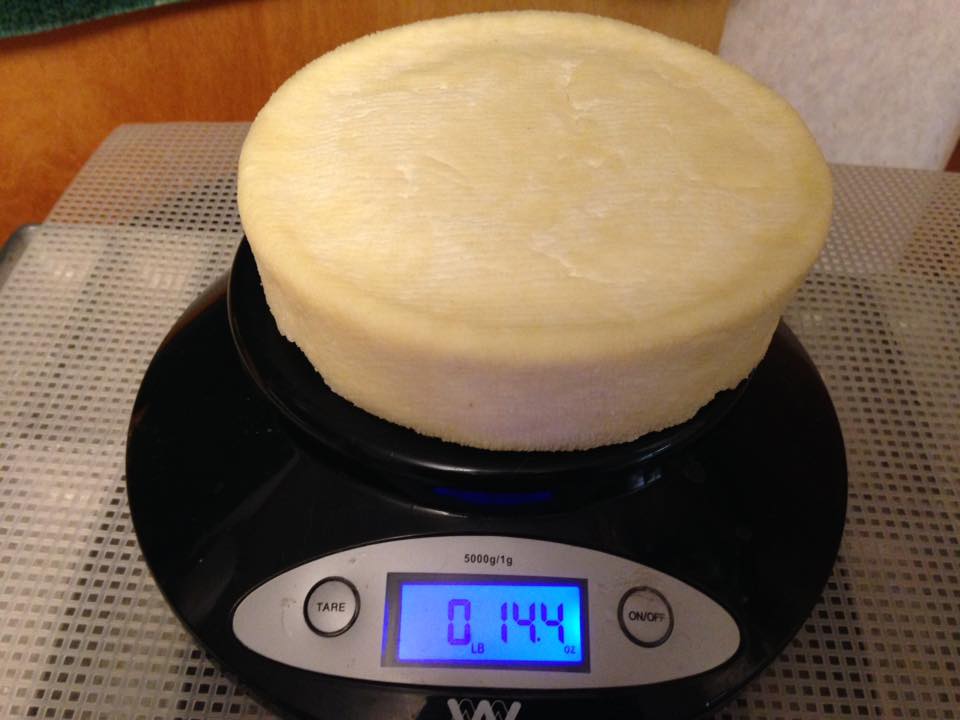
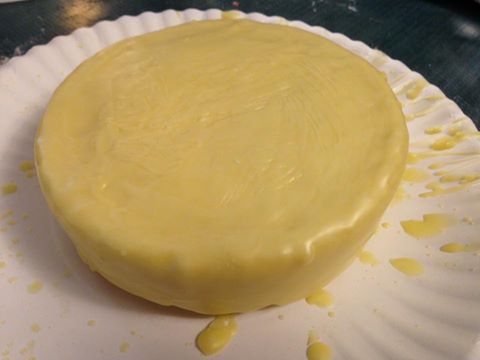
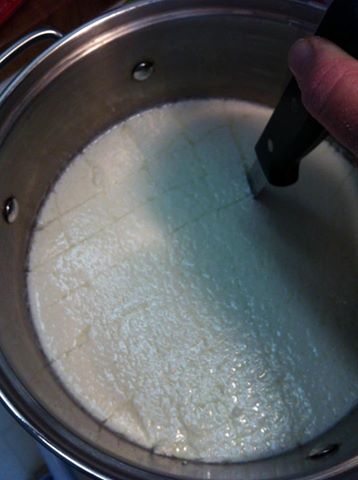
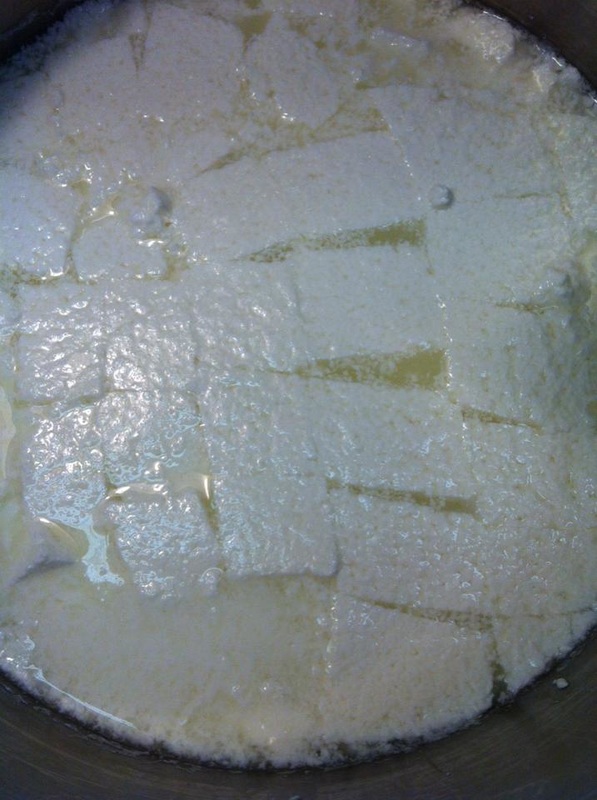
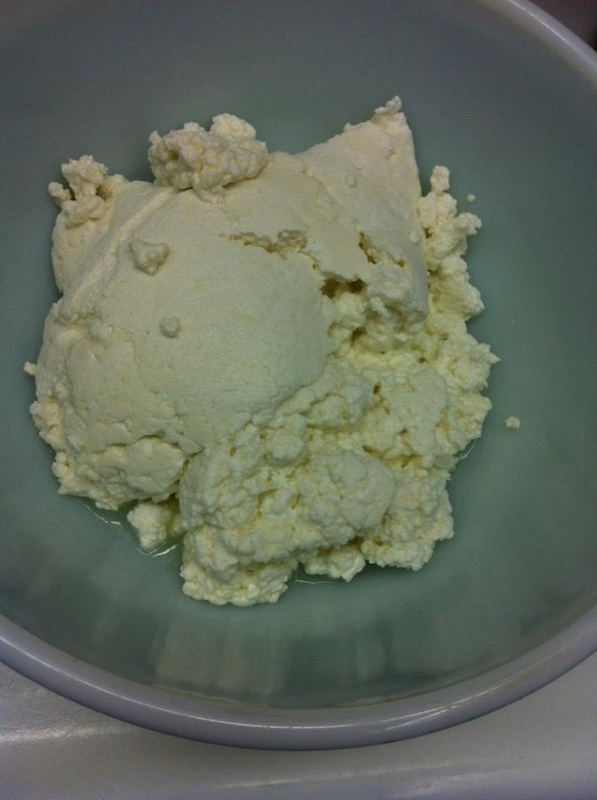
Makes 6 sliders 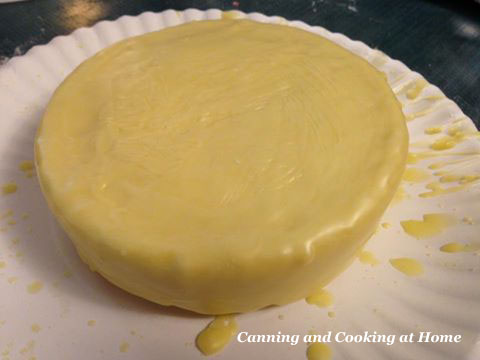 Farmhouse Cheddar Cheese *guest post Ingredients: 1 gallon milk 1/2 packet direct set mesophilic culture 1/4 tsp liquid rennet, or 1/4 rennet tablet, diluted in 1/4 cup cold, unchlorinated water 1/2 Tbsp kosher salt 1/5 tsp Calcium Chloride (Pickle Crisp Granules) dissolved in 1/4 cup cold, unchlorinated water I used store bought Vitamin D milk. I use a stockpot, set inside a larger stockpot, filled with water up to the level of the milk, for better temperature control. Add calcium chloride water solution to milk and stir well. Heat milk to 90F, sprinkle mesophilic culture over top of milk and let sit 3 minutes to hydrate. Using a large whisk or perforated spatula, gently stir in an up and down motion, being sure to get all culture mixed in, for 3 minutes. Cover and let sit for 45 minutes, be sure to keep milk at steady temperature, and as still as possible during this time. Add the rennet solution and again, gently stir, in an up and down motion, for 1 minute. Cover and let sit, keeping the pot at 90F for 45 minutes, or until you can get a clean break with the curds. You should be able to cut into the top about 1/2" and fold the cut over, and it stay, without the cut filling back in. Using a long knife, cut the curds in 1/2" slices, back and forth across the pot. (If you're not sure the curds are ready, slice some, then lift with a ladle and see if they retain their shape, if they do, they're ready.) Gradually bring the temperature up to 100F, over a period of about 30 minutes. Stir occasionally, very gently to prevent the curds from sticking together. Once you reach 100F, cover and let sit for 5 minutes. Line a colander with cheese cloth, and using a perforated dipper or spatula, gently lift the curds out and place into the lined colander. After you get most of the curds out, you can dip out most of the whey, then pour the remaining curds and whey into the colander. Tie up the ends of the cheesecloth, hang, and let drain for about an hour. Place the curds in a large bowl, remove the cheesecloth and break up the pieces, while gradually mixing in the salt. If you don't have a mold and press, place back in 2 or 3 layers of cheese cloth, bring the ends together and twist, to form a ball. The pressing process: You apply 10 pounds of pressure for 10 minutes, remove from mold, unwrap, turn over, replace cheese cloth, apply 20 pounds of pressure for 30 minutes, unwrap, replace flip over, replace cheese cloth, then apply 50 pounds of pressure for 12 hours. Then remove the cheese cloth, let air dry for 2 or 3 days, until a crust-like rind forms. Then wax or vac-seal and let age at least 1 month. I used a 2 pound plastic cheese mold and a big C-clamp. A better press can be made from 2 long threaded bolts and a couple of boards... Recipe and Photos by: JD Provence for Canning and Cooking at Home 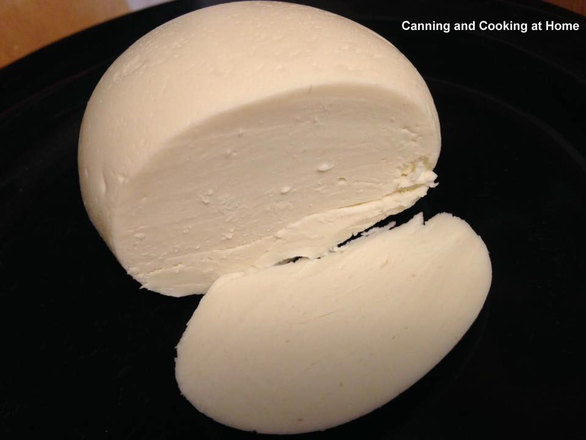 Homemade Mozzarella Ingredients 1 1/4 cup water 1 1/2 teaspoon citric acid 1/4 rennet tablet or 1/4 teaspoon liquid rennet (1/2 tablet Junket rennet) 1 gallon milk, whole, not ultra-pasteurized* 1 teaspoon kosher salt Equipment 5 quart or larger non-reactive pot Measuring cups and spoons Thermometer 8" knife, off-set spatula, or similar slim instrument for cutting the curds Slotted spoon Microwave Microwavable bowl Rubber Gloves Instructions 1. Prepare the Citric Acid and Rennet: Measure out 1 cup of water. Stir in the citric acid until dissolved. Measure out 1/4 cup of water in a separate bowl. Stir in the rennet until dissolved. 2. Warm the Milk: Pour the milk into the pot. Stir in the citric acid solution. Set the pot over medium-high heat and warm to 90°F, stirring gently. 3. Add the Rennet: Remove the pot from heat and gently stir in the rennet solution. Count to 30. Stop stirring, cover the pot, and let it sit undisturbed for 30 minutes. 4. Cut the Curds: After thirty minutes, the milk should have set, and it should look and feel like soft silken tofu. If it is still liquidy, re-cover the pot and let it sit for another fifteen minutes. Once the milk has set, cut it into uniform curds: make several parallel cuts vertically through the curds and then several parallel cuts horizontally, creating a grid-like pattern. Make sure your knife reaches all the way to the bottom of the pan. 5. Cook the Curds: Place the pot back on the stove over medium heat and warm the curds to 105°F. Stir slowly as the curds warm, but try not to break them up too much. The curds will eventually clump together and separate more completely from the yellow whey. 6. Remove the Curds from Heat and Stir: Remove the pan from the heat and continue stirring gently for another 5 minutes. 7. Separate the Curds from the Whey: Ladle the curds into a microwave-safe bowl with the slotted spoon. You can cool and save the whey for other uses (like adding to baked goods & smoothies) 8. Microwave the Curds: Microwave the curds for one minute. Drain off the whey. Put on your rubber gloves and fold the curds over on themselves a few times. At this point, the curds will still be very loose and cottage-cheese-like. 9. Microwave the Curds to 135°F: Microwave the curds for another 30 seconds and check their internal temperature. If the temperature has reached 135°F, continue with stretching the curds. If not, continue microwaving in 30-second bursts until they reach temperature. The curds need to reach this temperature in order to stretch properly. 10. Stretch and Shape the Mozzarella: Sprinkle the salt over the cheese and squish it with your fingers to incorporate. Using both hands, stretch and fold the curds repeatedly. It will start to tighten, become firm, and take on a glossy sheen. When this happens, you are ready to shape the mozzarella. Make one large ball, two smaller balls, or several bite-sized bocconcini. Try not to over-work the mozzarella. 11. Using and Storing Your Mozzarella: Mix a teaspoon of salt with a cup of cool whey and pour this over the mozzarella or dip cheese ball/balls in this mixture to coat. Wrap tightly in saran, Cover and refrigerate.The mozzarella can be used immediately or kept refrigerated for a week. Adapted from: New England Cheesemaking Supply Company Photo by: JD Provence and Diane Baker for Canning and Cooking at Home |