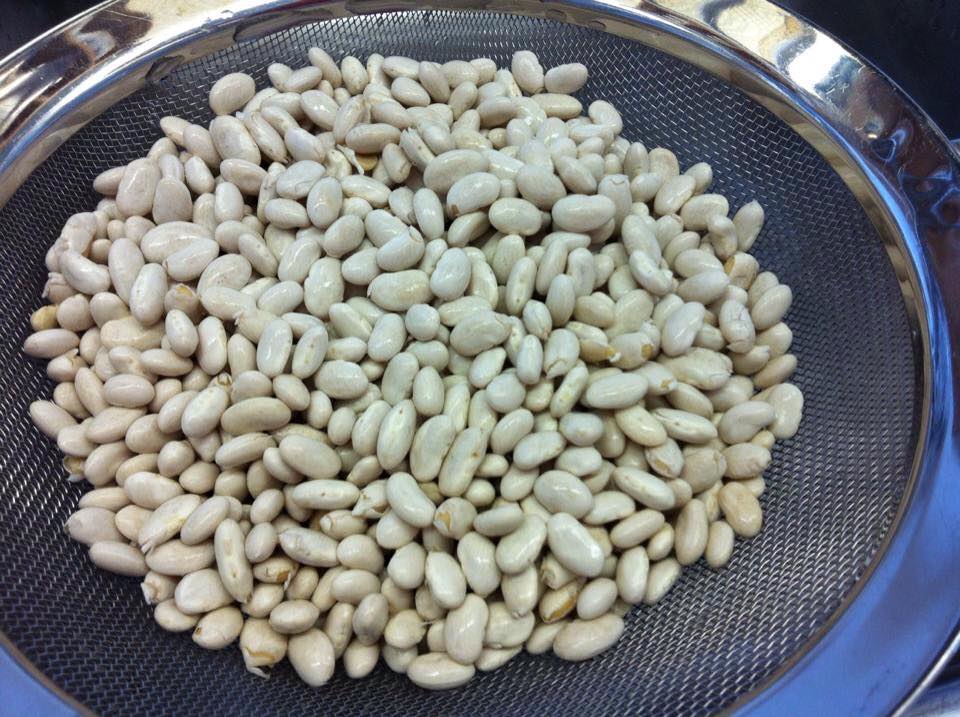
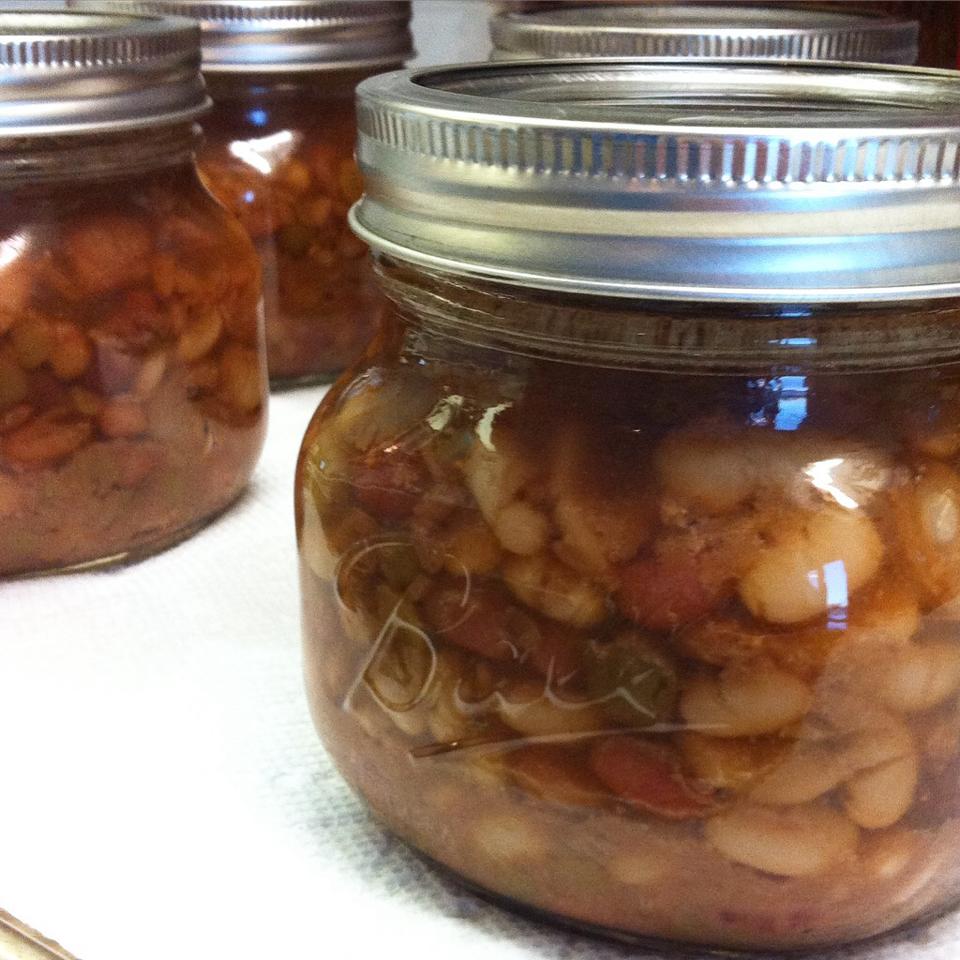
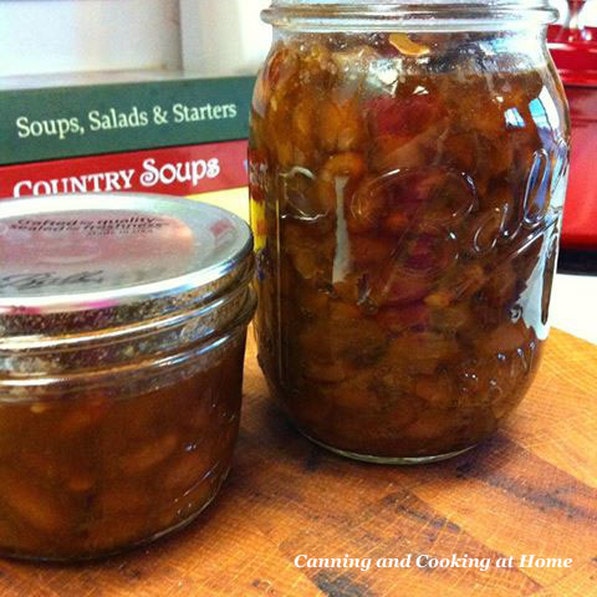
 Beans are easy to process. Baked Beans take a bit more time to prepare for canning but, worth the wait. Please see my "yield note" below - since you are baking the beans 3 1/2 hours - why not heed my dried bean advice so that you get a full 6 pint yield? ~Enjoy! Diane Ingredients: 1 Pound of navy beans (any small beans up to kidney beans work well) 2 teaspoons salt 1/2 pound of salt pork or bacon, cut up into 1/2 inch pieces 3 large onions, chopped into 1/4 inch slices 2 teaspoons dry mustard 2/3 cup brown sugar 2/3 cup molasses Directions: Rinse the dried beans under cold running water, Add beans to at least a 6 quart pot. Add water to cover the beans by 2 inches. Bring pot to a boil, boil 2 minutes, then remove from heat and let soak for one hour. Drain. Return beans to pot and add fresh water to cover by 2 inches again. Bring to a boil and reduce to simmer. Simmer (at 180 degrees) until skins start to split. Drain the beans and save the cooking water. Place beans in large baking dish. I use my large 7.25 quart dutch oven or my large, tall-sided 9x13 baking dish. Measure your cooking water - add enough additional water to make 4 cups total. Mix the onions, sugar, molasses, mustard powder and salt; add to the chopped onions and bacon with 1 cup of the cooking water. Mix into the beans. I then whisk in 2 more cups of the cooking water and reserve 1 cup to stir in during baking time, if needed. You want the entire bean mixture to remain 'soupy' when cooking in the oven. Bake at 350 for about 3 and 1/2 hours with the lid on the pan or covered with foil. Check the bean mixture once an hour to stir, and add water if needed. Prepare your pressure canner for canning. Ladle hot beans and sauce into jars, leaving 1-inch head-space. Remove air bubbles. Add new lid and process in Pressure Canner at the proper psi for your altitude and canner type. Pints: 1 Hour 20 minutes Quarts: 1 hour 35 minutes. **Yield Note: Beans are often a guesstimate in yield because of their varying sizes. (I used exactly 1 pound of dried navy beans which my total yield was 4.5 pints.) The 'rule' on beans is: "It takes 1/2 cup of dried beans to make a pint of cooked beans" the next time I can this recipe I will measure out 3 cups of dried beans so that my yield is 6 full pints. Recipe by: Ball Blue Book (edition 37) Photos by: Diane Baker for Canning and Cooking at Home 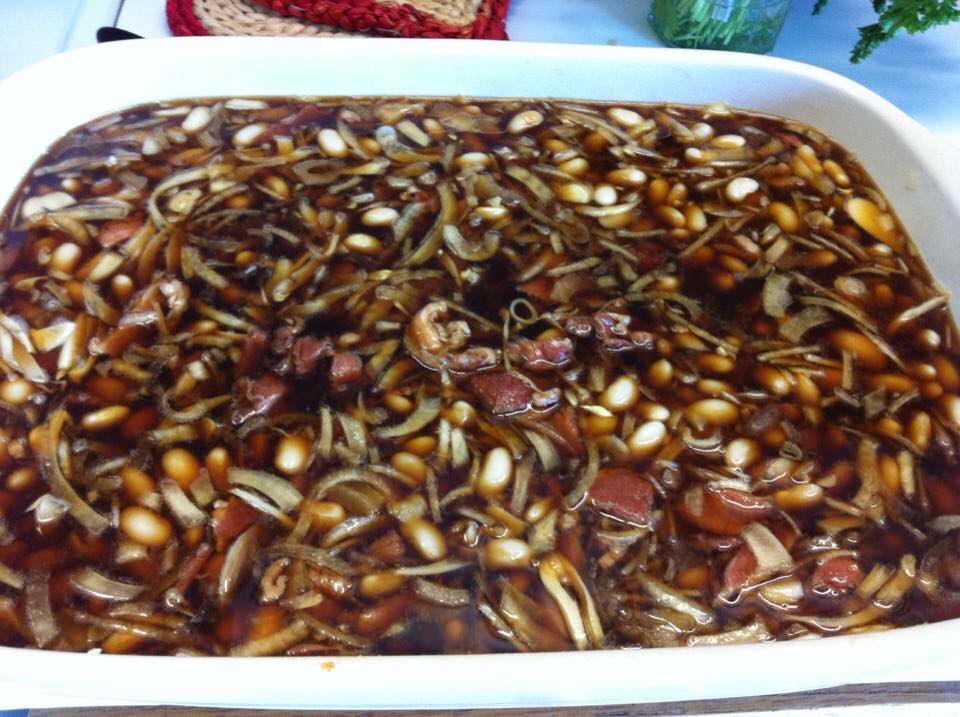
1 Comment
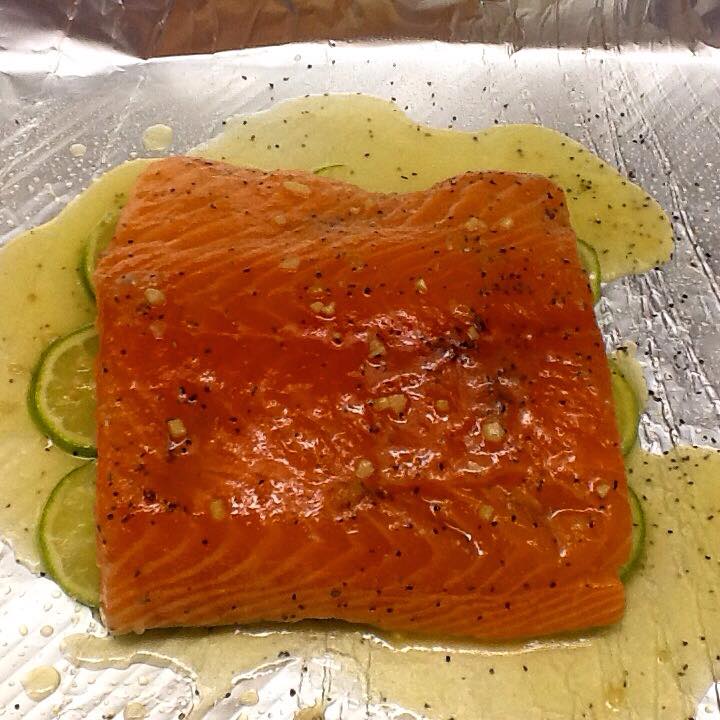
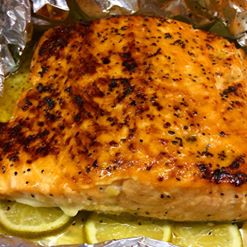
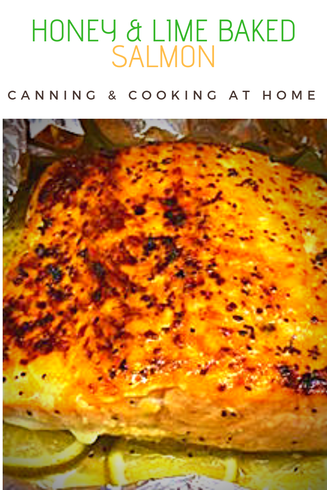 It's Winter and I wanted fresh salmon. I spied some nice Norwegian Salmon at my store and while its a it pricey - it is worth it. I am rather selective (ok, picky!) about salmon. We prefer: King, Copper River and Norwegian. Salmon that does not have "colorant" added and salmon that is not farm raised either. That being said, salmon in our house is a treat because the per pound price averages $13.99 for these picks when not on sale. Consumption/serving size in our house is roughly 3/4-1 pound per adult. and I always ask for the thicker (more square) body end (not the thinner, tail end) if I am having the salmon cut into a fillet for us. I was happy to find a new recipe to try out that is baked/broiled and ready in under 35 minutes. It's a fantastic mix of flavors. ~Enjoy! Diane Honey & Lime Salmon (for every 2 pounds of salmon fillets) Ingredients: 2 pound salmon fillets olive oil & foil 2 limes (one for slicing and one for juicing) 4 tablespoons butter, melted 2 teaspoons garlic, minced 2 tablespoons honey salt & pepper 1 tablespoon chopped cilantro or parsley, *optional Directions:
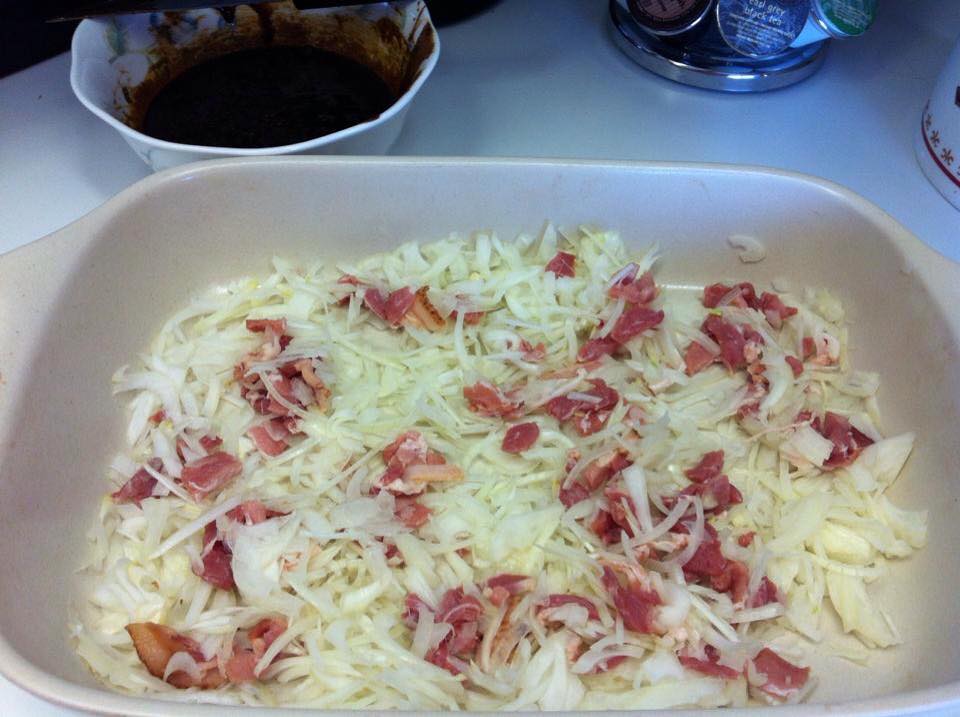
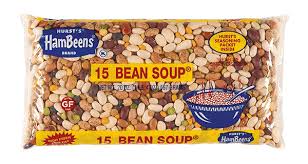
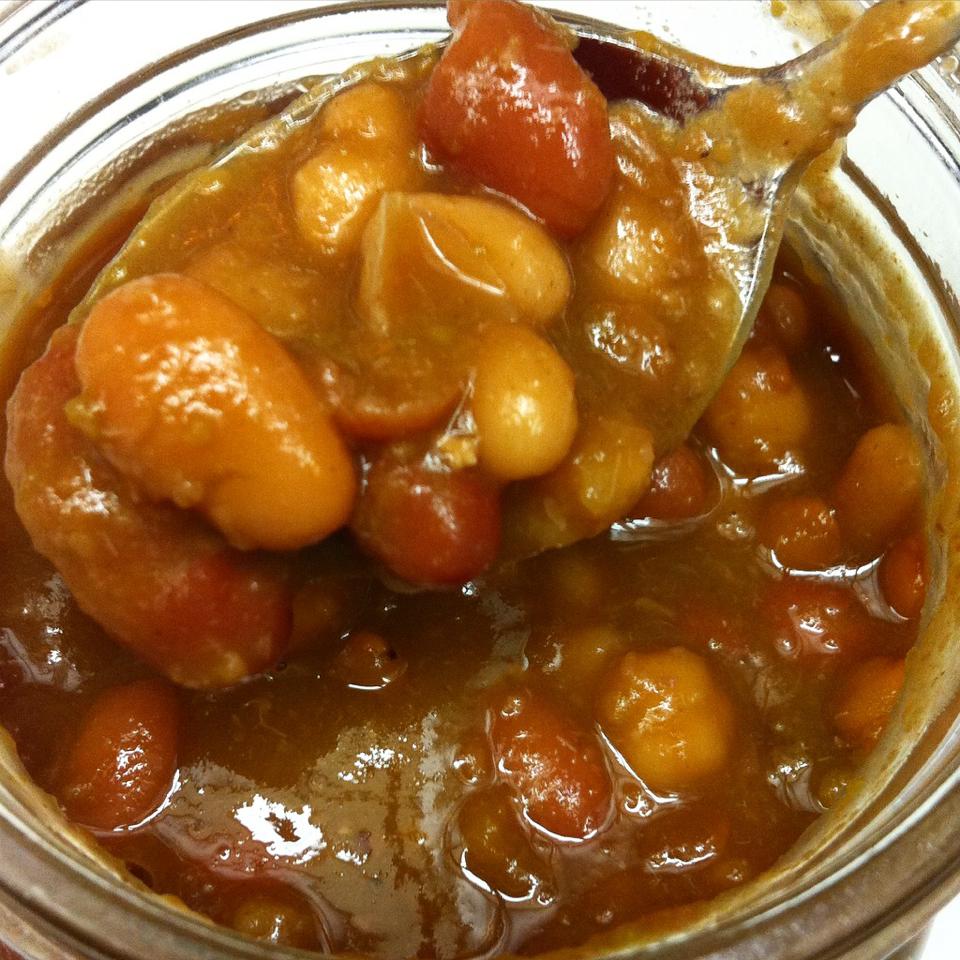
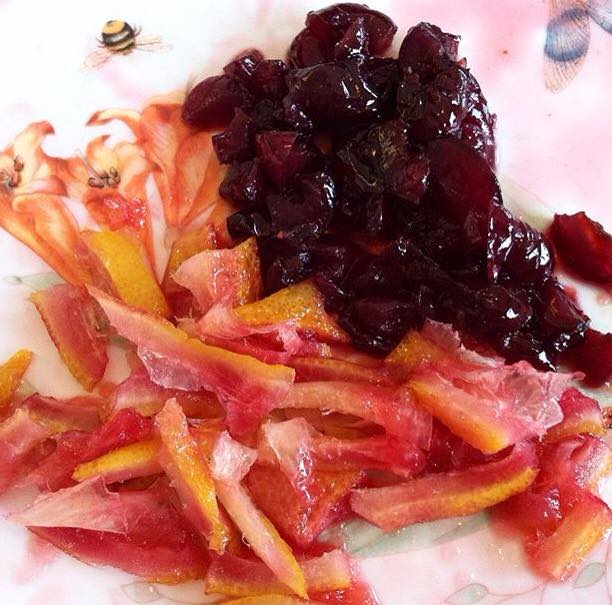
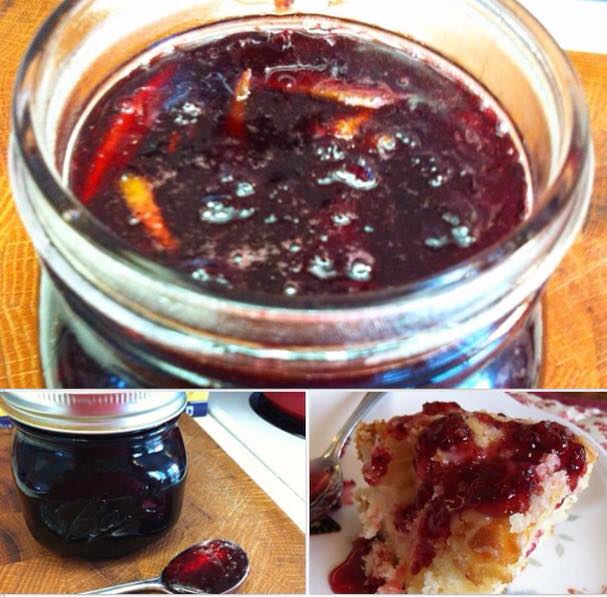
Recipe adapted from: Creme De La Crumb Photos by: Diane Baker for Canning and Cooking at Home 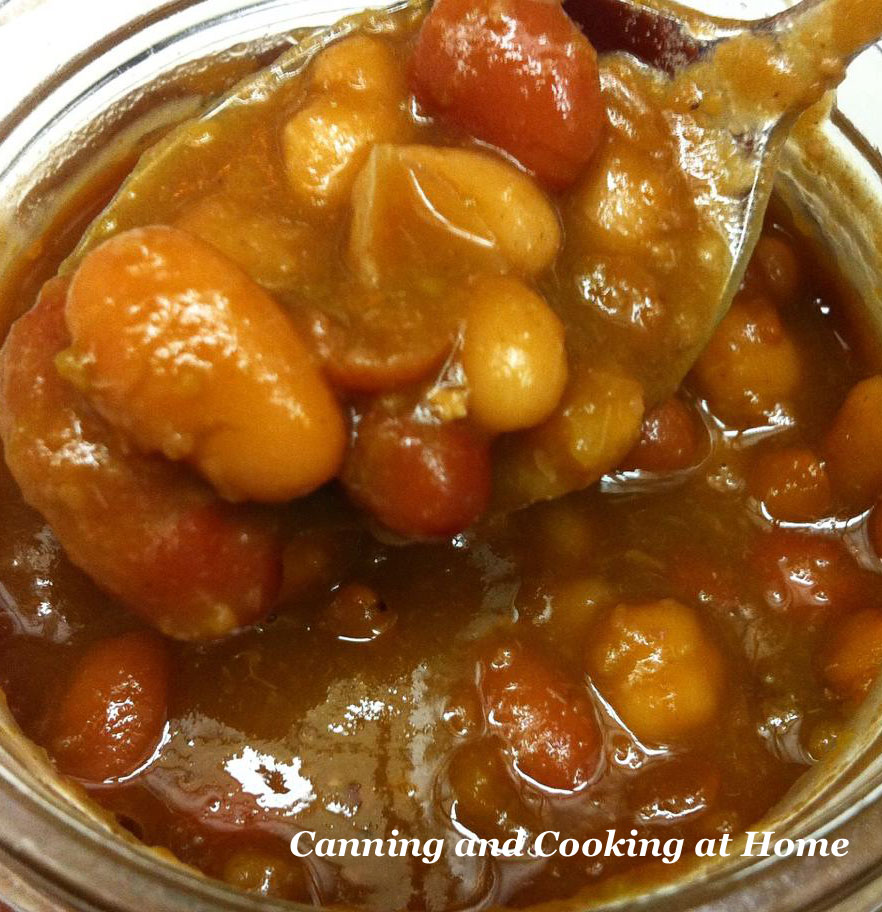 One of the easiest items to can (and cheapest) is beans. Why can them? Well, they taste better then any canned bean you buy from the store, and when simmered in my homemade ham stock - they taste even better. I am sharing my recipe that uses one dry bag of beans (in this recipe I used Hurst's 15 Bean Bean Soup Mix) You omit the ham flavoring packet from their bean bag and use you own ham stock. This makes exactly 5 pints so, if you want to double or triple this recipe - you can do so. I decided to test out the 15 Bean mix and follow the NCHFP Bean - Dry Guidelines in preparing and processing. The only change I made here was I am using my own homemade ham stock in place of water. My ham stock is clear, free of any particles or meats that would pose a possibly density issue. If you are using a broth or stock in place of water - make sure you strain your stock well for the clearest product to use. You can also season/spice up water to your liking and processes the beans that way (I have made Chili Beans in this manner) I like what I've done here because we can eat these as a side dish or I can add into a recipe and the ham flavor is not overpowering the beans. ~Enjoy! Diane Ingredients: 1 (20 oz.) Bag Hurst's 15 Bean Soup Mix (omit the flavor packet) 2 Quarts Fresh Water 2 Quarts Ham Stock Sea Salt Directions: Rinse beans under cool running water, pick out any unwanted debris. Place the beans in a large pot and cover with 2 quarts of fresh, cold water, cover and let soak 12-18 hours. (I let mine soak overnight, and I change out the water one more time in the morning and let them finish soaking) When soaking time is done, drain and rinse off the beans, clean out the pot and place the beans back in the clean pot along with 2 quarts of ham stock. Bring the mixture up to a boil. Reduce heat, cover and cook one hour at a high simmer. Prepare your Pressure Canner for Canning. Fill each pint jar with 1/2 teaspoon of sea salt (if preferred). Ladle beans to 1" head-space into each of the 5 jars, distributing equally, and top off with the hot ham stock to 1" head-space. De-bubble each jar and top off with stock to proper head-space, if needed. Process Pints in Pressure Canner for 75 minutes, with psi according to your canner type and altitude. Yield: 5 Pint Jars Recipe & Photos by: Diane Baker for Canning and Cooking at Home Processing Adapted from: NCHFP "So Easy to Preserve" 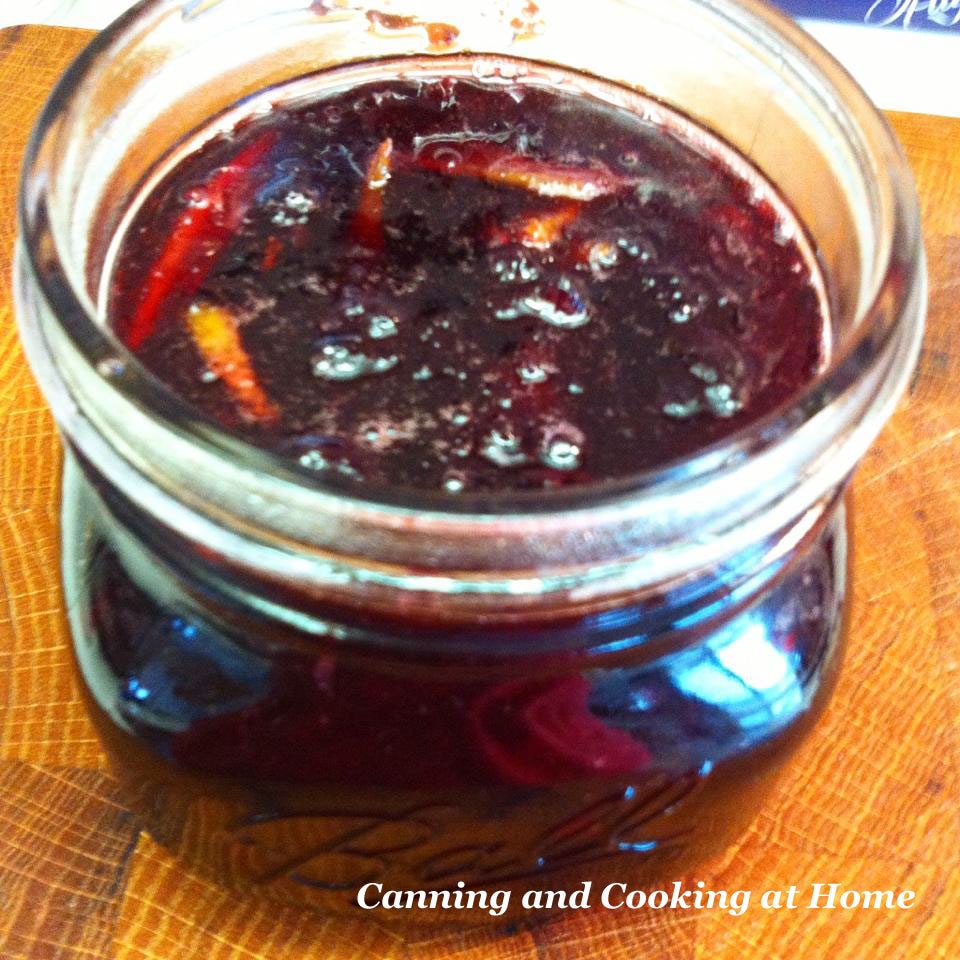 This year I am participating in the Food in Jars Mastery Challenge. The month of January is the "marmalade challenge" I decided to think outside the box a bit and designed a "Drunken" Cherry Lemon Marmalade. I actually used 2 pints of my home canned "Boozy Cherries" in this marmalade but, I wrote the recipe for folks who might not have those 'on hand' in their own pantry. IF you do, swap out the fresh cherries in my recipe below for the home canned boozy cherries and swap out the water by using the syrup/liquid from the boozy cherries. You do need 2 lemons to start because you want the zest of one lemon and you will be using the second lemon for the juice and peel/rind. I hope you enjoy this marmalade as much as I enjoyed creating it for you. ~Enjoy! Diane 'Drunken' Cherry Lemon Marmalade Ingredients: 5 cups of washed, pitted sweet cherries, just under 2 pounds 2 Tbs fresh lemon zest 1 large Lemon, cut in quarters, seeds removed (you will be using the juice and peel/rind) 2 cups water 2-1/2 cups sugar 1 cup honey (for 'Drunken' Marmalade) Add 1 Tbs of your choice: Cherry Brandy, Brandy, Amaretto or add almond extract to your liking (this gets stirred into marmalade at the end of cook time – right before jarring. Always start with a small amount, stir and taste – add more if preferred) Directions:
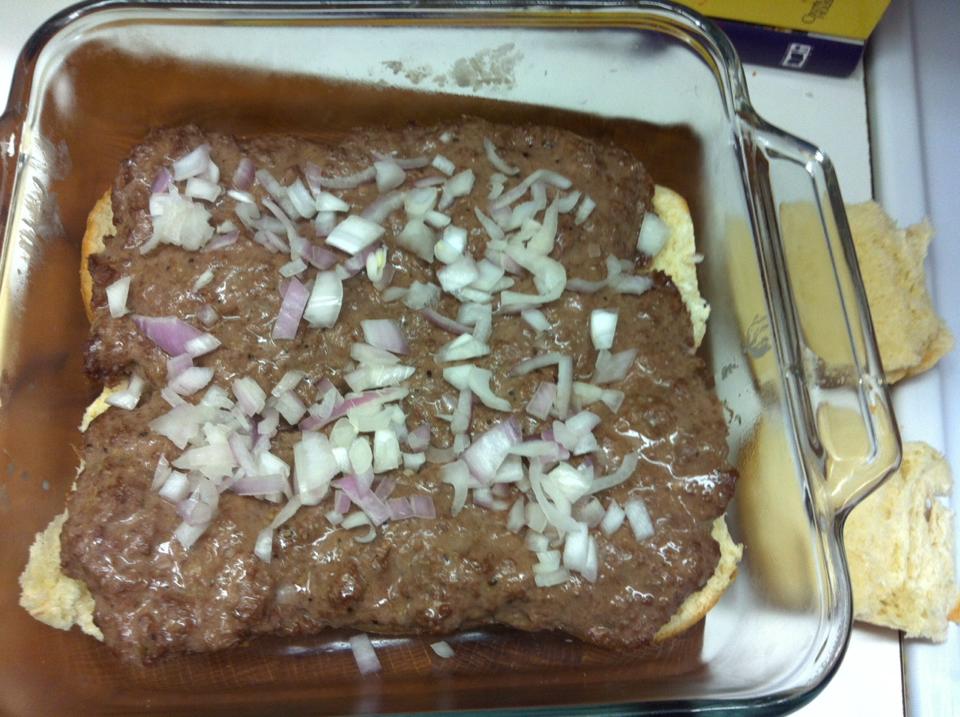
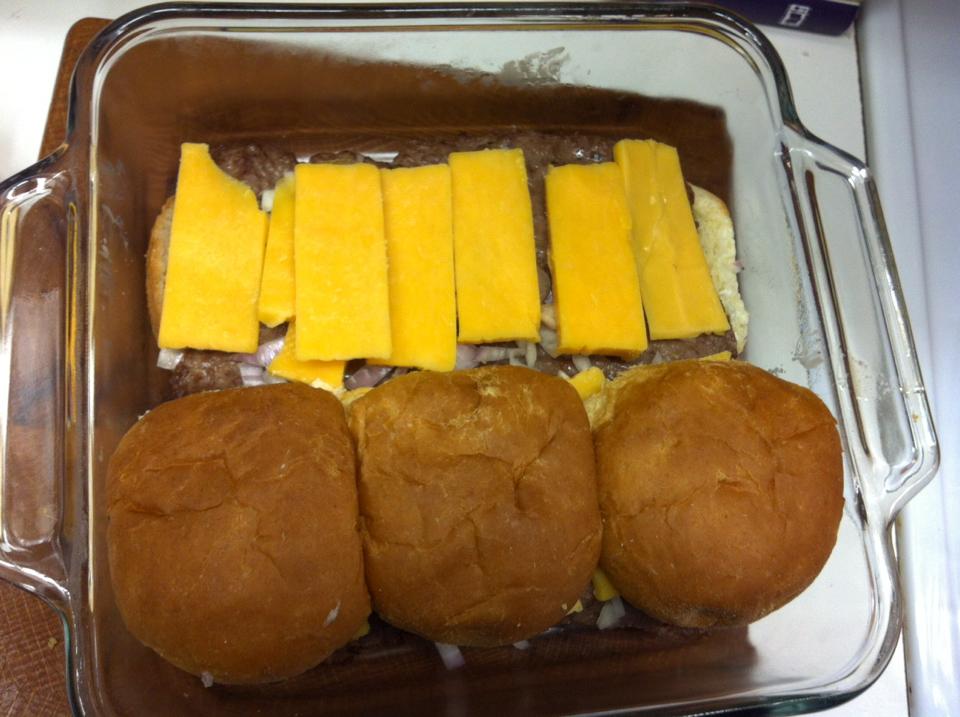
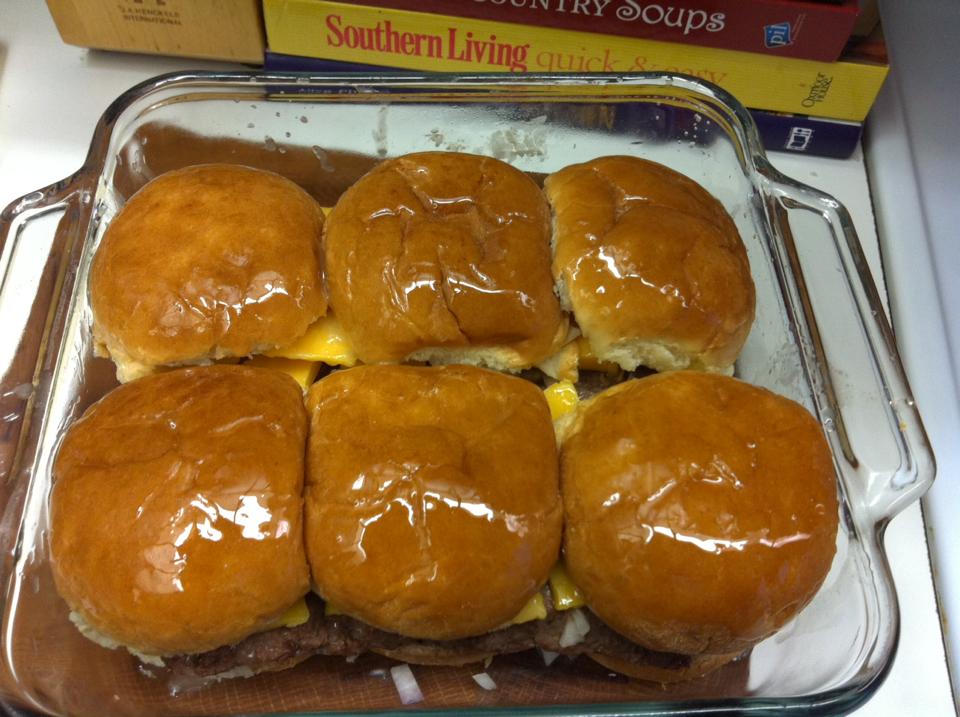
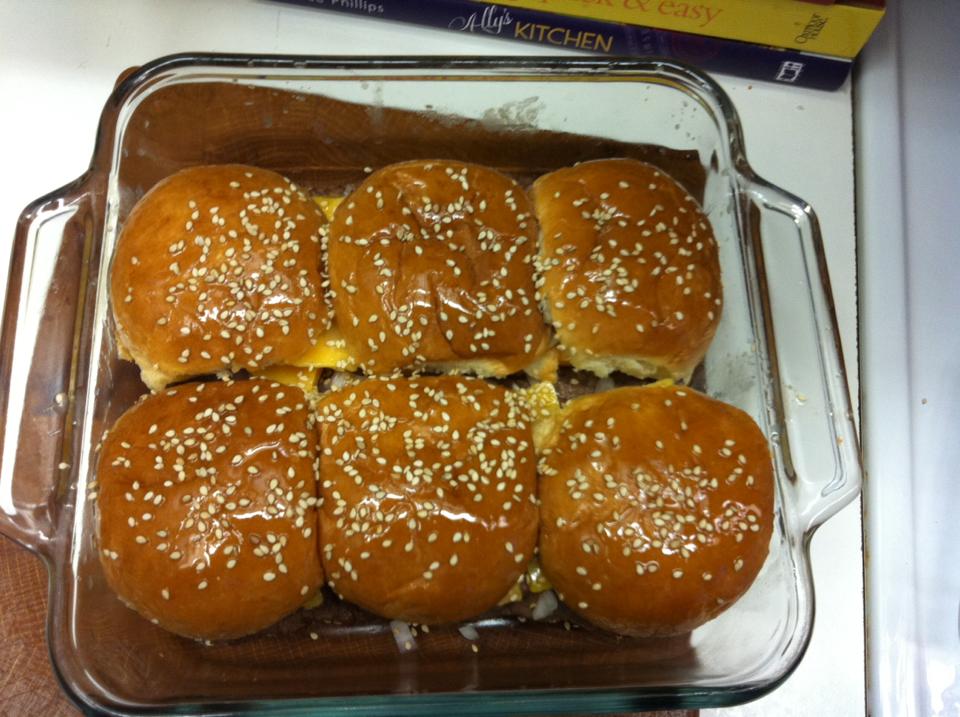
(*Gel test: Remove mixture from heat. Place a spoonful of mixture on plate in freezer for a few minutes; mixture is gelled when it does not run together when separated.) recipe & photos by: Diane Baker for Canning and Cooking at Home 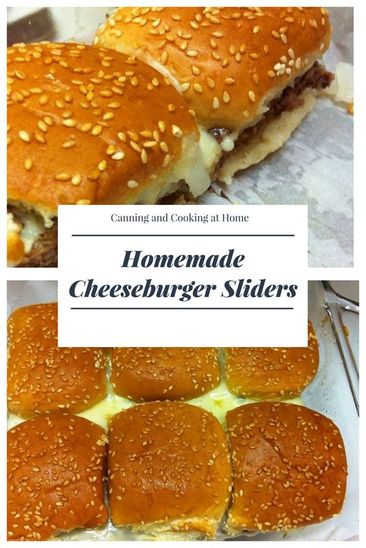 This recipe is for a quick and easy dinner. We like doing this when we don't have access to our outdoor grill but, craving a burger. You can make the hamburger patty as thick or as thin as you want but, if you do go thicker then increase your first 'bake time' accordingly. The second 'bake time' is to melt the cheese, warm up the onion and toast the buns. You can double this recipe completely by using 2 pounds of ground beef and spreading into a 9x13 baking dish. I use two 8x8 baking dishes (one to bake the ground beef and one to finish the recipe.) IF you don't have two equal sized baking dishes, just be extra careful wiping out the dish between the first and second 'bake time". I will admit, these remind me of "Home" and our ole ' White Castle' Burgers! ~Enjoy! Diane Easy Cheeseburger Oven Sliders 1 pound of lean ground beef 1/2 tsp garlic powder 1/2 tsp salt 1/4 tsp ground black pepper 1/4 onion, small dice 4-6 slices of cheddar cheese (enough to cover ground beef patties) 6 slider hamburger buns 2 Tbs melted butter sesame seeds, if needed, optional Directions: Preheat oven to 350F.
Makes 6 sliders |