CANNING AND COOKING AT HOME
  • Home
  • Diane's Blog
  • Canning 101
  • Pickling
    • My Pickle Creations
    • Pickle Recipes
  • Recipe Index
    • Canning Recipes >
      • Jams/Jellies/Fillings/Butters/Juices
      • Meats/Other
      • Pressure Canned Soups
      • Tomatoes
    • Cooking Recipes >
      • Breads
      • Breakfast
      • Instant Pot Recipes
      • Main Dishes
      • Soups
      • Sweets
      • Drinks
      • Sauces/Apps/Sides
    • Recipe Collections >
      • The Apple Cart
      • Asian Inspired Recipes
      • Bundts to Bake
      • Cherry Recipes (preserving)
      • Easter Menu Ideas
      • Freezer to SlowCooker
      • Irish Fare
      • Jelly & Jam Recipes
      • Mexican Inspired Recipes
      • Pickle Recipes
      • Soups
      • Summer Grillin' Guide
  • Work with Me
    • Privacy Policy
    • Give Aways
  • Recipes Via Email

Chocolate Crinkle Cookies

11/29/2018

1 Comment

 
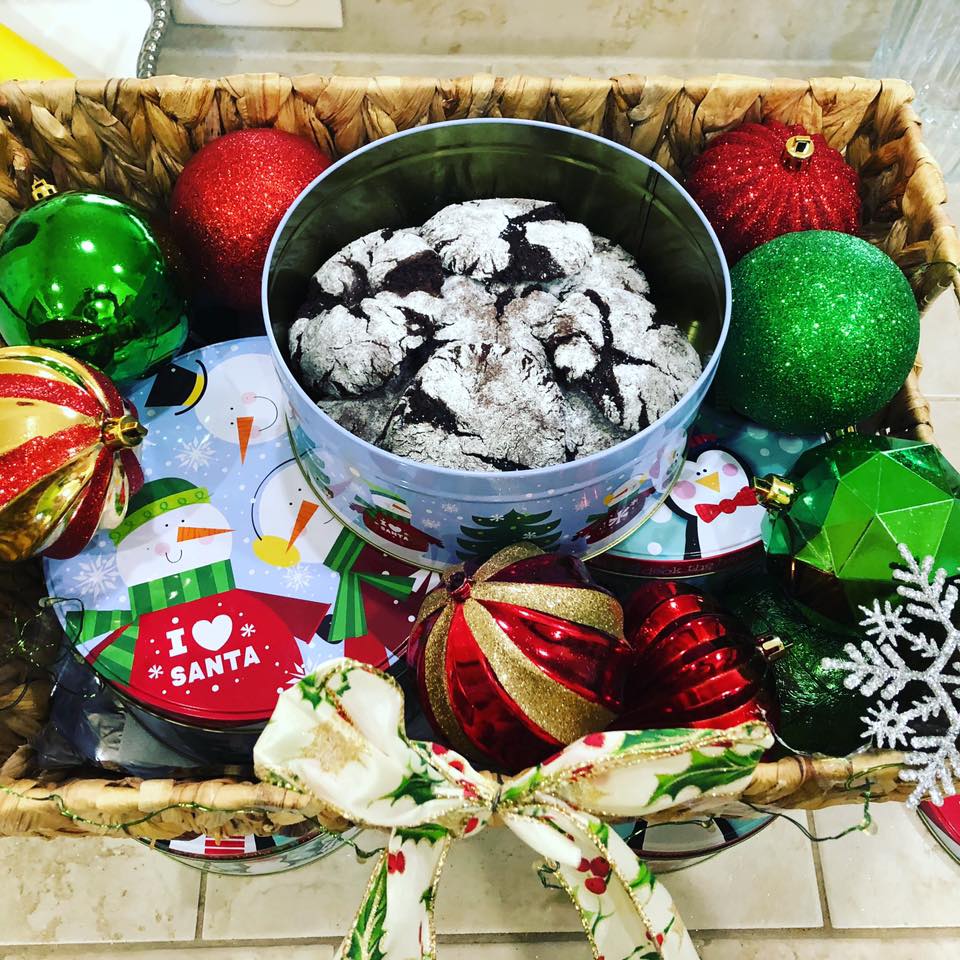
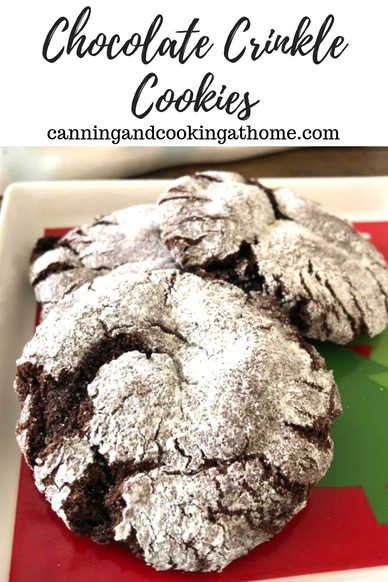
Chocolate Crinkle Cookies
      I'm so excited this year to participate in the "Cookies with Rodelle by the Dozen" Event.  Rodelle Kitchen Brand Ambassadors are bringing their favorite cookie recipes directly to you this Holiday Season.  A month-long holiday cookie celebration. 
     Want a flavorful and delightful Christmas Cookie? Try Chocolate Crinkle Cookies.  The taste of these are similar to a brownie, made into a decadent cookie! 
     Part of my yearly Holiday Cookie baking lineup, everyone seems to love these. 
I love how the Rodelle baking cocoa lends a deep chocolate richness to the cookies.  Give these traditional and tasty cookies a try!  
     ~Enjoy! Diane 

Chocolate Crinkle Cookies

Ingredients: 
2 cups all purpose flour
3/4 cup Rodelle baking cocoa 
2 tsp baking powder
1/2 tsp salt
1/4 cup butter, softened
1/4 cup vegetable oil
1 1/2 cups sugar
1/2 cup brown sugar
3 eggs
2 tsp Rodelle vanilla extract or Vanilla Paste 
1/2 tsp Rodelle chocolate extract 
powdered sugar and granulated sugar for rolling

Directions:
Preheat oven to 350F
Line cookie sheet with parchment paper or silicone mat.
In a medium bowl, whisk together flour, Rodelle baking cocoa, baking powder, and salt.
Set aside.
In your mixer (or a large mixing bowl) beat butter until smooth. Add oil, sugar and brown sugar and cream until light and fluffy.
Beat in eggs one at a time and then stir in the Rodelle vanilla paste and Rodelle chocolate extract.
Add the flour mixture and stir until just combined.
Roll a Tablespoon of dough at a time into a ball.
Then roll in granulated sugar and powdered sugar.
*If you find the dough hard to work with, you can put it in the refrigerator for 10 minutes to firm it up a bit.
Place cookie dough balls about 2 inches apart on prepared cookie sheets and bake for 12-13 minutes or until crackled.
Cool for 5 minutes on the cookie sheet and then remove to a wire rack to cool completely.
Store extras in an airtight container.

Makes Approx. 3 dozen 
Picture
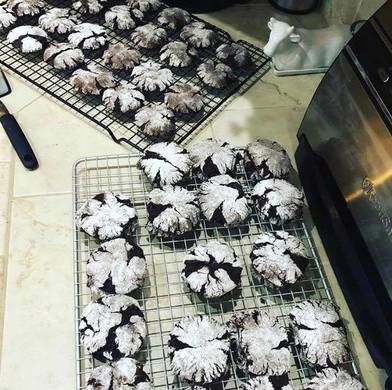
   I thought I'd share the photos below - I won "most creative cookie display" at friends cookie exchange party this past weekend.  I had 6 dozen chocolate crinkle cookies made and packed into 6 tins, placed into a larger basket with ornaments scattered about - such a fun day and tasty too!!
Picture
This post is sponsored by Rodelle, Inc 
1 Comment

Cast Iron Dutch Baby Pancake

11/20/2018

0 Comments

 
Dutch Baby Pancake
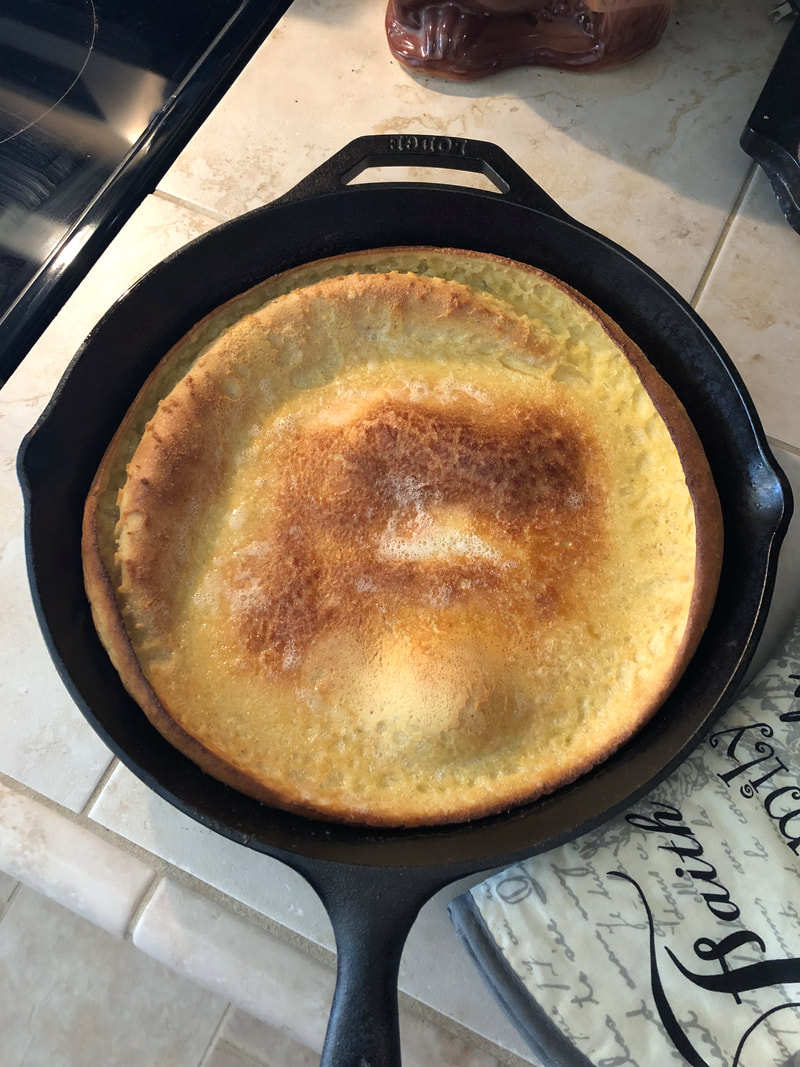
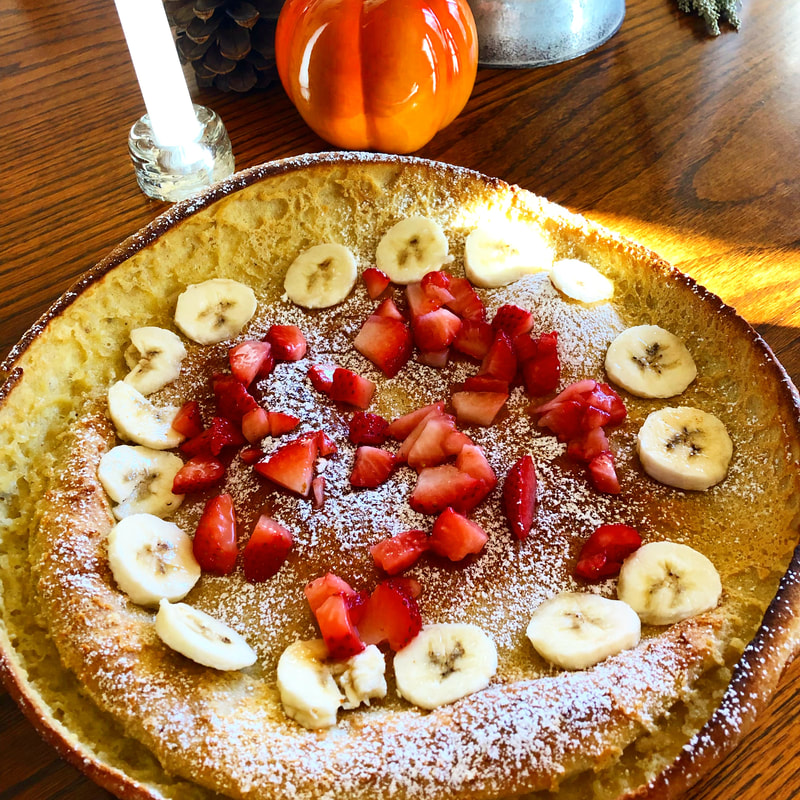
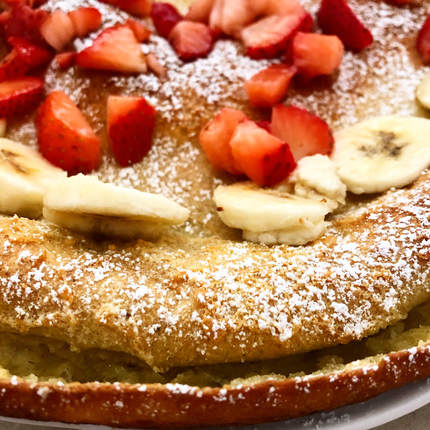
     Simple. Easy. Breakfast.  
    Using a cast iron pan, heated in the oven with butter - then adding in a pancake type batter to bake - Voila! You've made your first Dutch Baby Pancake...
     Did it NOT puff? perhaps all your ingredients were TOO cold.  Most folks I know assemble their ingredients and let them come to room temperature (or at least get the chill off the milk and eggs.) I place my cast iron pan in the oven while the oven is heating so that gets nice and HOT too...Beat your ingredients together until smooth, add your butter to the cast iron pan in the oven and let it all melt *keep an eye on it so it doesn't burn!  Once the butter has melted, remove cast iron pan from oven, add in batter and place back in oven to bake into a puffy pancake!!!!!!  Bake at 425 for 20 minutes then lower oven to 300 for a remaining 5 minutes - the pancake should be puffy and golden when done. 
    You can add all sorts of spices to your batter or top with any selection of sliced fruits & nuts (tradition is a simple sprinkle of powdered sugar.)  
​    Enjoy! Diane 

Simple Dutch Baby
(made in a cast iron pan) 


Ingredients: 
Batter ~
3 eggs *room temp
1/2 cup milk *room temp
1/2 cup flour
1 Tablespoon sugar
pinch of nutmeg
dollop of vanilla bean paste or extract  

​For the Pan ~ 
4 Tablespoons butter, to melt in cast iron pan

​Directions: above 
0 Comments

Boho KitchenAid ~ Holiday Giveaway!!

11/16/2018

0 Comments

 
Picture
Boho Holiday Giveaway 2018
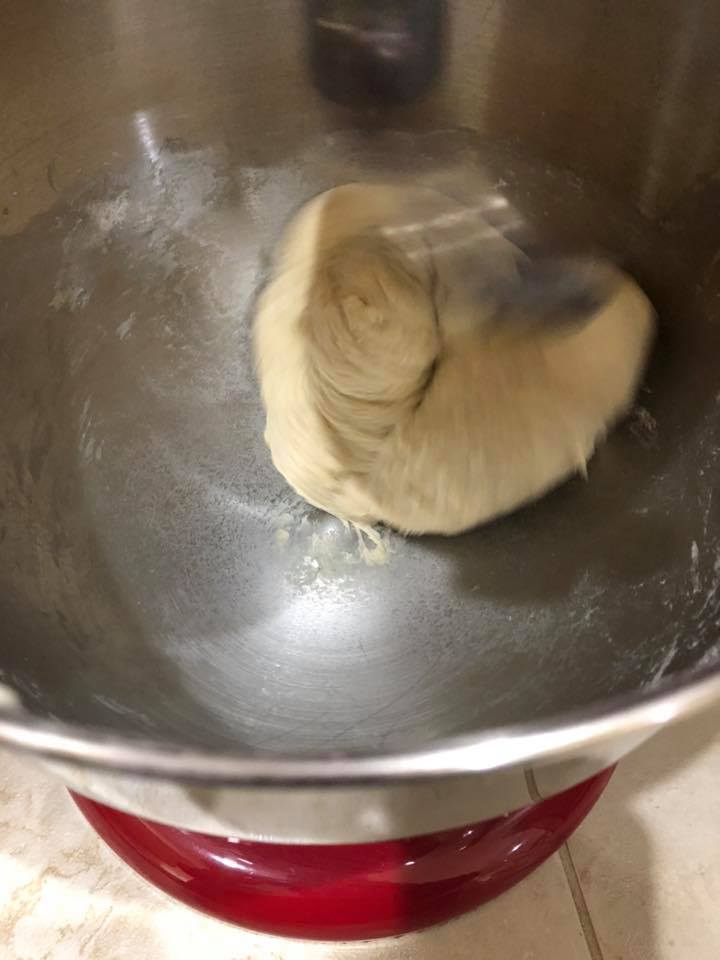
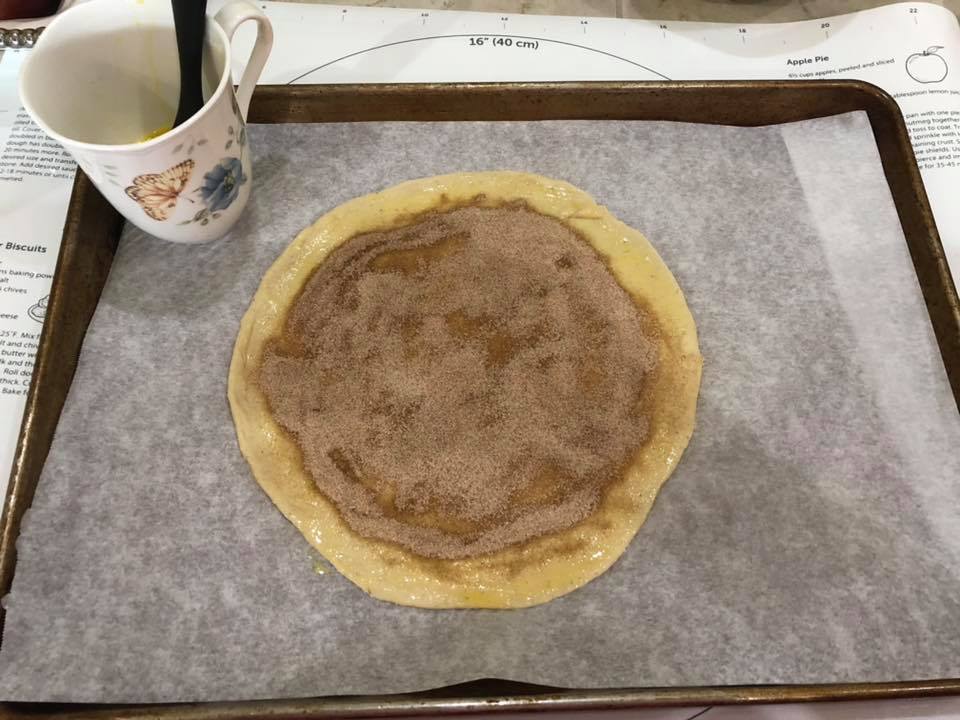
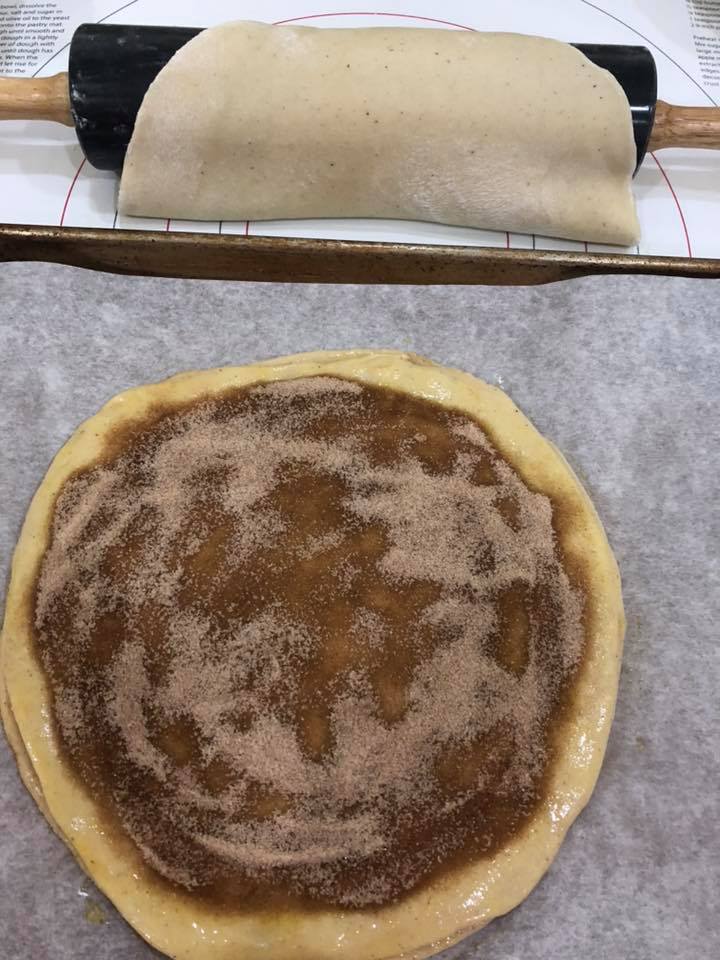
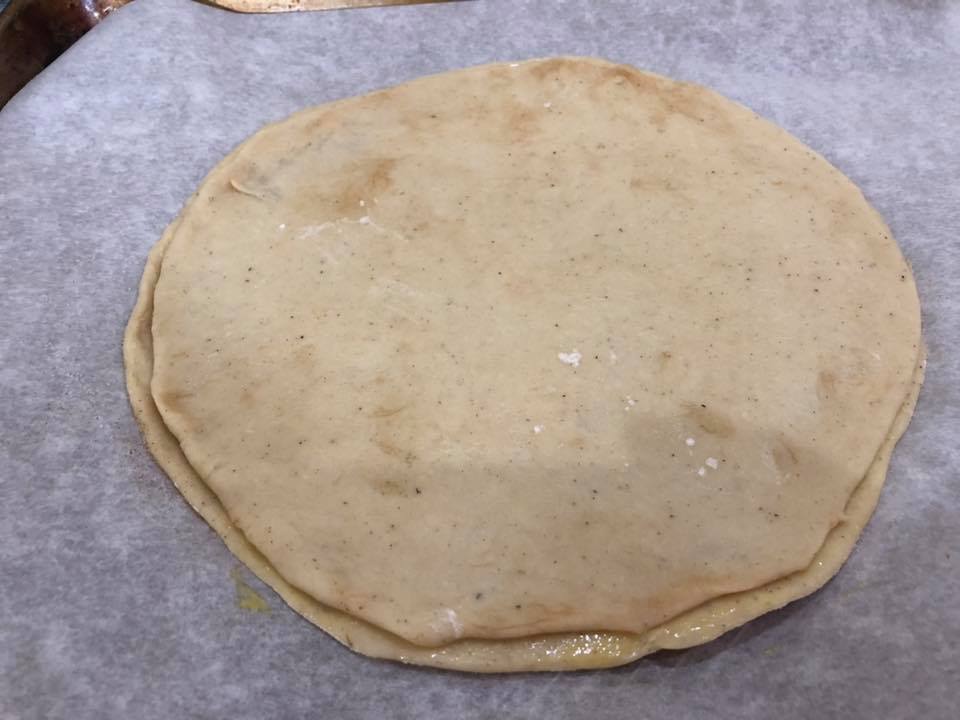
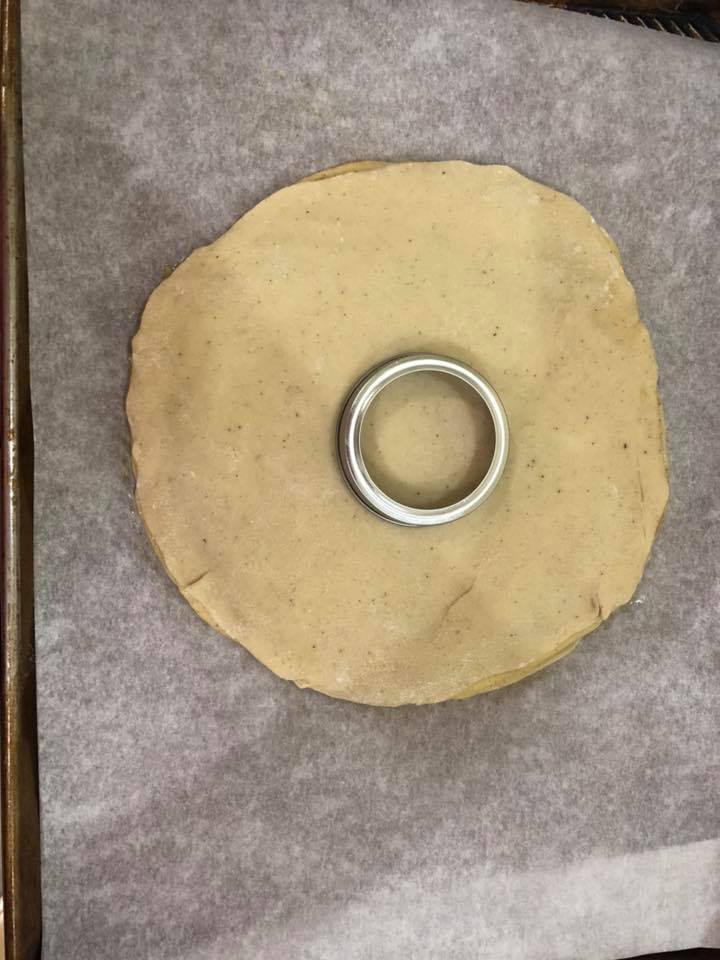
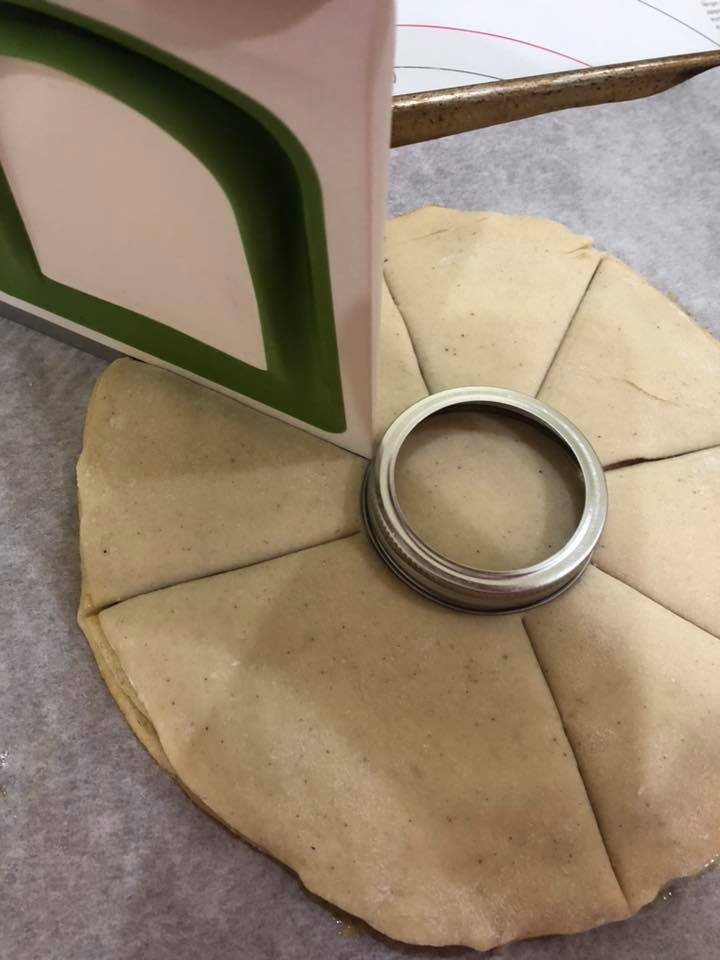
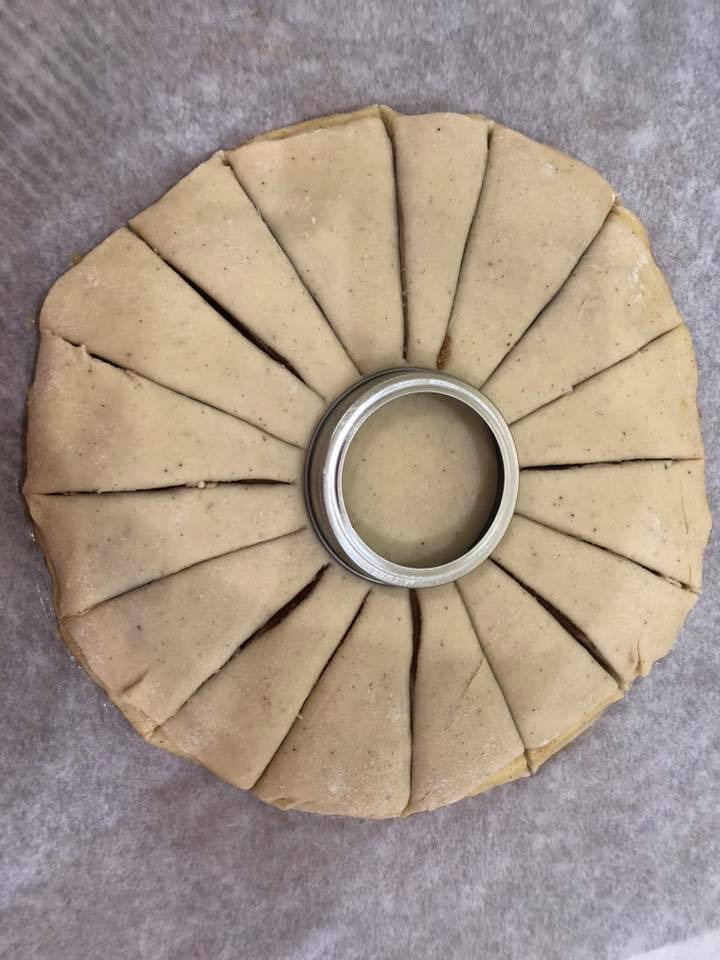
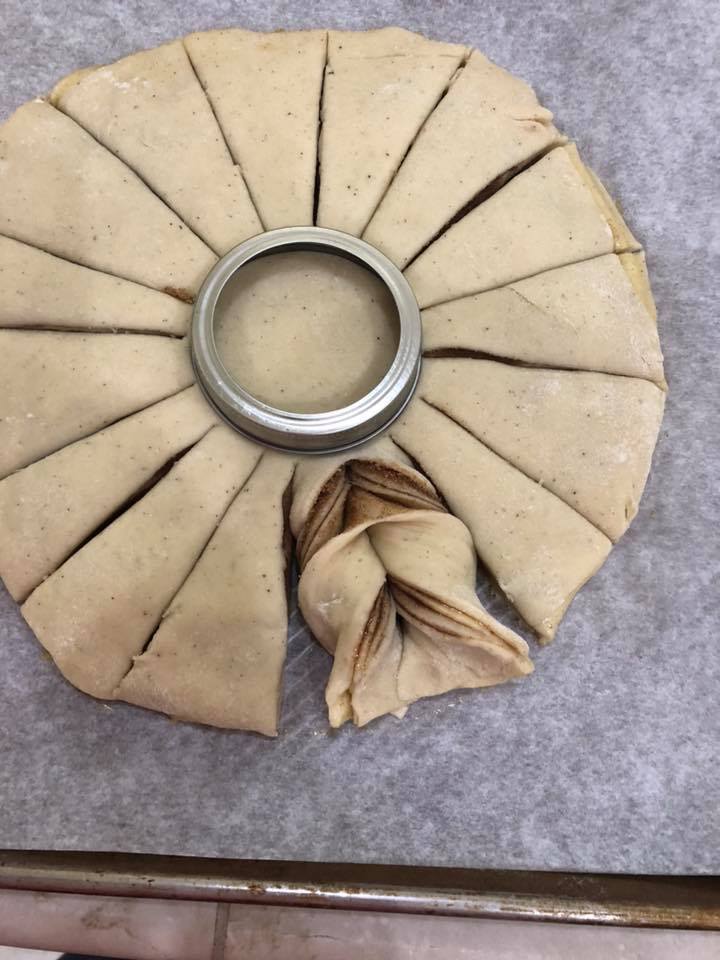
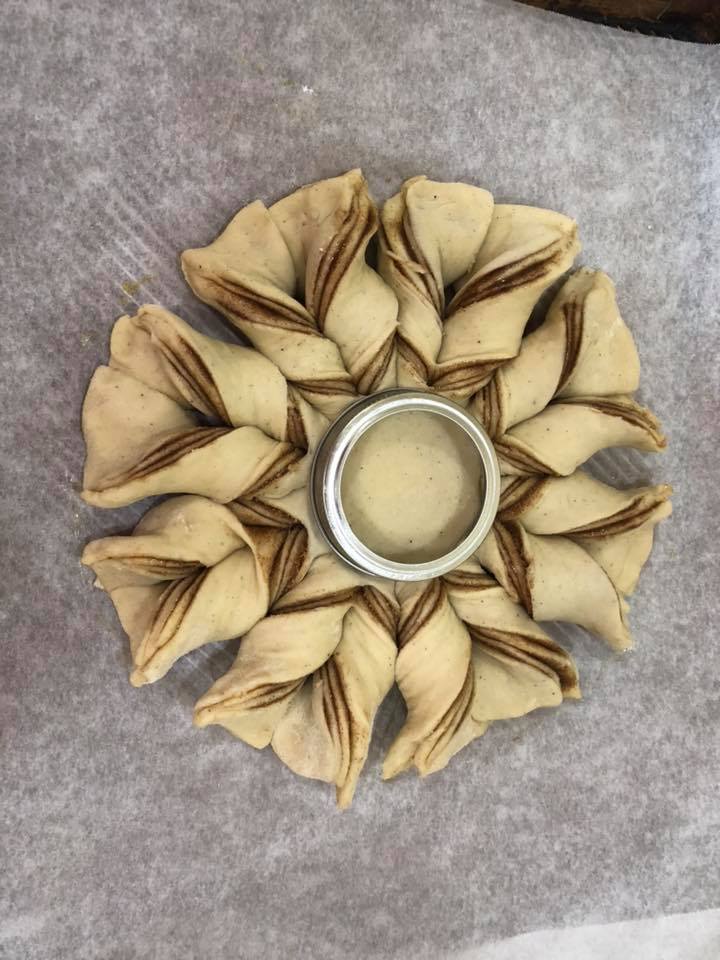
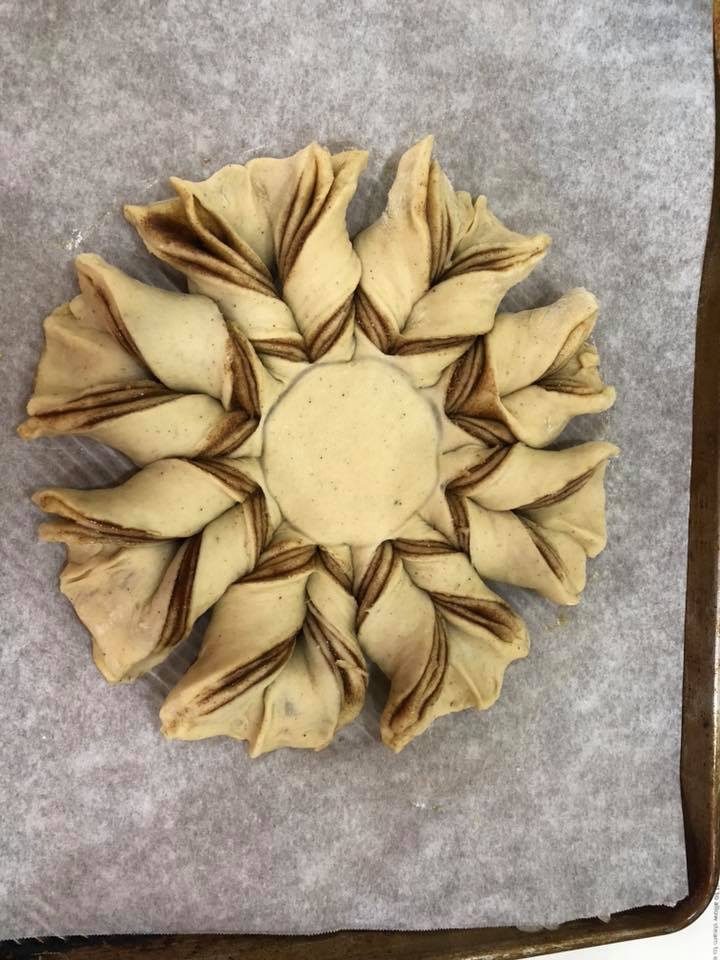
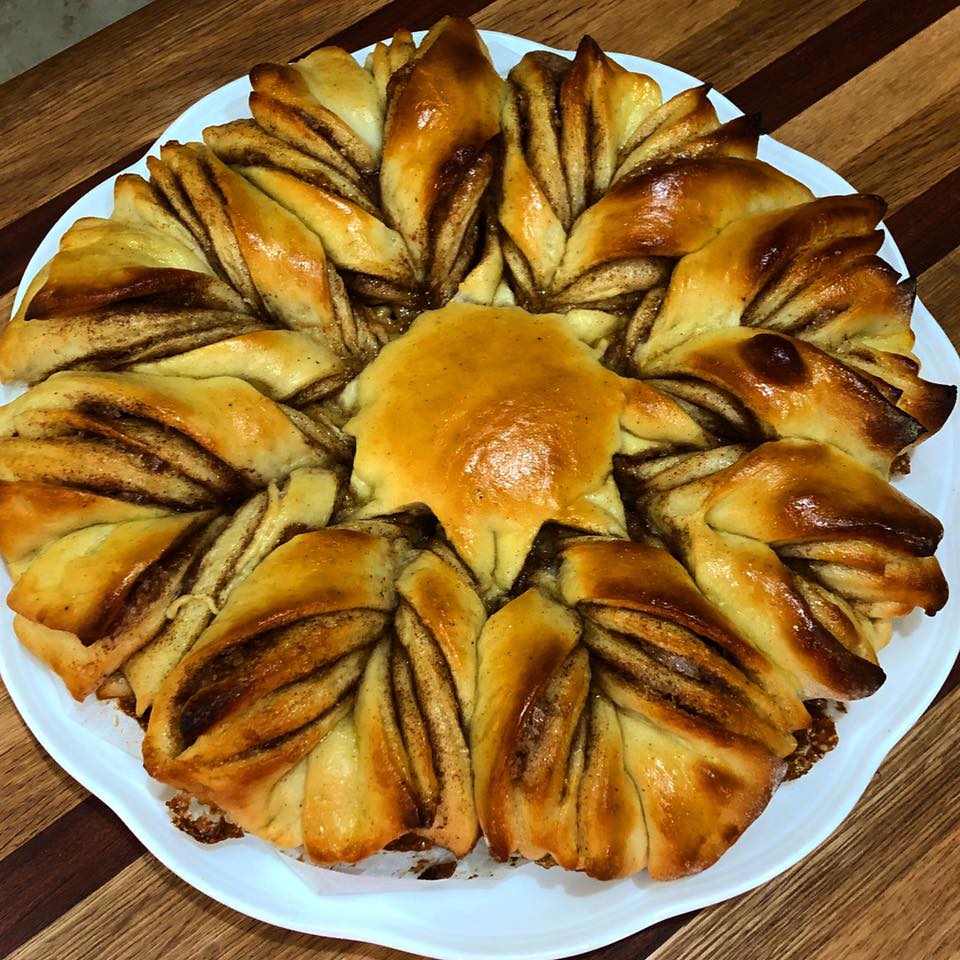
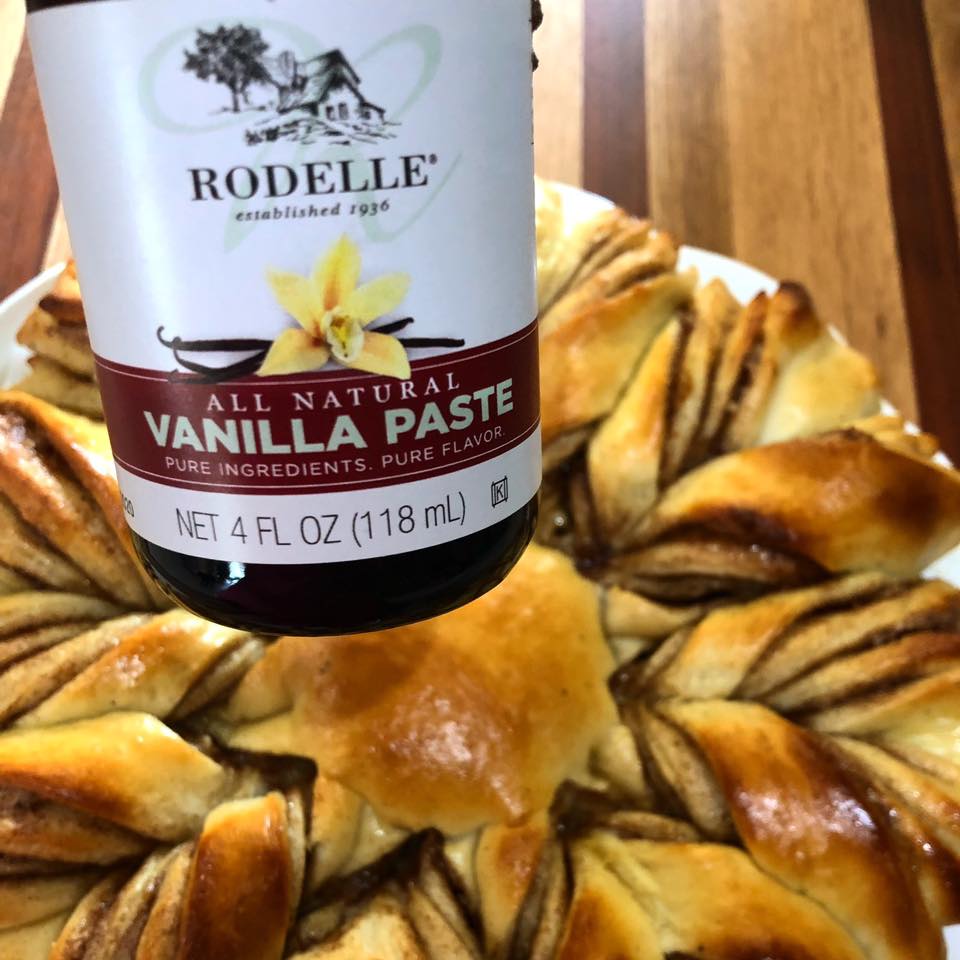
((THE GIVE AWAY IS NOW OVER & CLOSED))

If you don’t have a KitchenAid stand mixer, you’re missing out on one of the most useful and durable pieces to own. We’re giving away a 5 qt. KitchenAid Artisan stand mixer in candy apple red, just in time for the holidays!

Click on the rafflecopter below to enter to win. The more options you complete, the more chances you have of winning. (open to US residents only) 

The only mandatory option is to leave a comment below the post - We want to know what you would do with the mixer - keep it or give it to someone special for the holidays?

Good Luck, and Happy Holidays from the Boho Tribe!

This giveaway is sponsored by the following content creators/influencers:


Shea Goldstein - Dixie Chik Cooks

Mary Marshall - Cooking with Mary and Friends

Ally Phillips - Ally’s Kitchen

Ann Krause - Sumptuous Spoonfuls

Abbe Odenwalder - This Is How I Cook

Michaela Kinkel - An Affair From The Heart

Liz Weber Berg - That Skinny Chick Can Bake

Claudia Lamasco - What’s Cooking Italian

Lynnette Moore - Moore or Less Cooking

Veronica Gantley - My Catholic Kitchen

Diane Baker - Canning and Cooking at Home

Sara de Leeuw - My Imperfect Kitchen

Lynn Vining - Southern With a Twist


​
a Rafflecopter giveaway
0 Comments

Swedish Cinnamon Star Bread

11/2/2018

0 Comments

 
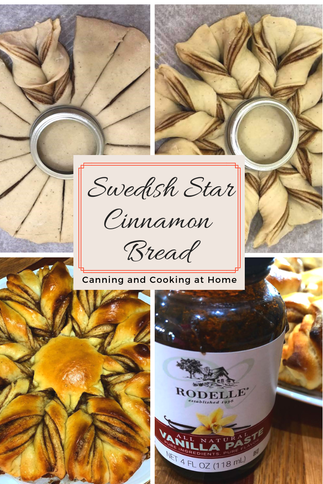
Swedish Cinnamon Star Bread
     I don't know about you but, it feels like the Holidays are trying to sneak up on me this year!  I decided to get busy and test out some recipes for Thanksgiving and I am adding this Swedish Cinnamon Star Bread to our menu.  The taste and visual appeal of this bread is amazing.  There are endless possibilities and variations for this recipe adding in everything from sweet to savory; nuts, Nutella, chocolate, jams, jellies, pesto, fresh herbs and sundried tomatoes.
    The first time I tasted Cinnamon Star Bread was at a Swedish Holiday party I attended years ago... and I can't believe it took me so long to make one myself.  I admit, it seems like a daunting task to twist and flip the sections of bread but, the dough is so soft and pliable, it all works out great!  It's the perfect "pull-apart cinnamon bread."
     As an Ambassador for Rodelle - they provided the Vanilla Paste used in this recipe. You too can bake with quality flavors and enhance your recipes - just stop by the Rodelle website and check out all their great baking essentials at: www.rodellekitchen.com
​
Swedish Cinnamon Star Bread 

Dough
  • 2 cups All-Purpose Flour 
  • 1/4 cup Potato Flour or 1/2 cup instant mashed potato flakes
  • 1/4 cup Nonfat Dry Milk
  • 3/4 cup Lukewarm water: the temp your yeast calls for, plus enough additional water to make a soft, smooth dough
  • 1/4 cup Unsalted Butter, at room temperature
  • 1 teaspoon Rodelle Vanilla Extract or Rodelle Vanilla Paste 
  • 2 teaspoons Instant Yeast
  • 2 tablespoons Sugar
  • 1 teaspoon Salt

Filling
  •   1 large egg, beaten *and set aside 
 
  •   1/2 cup sugar
  •   1 tablespoon cinnamon 

Instructions
  1. Measure and sift the flour, potato flour, and dry milk. (If you're using instant mashed potatoes rather than potato flour - sift only the flour and dry milk.)
  2. Combine all of the dough ingredients by hand, mixer, or bread machine — to make a soft, smooth dough.
  3. Place the dough in a lightly oiled/greased bowl, cover, and let it rise for 60 minutes, until it's nearly doubled in bulk.
  4. Divide the dough into four equal pieces. Shape each piece into a ball, cover the balls, and allow them to rest for 15 minutes.
  5. On a lightly floured work surface, roll one piece of dough into a 10" circle. Place the circle on a piece of parchment, brush a thin coat of the beaten egg on the surface, then evenly sprinkle with 1/3 of the cinnamon-sugar, leaving 1/4" of bare dough around the perimeter.
  6. Repeat with the next ball of dough - roll out a second circle the same size as the first, and place it on top of the filling-covered circle. Repeat the layering process — egg, cinnamon sugar, dough circle — leaving the top circle bare.
  7. Place a 2 1/2" to 3" round cutter in the center of the dough as a guide. (I use a regular jar canning ring.) With a sharp knife, cut the circle into 16 equal strips, from the center to the edge, through all the layers. I cut first in 4 equal parts then move on from there. 
  8. To create twists: Using two hands, pick up two adjacent strips and twist them away from each other twice so that the top side is facing up again. Repeat with the remaining strips of dough so that you end up with eight pairs of strips.
  9. Pinch each pair of strips together to create a star-like shape with eight points. Remove the center round cutter/canning ring.
  10. Transfer the star on the parchment to a baking sheet. Cover the star and let it rise until it becomes noticeably puffy, about 45 minutes.
  11. While the star is rising, preheat the oven to 400°F.
  12. Brush the star with a thin coat of the remaining beaten egg. Bake for 12 to 15 minutes, until it's nicely golden with dark brown cinnamon streaks; the center should register 200°F on a digital thermometer.
  13. Remove the bread from the oven and allow it to cool for about 10 minutes before serving. Serve warm or at room temperature.
  14. Store any leftover bread, wrapped in plastic, at room temperature. Freeze for longer storage.

Recipe adapted from KAF
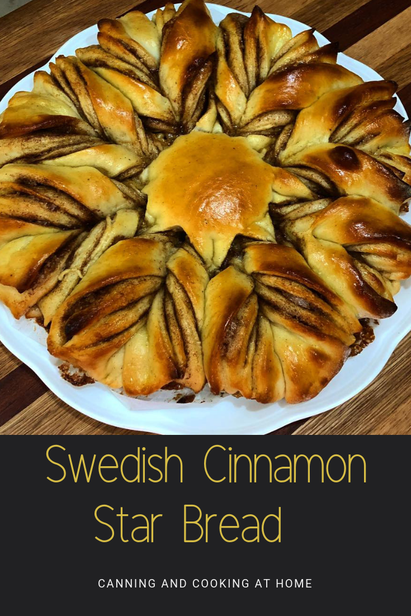
Picture
0 Comments
    F I N D  A  R E C I P E 

         PRINT OR SAVE TO .PDF 
    Print Friendly and PDF


    RSS Feed

    Archives

    February 2023
    January 2023
    December 2022
    November 2022
    October 2022
    September 2022
    July 2022
    June 2022
    May 2022
    March 2022
    February 2022
    January 2022
    December 2021
    October 2021
    September 2021
    July 2021
    February 2021
    January 2021
    December 2020
    November 2020
    October 2020
    September 2020
    August 2020
    July 2020
    June 2020
    May 2020
    April 2020
    March 2020
    February 2020
    December 2019
    November 2019
    October 2019
    September 2019
    August 2019
    July 2019
    May 2019
    April 2019
    March 2019
    February 2019
    January 2019
    December 2018
    November 2018
    October 2018
    September 2018
    August 2018
    July 2018
    April 2018
    March 2018
    February 2018
    January 2018
    December 2017
    November 2017
    October 2017
    September 2017
    August 2017
    July 2017
    June 2017
    May 2017
    April 2017
    March 2017
    February 2017
    January 2017
    December 2016
    November 2016
    October 2016
    September 2016
    August 2016
    July 2016
    June 2016
    May 2016
    April 2016
    March 2016
    February 2016
    January 2016
    December 2015
    November 2015
    October 2015
    September 2015
    August 2015
    July 2015
    June 2015
    May 2015
    April 2015
    March 2015
    February 2015
    January 2015
    December 2014
    November 2014
    October 2014
    September 2014
    August 2014
    July 2014
    June 2014
    May 2014
    April 2014
    March 2014
    February 2014
    January 2014

Picture
© Copyright 2023, Canning and Cooking at Home.
All images & content are copyright protected. Please do not use my images on your own site/page without prior permission. Sharing, pinning, and tweeting is always appreciated as long as the shares and pins link back to this website and recipe.  Canning and Cooking at Home claims NO liability for the safety of ANY recipe or advice contained within this website.  Always consult with the NCHFP to ensure Canning Safety. 

  • Home
  • Diane's Blog
  • Canning 101
  • Pickling
    • My Pickle Creations
    • Pickle Recipes
  • Recipe Index
    • Canning Recipes >
      • Jams/Jellies/Fillings/Butters/Juices
      • Meats/Other
      • Pressure Canned Soups
      • Tomatoes
    • Cooking Recipes >
      • Breads
      • Breakfast
      • Instant Pot Recipes
      • Main Dishes
      • Soups
      • Sweets
      • Drinks
      • Sauces/Apps/Sides
    • Recipe Collections >
      • The Apple Cart
      • Asian Inspired Recipes
      • Bundts to Bake
      • Cherry Recipes (preserving)
      • Easter Menu Ideas
      • Freezer to SlowCooker
      • Irish Fare
      • Jelly & Jam Recipes
      • Mexican Inspired Recipes
      • Pickle Recipes
      • Soups
      • Summer Grillin' Guide
  • Work with Me
    • Privacy Policy
    • Give Aways
  • Recipes Via Email