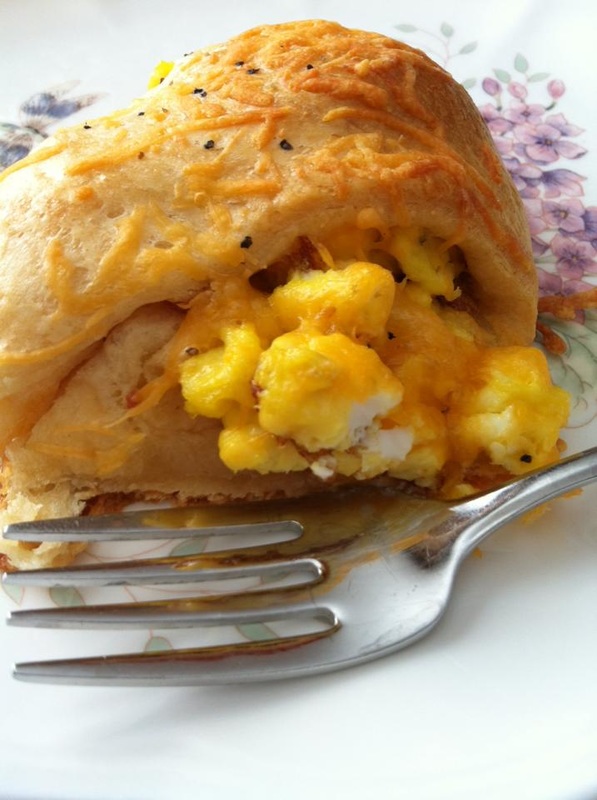
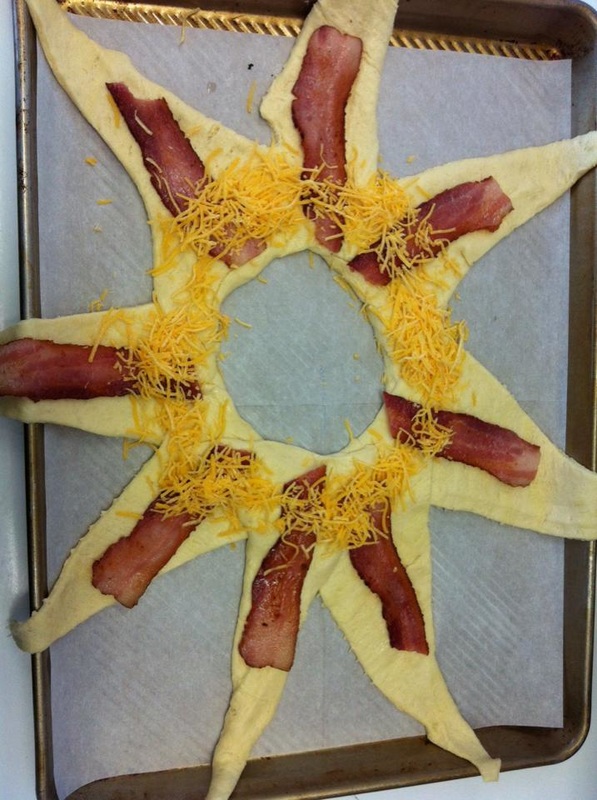
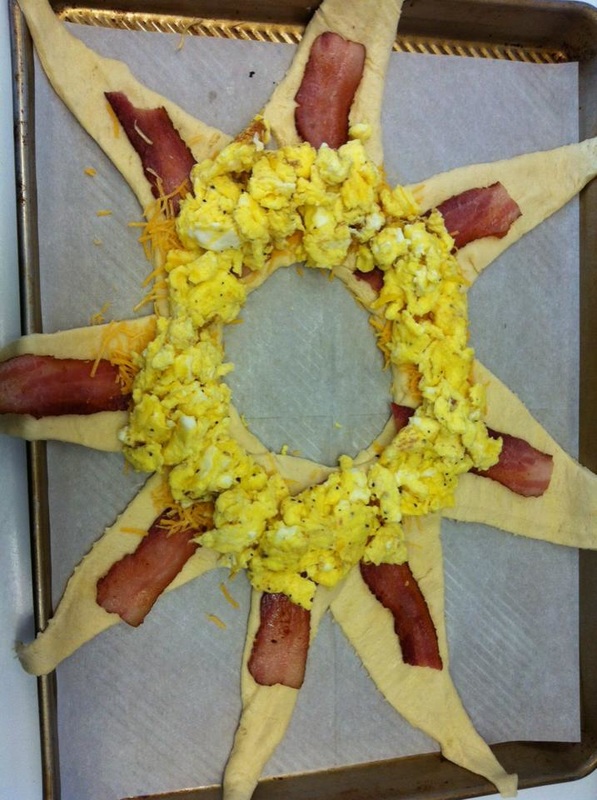
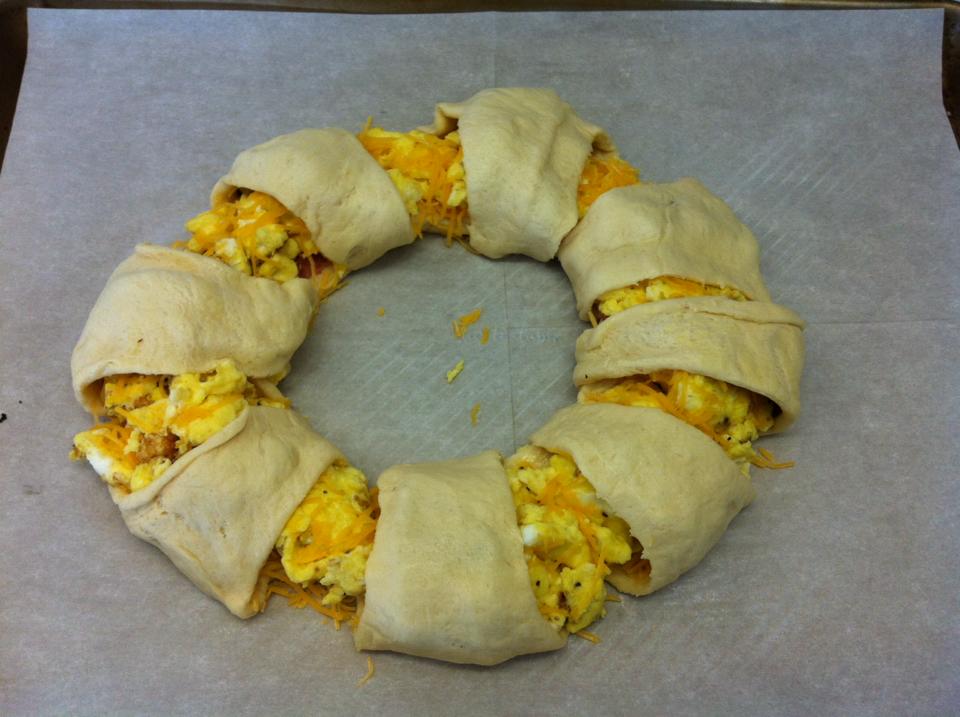
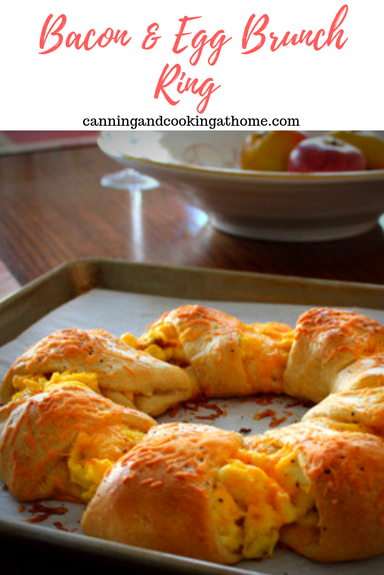
 We love this brunch dish because it serves 8 and is relatively easy to make. You can dress this brunch 'ring' up or down, change flavors and spices, its up to you. Try an Italian version with prosciutto, Italian cheeses and an herb crust or a Mexican flair with cilantro, pepper-jack cheese and Salsa...the combinations are endless but, I wanted to give you an idea of how to make the basic, and simple recipe offered by Pillsbury (using their crescent dough makes it a snap too!) My husband loves making a jalapeno, cheddar & pepper-jack, salsa & egg one <---whew! too hot for me LOL Whatever your choice, give it a try! ~Enjoy! Diane Bacon & Egg Brunch Ring Ingredients: 4 slices bacon, cut in half crosswise 1/3 cup plus 1 tablespoon milk 5 eggs, slightly beaten Salt and pepper, if desired 1 can (8 oz) Pillsbury refrigerated crescent dinner rolls 1 cup shredded cheddar cheese Directions: Heat oven to 375°F. Line large cookie sheet with cooking parchment paper. In a large 10-inch skillet, cook bacon over medium heat about 6 minutes or until cooked but not crisp, turning once. (It will finish cooking in the oven.) Set bacon aside; drain all but, 2 teaspoons bacon drippings from skillet. In medium bowl, beat 1/3 cup of the milk, the eggs, salt and pepper with fork or whisk until well mixed. Pour egg mixture into skillet with bacon drippings. Cook eggs, as mixture heats, gently push eggs around (you are lightly scrambling eggs but, leave eggs in larger chunks). Avoid stirring constantly. Cook 5 to 6 minutes or until eggs are thickened throughout but still moist. Unroll dough; separate into 8 triangles. On parchment-lined cookie sheet, arrange triangles with shortest sides toward center, overlapping in star shape and leaving 4-inch round circle open in center (see diagram). Crescent dough points may hang over edge of cookie sheet. Press overlapping dough to flatten. Place bacon on each of the triangles. Sprinkle 1/3 cup of the cheese onto widest part of dough. Spoon eggs over cheese. Sprinkle with 1/3 cup of the cheese. Pull points of triangles over eggs and cheese, and tuck under dough to form ring (filling will be visible). Carefully brush dough with remaining 1 tablespoon milk; sprinkle with remaining 1/3 cup cheese. Bake 20 to 25 minutes or until deep golden brown. Cool 2 minutes. With large spatula, carefully loosen ring from cookie sheet; slide onto serving platter.
0 Comments
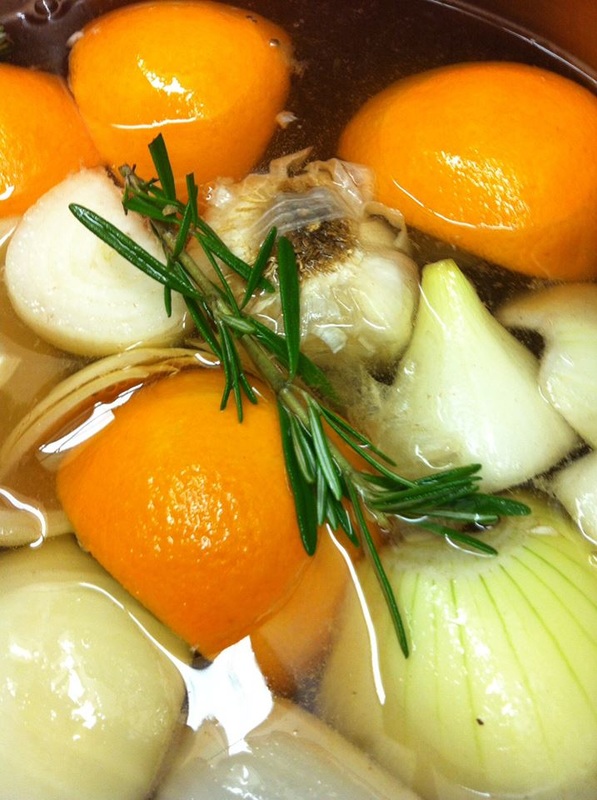
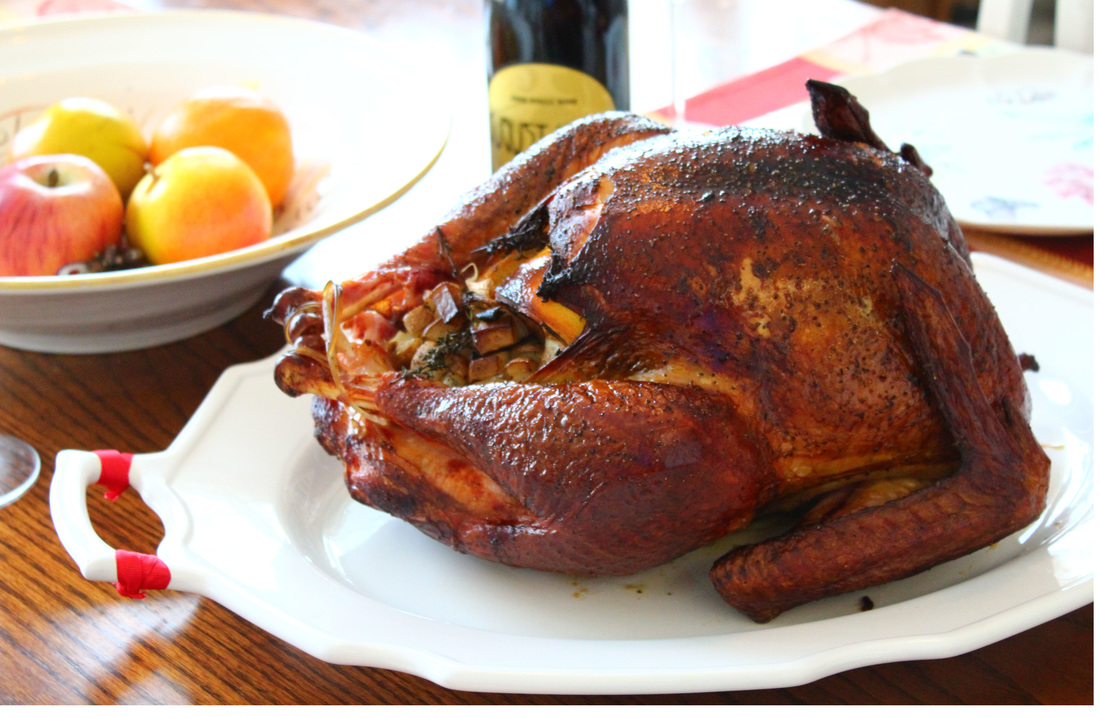
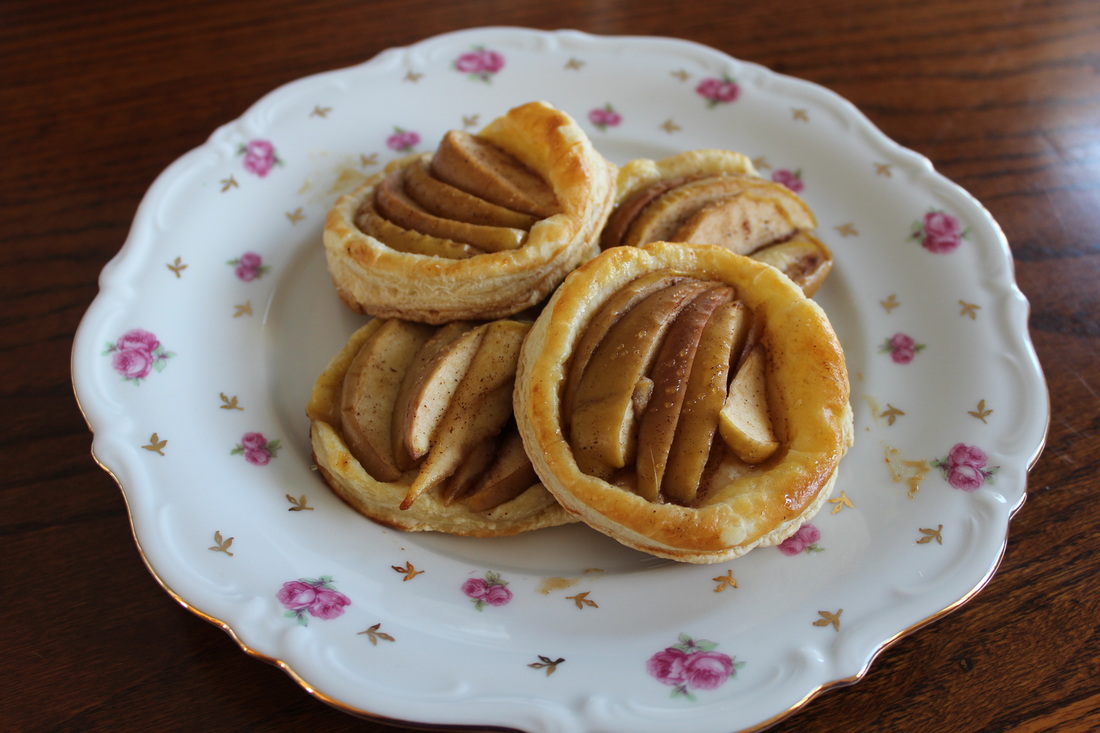
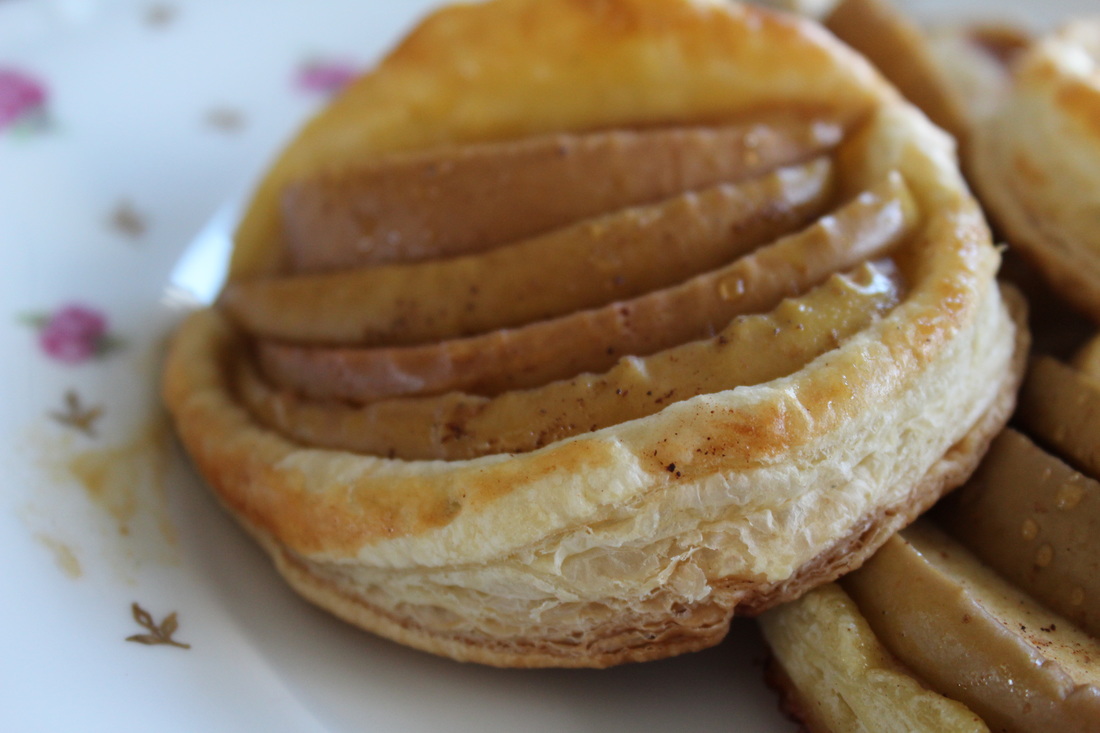
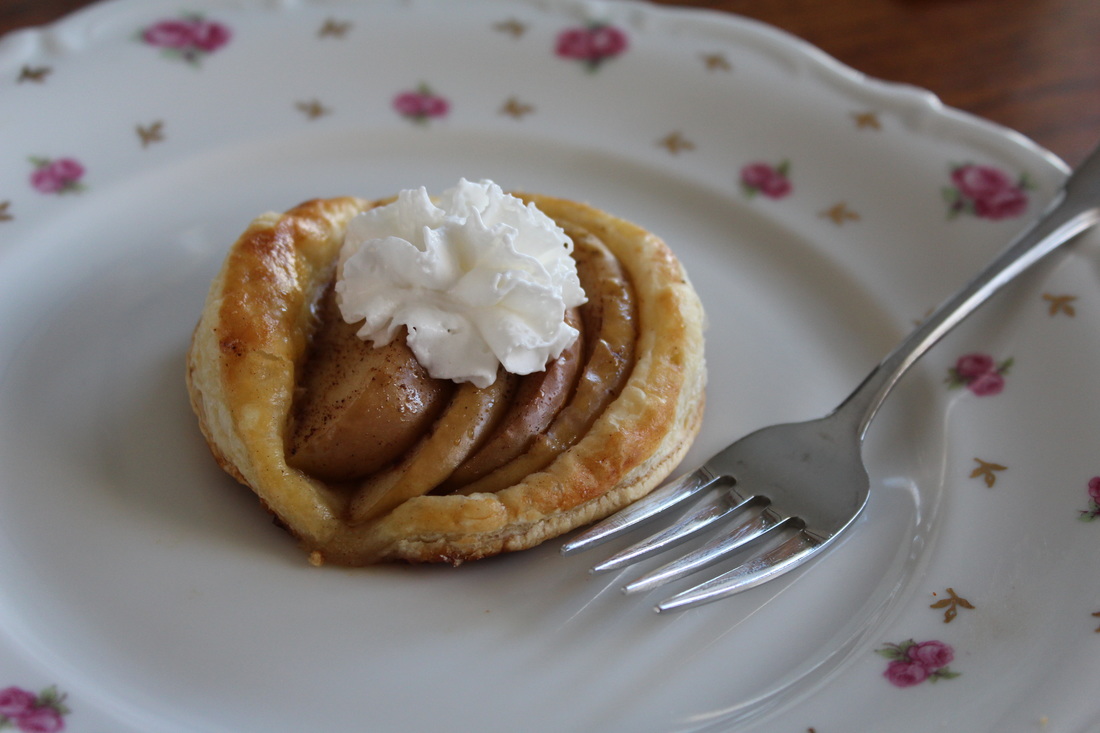
 I concede - my husband hit a "Home Run"...He loves to grill and has been experimenting with his new grill (a Big Green Egg) we decided this year we would go for it and try our Thanksgiving turkey out there under the Colorado skies! Throw caution to the wind and no matter what the results were - we'd deal with it. Boy - we totally fell into this one - it was truly an amazing tasting bird. Mike used a light hickory (2 large chunks, bark taken off & soaked in water for 2 hours) We brined the bird for 12 hours (overnight) and ended up with just the perfect blend of - well, everything from spices to smoke to herbs!! I don't think I can go back to a turkey done in the oven...I think he's ruined me and he will be cooking the bird for future Festivities! If you have time, give this recipe a try! ~Enjoy! and Happy Thanksgiving! Brined/Smoked Turkey Ingredients Brine: 16 cups (1 gallon) water 1/2 cup firmly packed brown sugar Rind of 1 navel orange 3 sprigs rosemary 1 cup kosher salt 2 yellow onions, quartered 1/2 heads garlic, halved horizontally 1 (15-pound) turkey Stuffing for the Cavity of Bird: 2 lemons, quartered 10 sprigs thyme 1 onion, quartered 1/4 cup olive oil Freshly ground black pepper Salt Instructions Set the EGG for indirect cooking at 350ºF Brine: Pour the water into a large bowl. Add the brown sugar, orange rind, rosemary, salt, the quartered onions and 1/2 halved garlic head. Mix until the sugar and salt dissolve. Remove the giblets from inside the turkey and reserve for another use. Rinse the turkey well. Place the turkey in a 2-1/2 gallon resealable plastic bag or any container that is large enough to hold the turkey and the liquid. Pour the brine over the turkey, making sure it’s completely covered. Refrigerate for 12 hours, turning occasionally. Remove the turkey from the brine, rinse well to remove the brining liquid, and pat dry with paper towels. Discard the brining liquid and solids. Prepare the Bird: Stuff the turkey cavity with the lemon quarters, onion, thyme, salt & pepper. Brush the turkey with olive oil and season with pepper and salt or we use "Black Dog Belly Rub". If smoking, place the hickory chips over the hot coals and, using barbecue mitts. Add the ConvEGGtor legs up Place the Drip Pan filled with a bit of apple juice onto ConvEGGtor. Place the Cooking Grill Grate on top (brushed with olive oil) Place Turkey (wings tucked) onto Cooking Grill Grate and close the lid of the EGG. Cook for at least 2 hours, not opening grill. If the turkey starts to brown too quickly, carefully tent the turkey with aluminum foil. Check the Turkey after 2 hours, add more coals or smoke chips if preferred, tent with foil if browning too fast. Continue cooking until the instant read thermometer registers 165F in the breast and 180F in the thickest part of the thigh. A 15 pound Turkey takes approximately 3.5 hours to fully cook a turkey from a defrosted state. Remove the turkey from the EGG and let rest for 15 to 20 minutes before carving and serving. Serves 8 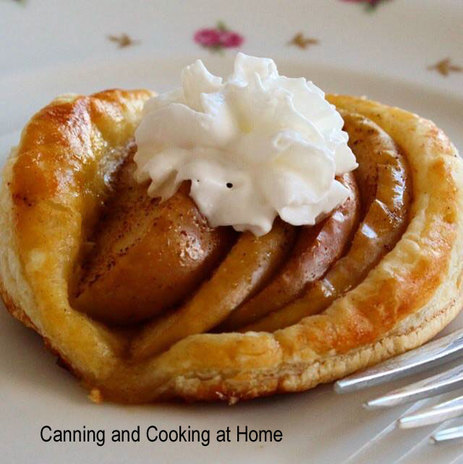 Mini Spiced Apple Tarts Ingredients: 1/2 box (1 sheet) puff pastry dough, thawed 1 egg 1 tsp water demerara sugar or large granulated sugar, for sprinkling Spiced Apple Mix: 1 Fuji apple, thinly sliced & cored 2 Tbs maple syrup 2 tsp cinnamon 1/2 tsp nutmeg 2 Tbs brown sugar Makes 8 Mini Tarts Directions: Preheat oven to 400. While the pastry dough is thawing, mix together your apple slices with spice mix in a large bowl, toss to coat and set aside. Thaw one sheet of puff pastry dough *takes approx 40 mins from frozen, when defrosted, lay pastry dough on a piece of parchment paper or a lightly floured surface and gently roll out dough to create a smooth, flat, seamless surface. Using a 3 inch cookie/biscuit cutter, cut out as many circles as you can (I get about 4-5 circles from the start) continue gently rolling and cutting circles until all the dough is used up. Lay the cut circles on a baking sheet lined with parchment paper, prick only the centers of each circle all over with a fork - leaving about a 1/2 inch edge of solid dough. Lay spiced apples in the middle of each circle (I stood mine upright a bit, resting against each other - 4 thin slices fit into the center of each of my circles.) Mix the egg and water together in a bowl and Brush the outside solid edges of dough with the beaten egg/water mixture, sprinkle with sugar and Bake at 400 for approx 20 mins or until golden brown. Serve warm or room temperature. Recipe & Photos by: Diane Baker for Canning and Cooking at Home 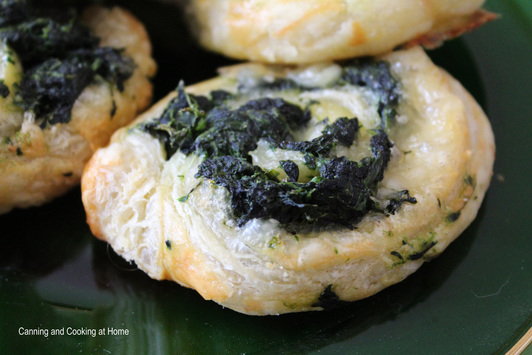 I love working with Puff pastry for appetizers and desserts. Why? because, the dough is flaky, soft and buttery which most people equate to decadent. The best part is how easy the dough is to work with...I do buy store bought as layering slabs of butter between dough I feel needs to be left up to Commercial bakers...not me! I watched a chef make puff pastry once, it was an hour long show that was time lapsed (enough said?) Even that chef admitted that buying it frozen from the store is a far better and less time consuming endeavor. I trust his word! I buy frozen Puff Pastry and just grab it from Freezer when I know I want to be baking with it. The instructions are to thaw 40 mins at room temperature - you do want the dough softened but, still cold. I lay out parchment paper and open up my dough sheets to let defrost...(you usually get two sheets per box) I then use a rolling pin to stretch the dough a bit (it the dough starts sticking to your pin, its getting too warm (pop in fridge for 5 mins) <---or flour your rolling pin if need be. I hope you enjoy this little appetizer (I fully admit, this recipe is ON THE BOX!) Some of the best recipes usually are somewhere on the products box or packaging - I figure if they took the time to place it on there - it must be decent! ~Enjoy! Diane Spinach & Cheese Puffs Ingredients: 1 egg 1 tbsp. water 1 cup shredded Swiss cheese garlic powder 1/2 pkg. Pepperidge Farm Puff Pastry Sheets (1 sheet), thawed 1 pkg. (10 oz) frozen chopped spinach, thawed and well drained, lightly salt. Directions: Heat the oven to 400°F. Beat the egg and water in a small bowl with a fork. Unfold the pastry sheet onto a piece of parchment paper, lightly roll out dough a bit longer and wider then place dough on parchment paper onto a baking sheet. Brush the pastry sheet all over the top surface with the egg/water mixture. Sprinkle garlic powder lightly over entire egged, surface. Top with the cheese and lightly salted spinach. Starting at a short side, roll up like a jelly roll. Cut into about 10 (1 inch) slices. Place the slices, around your backing sheet cut-side down. Brush the slices with the egg/water mixture. Bake for 20-30 minutes or until the pastries are golden brown. Remove the pastries from the baking sheets and let cool on wire racks for 10 minutes. The wider you cut your slices, the longer they take to bake (if cutting 1/2 inch slices, cook time is approx 15-20 mins) For best results, make sure to remove as much liquid as you can from the spinach before adding it to the pastry. If it's too wet, it may make the pastry soggy. Recipe Adapted from: Pepperidge Farms Photos by: Diane Baker for Canning and Cooking at Home 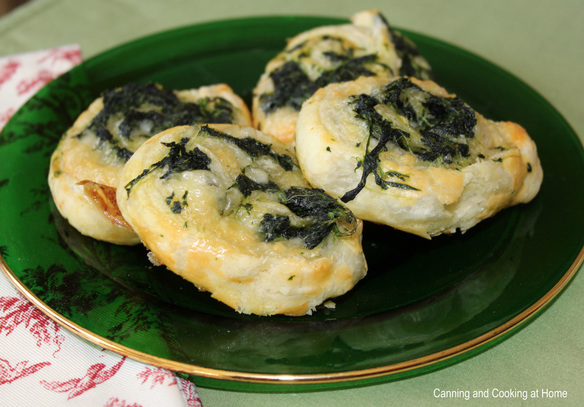 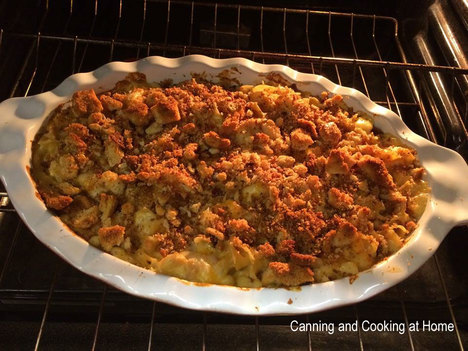 Just a very simple, comfort casserole. It doesn't get any more basic. You can add in any vegetables you desire, try out any new cheeses and top with your favorite crushed crackers or crushed croutons... ~Enjoy! Diane
Chicken Noodle Casserole Ingredients: 1 large onion, chopped 2 cups mushrooms, sliced 3 tablespoons butter, melted 2 (10 3/4 ounce) cans cream of chicken soup 2 cups shredded cheddar cheese, divided 3/4 cup milk 3-4 cups cooked chicken, chopped 2 1/2 cups cooked noodles salt & pepper, to taste Topping: 1/4 cup Ritz crackers, crushed Directions: In a large pan or skillet over medium-high heat, saute onions and mushrooms in butter, until onions are tender. Add in soup and 1 ½ cups cheese; gradually stir in milk. Cook over medium heat until cheese melts; stir in chicken and noodles; taste and adjust seasoning with salt and pepper. Transfer mixture to a greased 2 ½ quart casserole; sprinkle with cracker crumbs. Bake uncovered in a preheated 350° oven for 30 minutes or until heated through. Top with remaining ½ cup cheese and bake 5 minutes. Serve Hot. Recipe & Photo by: Diane Baker for Canning and Cooking at Home |