CANNING AND COOKING AT HOME
  • About Diane
  • Diane's Blog
  • Work with Me
  • Pickle Collection
  • Cooking Recipes
    • Breads
    • Breakfast
    • Instant Pot Recipes
    • Main Dishes
    • Soups
    • Sweets
    • Drinks
    • Sauces/Apps/Sides
  • Canning Recipes
    • Canning 101
    • Meats/Other
    • Pressure Canned Soups
    • My Pickle Creations
    • Tomatoes
  • Recipe Collections
    • The Apple Cart
    • Asian Inspired Recipes
    • Bundts to Bake
    • Cherry Recipes (preserving)
    • Cookie Time!
    • Easter Menu Ideas
    • Freezer to SlowCooker
    • Irish Fare
    • Jelly & Jam Recipes
    • Mexican Inspired Recipes
    • Pickle Recipes
    • Soups
    • Summer Grillin' Guide

Almond Bark Candy

12/13/2019

0 Comments

 
Picture
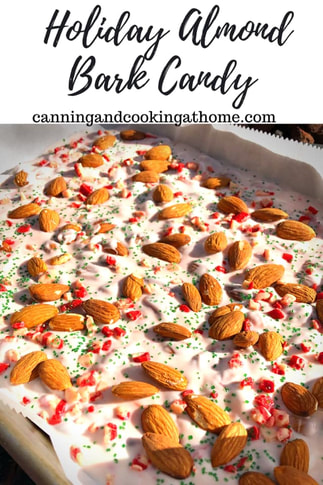
     You know what's nice? this recipe is easy! As easy as candy making gets!  All you need is some Vanilla Almond Bark from the baking aisle of your local grocery store (it comes in a 24oz brick of large cubes) it also comes in Chocolate (as in looks and tastes like milk chocolate) and the Vanilla looks and tastes like white chocolate.  Bark doesn't use cocoa butter as chocolate does, Barks use vegetable fats.  Barks are right up there with 'Candy Melts' in the workability of the product once melted.
     I prefer microwaving the Bark. Follow the directions on the package but, basically you melt for 1 minute at high, stir and then heat in 12 second intervals, stirring in-between until completely melted. Melting is usually 2 minutes total cooking time. 
     You can also add colorings and flavorings.  You cannot (must not) use water based liquids or the Bark chocolate will seize.  Oil based food colorings are best for this application.  Wilton "Candy Colors Food Colorings" work great for candy making!  When making a batch of Vanilla, white chocolate almond bark for this recipe today, I added in some peppermint white chocolate chips I had on hand - and then added some on top along with green sprinkles for the Christmas Holiday.  Again, you don't want to flavor or color with any non-oil based product or the candy will seize.  Enjoy! Diane 

Almond Bark Candy
Ingredients: 

1/2 pound whole almonds
6 bricks/cubes of Vanilla Bark (12 oz. white almond bark) 
Sprinkles of your choice 

Directions: 
    Toast your almonds in the oven at 350 for 10 minutes. Toasting deepens the flavor of the nuts and a step that shouldn't be skipped. Let the almonds cool while you prepare/melt the bark.  Once the bark is melted, stir in three-fourths of your toasted almonds and any oil based food colorings you prefer. (optional)  Pour the mixture out onto an 8x8 or 9x12 baking sheet, lined with parchment paper.  Sprinkle top of bark with remaining almonds and any decorations you prefer. Press the almonds down slightly so they set into the bark and won't pop off easily.   Let the entire mixture cool on your counter for 20 minutes and then place in refrigerator for a half hour.  Once fully cooled and solidified, break the bark into chunks as you prefer, I break into larger pieces first and then break those in half. 

(Almond Bark typically comes in 12 segmented bricks 
per 24 ounce bag)  

My Holiday White & Peppermint Almond Bark pictured below: 
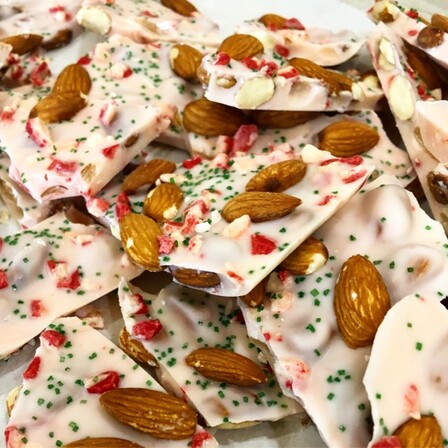
Picture
0 Comments

Creamy Potato Chowder *with Bacon or Ham

12/6/2019

0 Comments

 
Picture
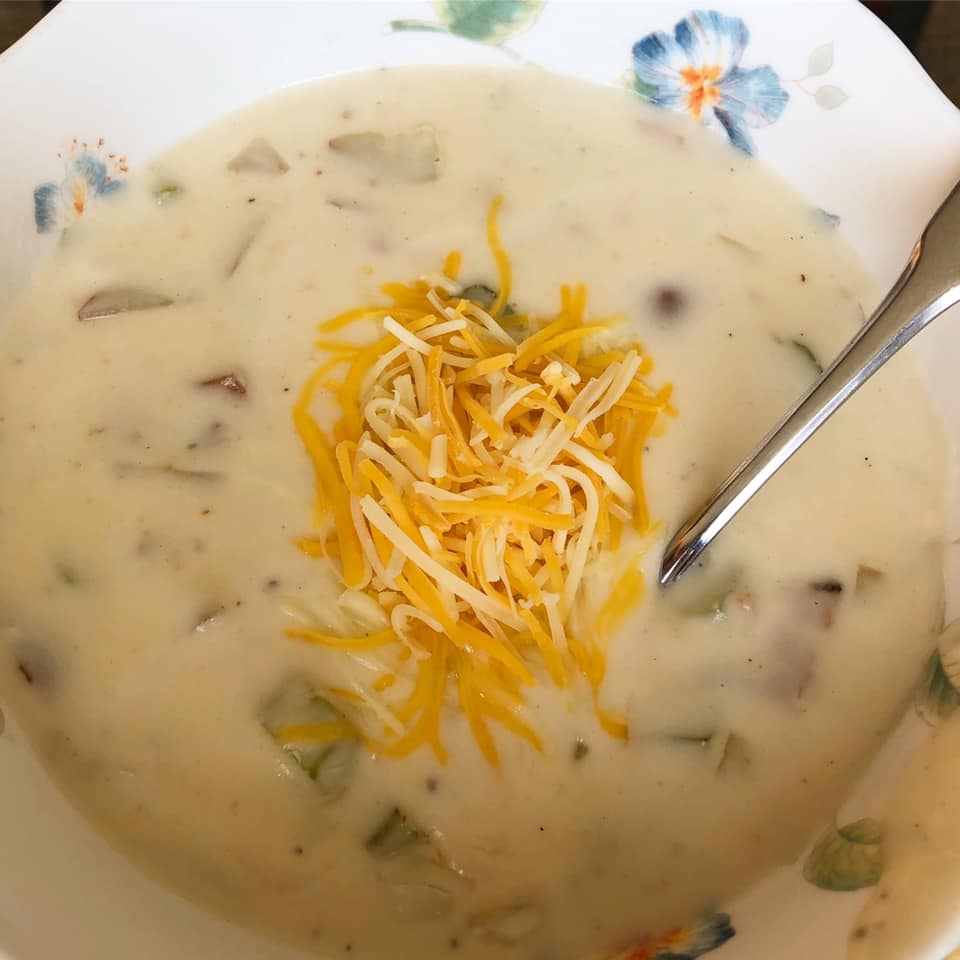
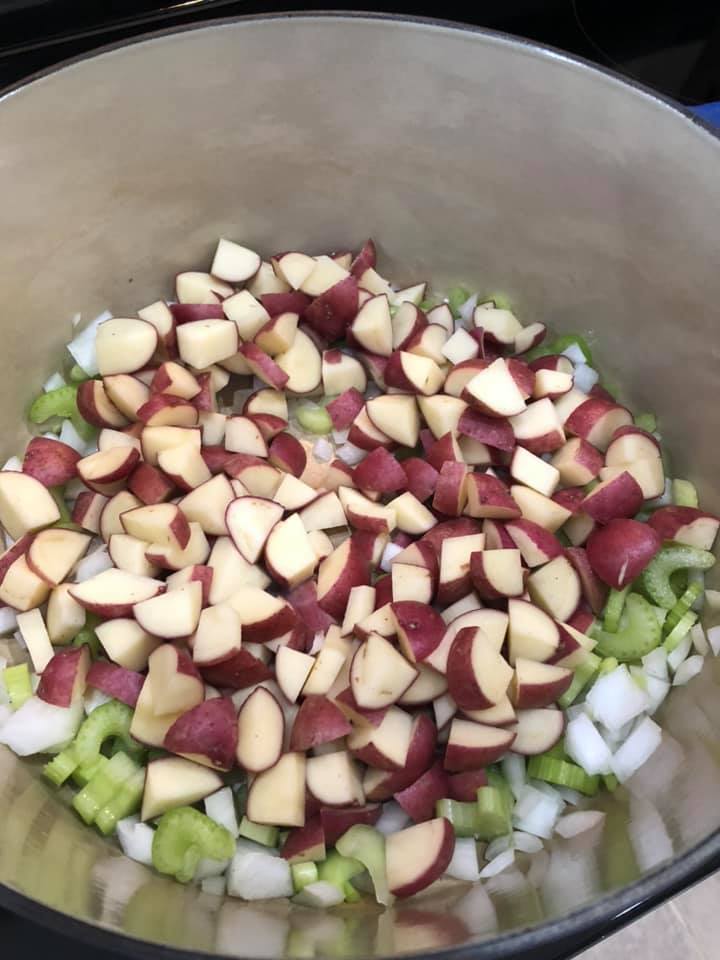
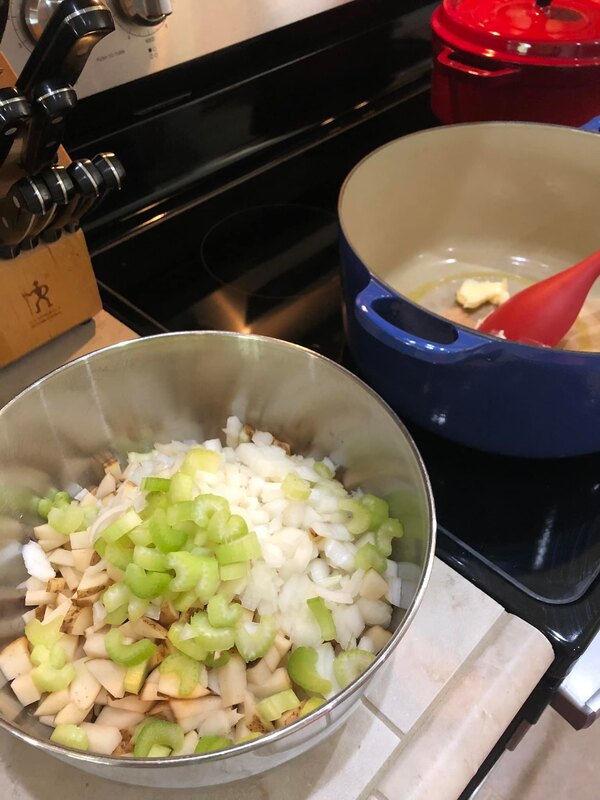
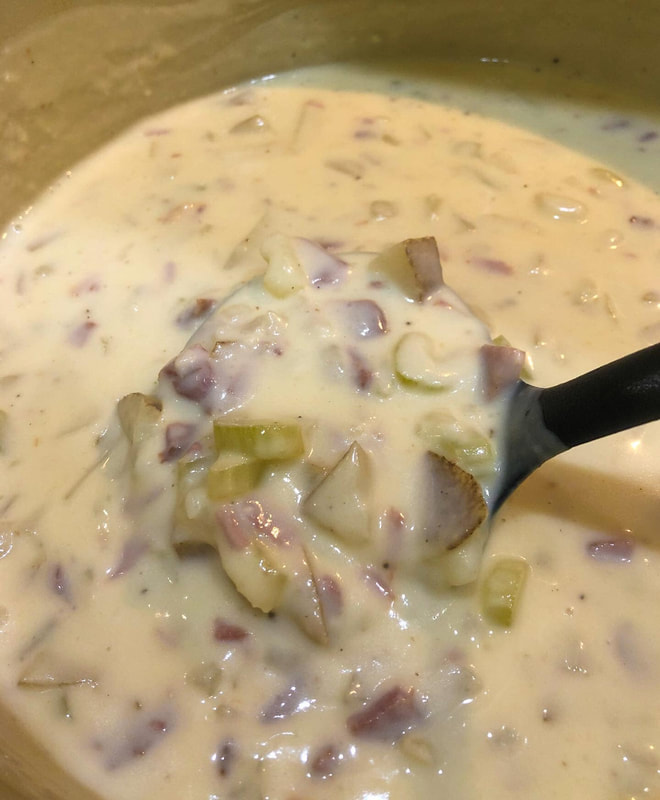
     I haven't met a soup I didn't like - when the weather turns colder we tend to eat more hot, hearty soups.  Summer seems a distant memory when the smells of a hearty soup is simmering in the house.  Pull up a chair, grab a spoon and dig in! Enjoy! Diane  
UPDATED: 11/3/2024

​Creamy Potato Chowder *with Bacon or Ham optional
Makes approx. 2-3 quarts

Ingredients:
4 Cups Chicken Broth
4 Cups diced/cubes red potatoes, skin optional
1 cup diced onion
1 cup diced celery

2 teaspoons salt, or to taste
1/2 teaspoons garlic salt
ground black pepper, to taste
1 Tablespoon Better Than Bullion, Chicken. optional but, preferred 
6 slices cooked Bacon or 2 Cups chopped cooked Ham, optional

ROUX:
1/2 cup butter
1/2 cup all-purpose flour
2 1/2 cups milk, I use whole milk
1/2 cup heavy cream


Directions:
  • Place Potatoes, Onions and Celery into large soup pot, sauté in a little butter and olive oil for about 5 minutes. 
  • Pour broth into soup pot over the onions, celery and potatoes.
  • Add in the garlic salt, salt, pepper and better than bullion to pot.
  • Stir in and cover to cook over medium heat until tender. (Covered pot approx. 35 mins. once to a good simmer.)
  • 5 minutes before vegetables are done, warm your cream/milk and set aside.
  • In a large, heavy saucepan, melt the butter over medium heat - whisk in the flour until smooth and mixture browns a bit. 
  • Make sure the flour and butter start to cook and smell "nutty" or your soup will taste like flour paste.
  • Whisk in warmed milk/cream (I microwave milk/cream for 45 seconds to get the chill off) and stir into butter/flour constantly until thick and smooth.
  • Stir the roux (milk/butter) mixture into the vegetables and broth.
  • Heat through, but do not boil.
  • Stir in cooked bacon or ham if preferred. 
  • Taste and add more salt, garlic salt and pepper if needed. 
0 Comments

Italian Seasonings Mix *homemade

12/4/2019

1 Comment

 
Picture
  • 3 tablespoons each dried basil, oregano and parsley flakes
  • 1 tablespoon garlic powder
  • 1 teaspoon dried thyme
  • 1 teaspoon dried rosemary, crushed
  • 1/4 teaspoon pepper
  • 1/4 teaspoon crushed red pepper flakes, optional

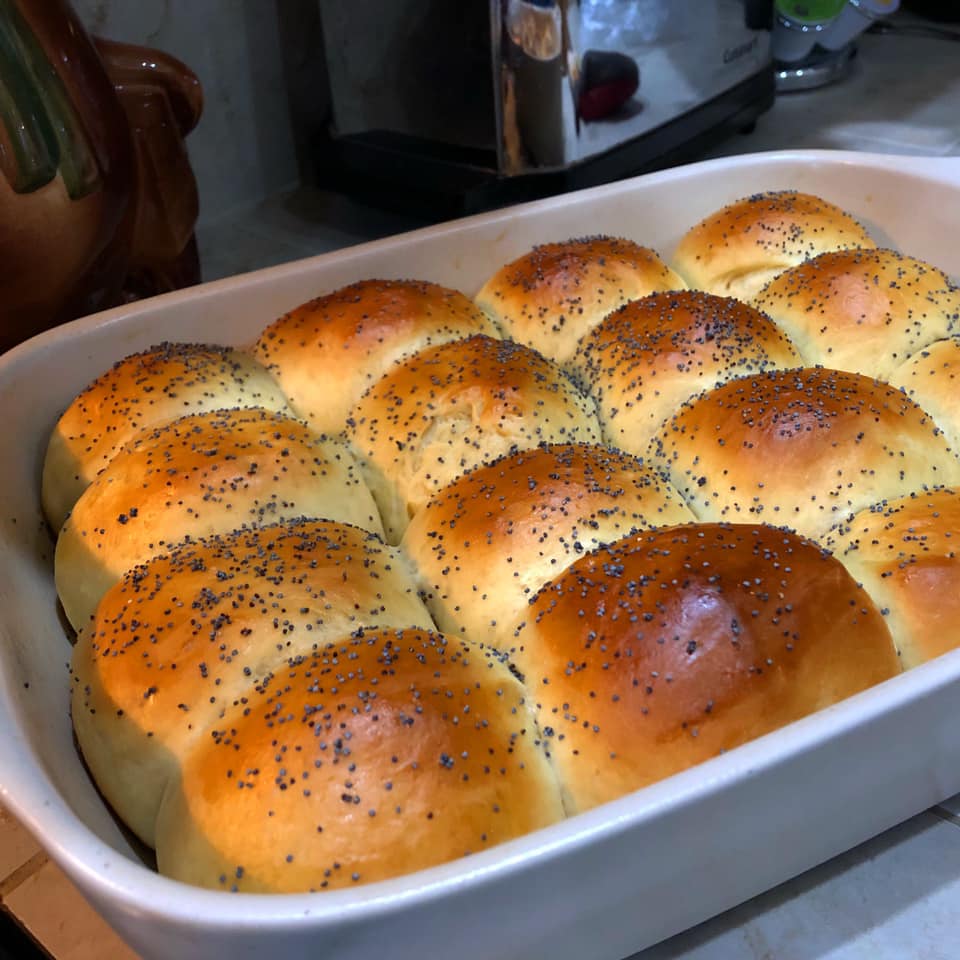
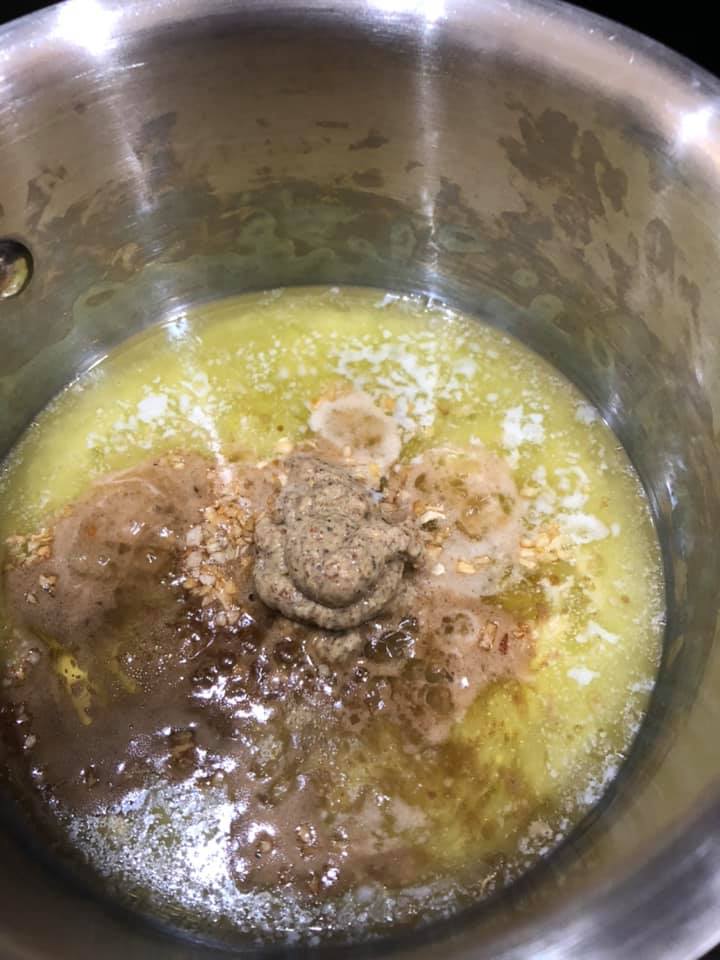
Place all ingredients, in batches if necessary, in a spice grinder or small bowl. Grind or crush with the back of a spoon until mixture becomes a coarse powder.

​Store in an airtight container for up to 6 months.

1 Comment

Hot Ham & Cheese Sliders

12/4/2019

0 Comments

 
Picture
Hawaiian Ham & Cheese Sliders - ready for the oven.
     This dish is easy to make and stands great as part of a dinner (think soup and sandwiches) or a party appetizer.  I like to make my own Hawaiian dinner rolls and use those but, store bought is just as great!  I prefer to make the "mustard topping" in the morning, pour over the assembled complete dish - then bake off in time for dinner.
Enjoy! Diane

Link to the Homemade Hawaiian Rolls below. 

Hot Ham & Cheese Sliders

Ingredients:
12 Hawaiian style rolls (cut in half crosswise, do not separate the rolls)
3/4 pound deli ham (thinly sliced)
1/4 pound Swiss cheese (sliced)
1/4 pound Cheddar cheese (sliced) 
6 tablespoons butter (melted)
2 teaspoons Dijon mustard
2 teaspoons poppy seeds
1 ½ teaspoons onion (dried, minced)
1 teaspoon Worcestershire sauce
1 tablespoon parsley (chopped)

Directions:
  1. Preheat oven to 350F degrees. Spray a 9x13-inch baking dish with cooking spray.
  2. Melt butter in a saucepan over medium-low heat; cook and stir onion until softened, 5 to 7 minutes. Add mustard, poppy seeds, and Worcestershire sauce; cook and stir for 5 minutes.
  3. Arrange the bottoms from each roll in the prepared baking dish. Spoon 2/3 the onion mixture over the roll bottoms. Add ham and Swiss cheese to each roll. Put tops of rolls over the Swiss cheese layer. Brush the remaining 1/3 onion mixture over tops of rolls. Cover dish with aluminum foil.
  4. Bake in the preheated oven for 15 minutes. Remove aluminum foil and bake until tops of rolls are lightly browned, 5 to 10 minutes.

This recipe makes 12 sliders and most people eat 2. 
You can cut this recipe in half and use an 8x8 baking dish and 6 buns. 
  
Hawaiian Dinner Rolls Recipe - CLICK HERE  
0 Comments
    F I N D  A  R E C I P E 

       PRINT OR SAVE TO .PDF 
    Print Friendly and PDF


    Archives

    December 2024
    November 2024
    June 2024
    December 2023
    August 2023
    July 2023
    April 2023
    February 2023
    January 2023
    December 2022
    November 2022
    October 2022
    September 2022
    July 2022
    June 2022
    May 2022
    March 2022
    February 2022
    January 2022
    December 2021
    October 2021
    September 2021
    July 2021
    February 2021
    January 2021
    December 2020
    November 2020
    October 2020
    September 2020
    August 2020
    July 2020
    June 2020
    May 2020
    April 2020
    March 2020
    February 2020
    December 2019
    November 2019
    October 2019
    September 2019
    August 2019
    July 2019
    May 2019
    April 2019
    March 2019
    February 2019
    January 2019
    December 2018
    November 2018
    October 2018
    September 2018
    August 2018
    July 2018
    April 2018
    March 2018
    February 2018
    January 2018
    December 2017
    November 2017
    October 2017
    September 2017
    August 2017
    July 2017
    June 2017
    May 2017
    April 2017
    March 2017
    February 2017
    January 2017
    December 2016
    November 2016
    October 2016
    September 2016
    August 2016
    July 2016
    June 2016
    May 2016
    April 2016
    March 2016
    February 2016
    January 2016
    December 2015
    November 2015
    October 2015
    September 2015
    August 2015
    July 2015
    June 2015
    May 2015
    April 2015
    March 2015
    February 2015
    January 2015
    December 2014
    November 2014
    October 2014
    September 2014
    August 2014
    July 2014
    June 2014
    May 2014
    April 2014
    March 2014
    February 2014
    January 2014

Picture
© Copyright 2025, Canning and Cooking at Home.  Established 2013.
All images & content are copyright protected. Please do not use my images on your own site/page without prior permission. Sharing, pinning, and tweeting is always appreciated as long as the shares and pins link back to this website and recipe.  Canning and Cooking at Home claims NO liability for the safety of ANY recipe or advice contained within this website.  Always consult with the NCHFP  to ensure Canning Safety.