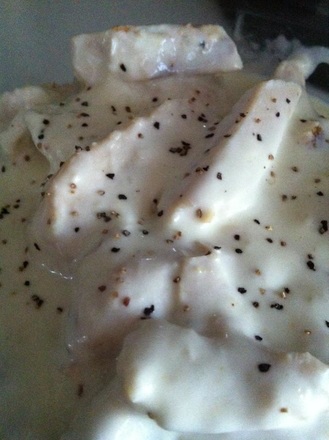
 Want a super easy but, impressive dinner using leftover cooked chicken? use leftover cooked chicken and dress it up with a simple sauce. I served this over fresh cooked spinach with stuffing and a side salad...this is an excellent sauce for chicken and pasta too - the photo doesn't look too great but, it is just a white sauce, can't really showcase a plain sauce in a photo but, trust me - the taste is excellent! ~Enjoy! Diane
White Wine Sauce **adding mushroom/optional 2 cups heavy cream 1 cup white wine 2 tablespoons butter 2 tablespoons corn starch 2 1/2 teaspoons chicken bouillon granules black pepper In a saucepot, add white wine, butter and chicken bouillion granules. Bring to medium-high heat, stirring to dissolve boullion. In a separate cup or bowl whisk the corn starch into the cream, add half the cream mixture into the wine mixture and bring to a medium boil, adding remaining cream mixture until all added, once thickened at a boil, lower heat and let simmer to thicken. Stirring in black pepper (and mushrooms if wanted) and add in cooked chicken until chicken is warmed through. This sauce is also great with pasta and chicken. Diane Baker for Canning and Cooking at Home
0 Comments
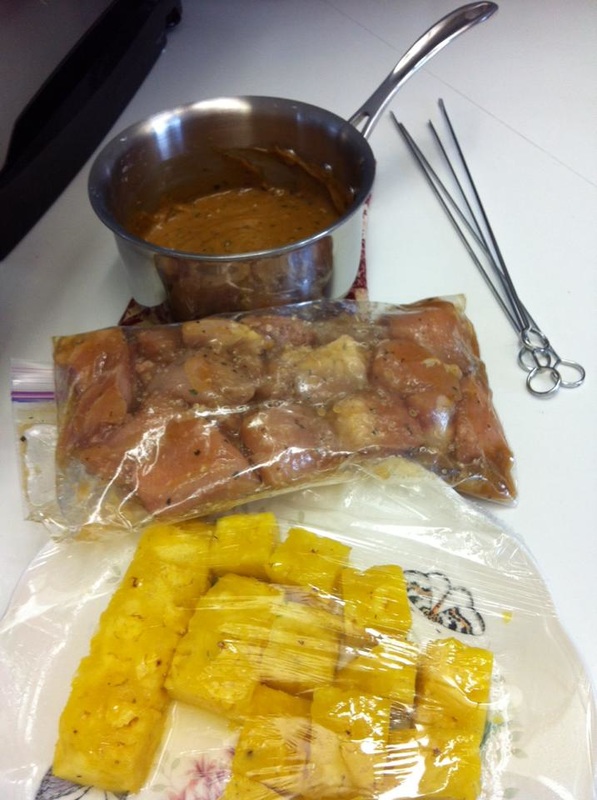
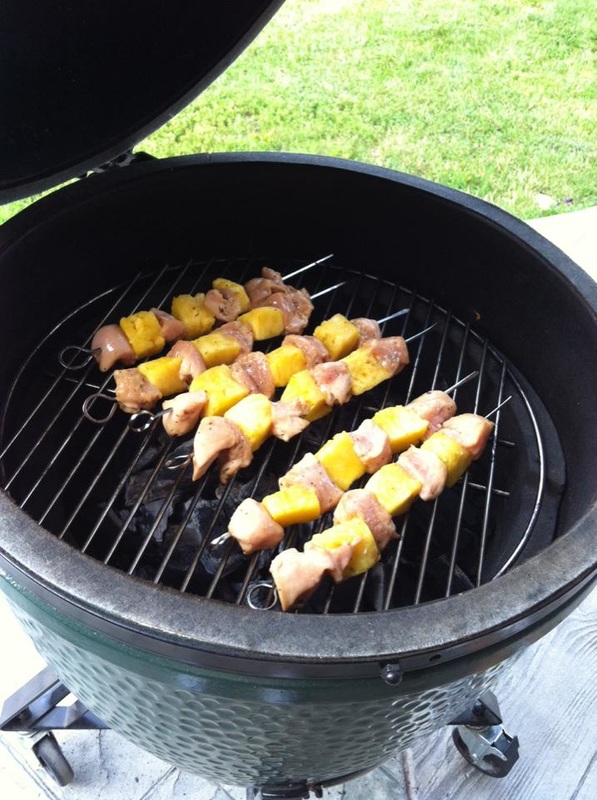
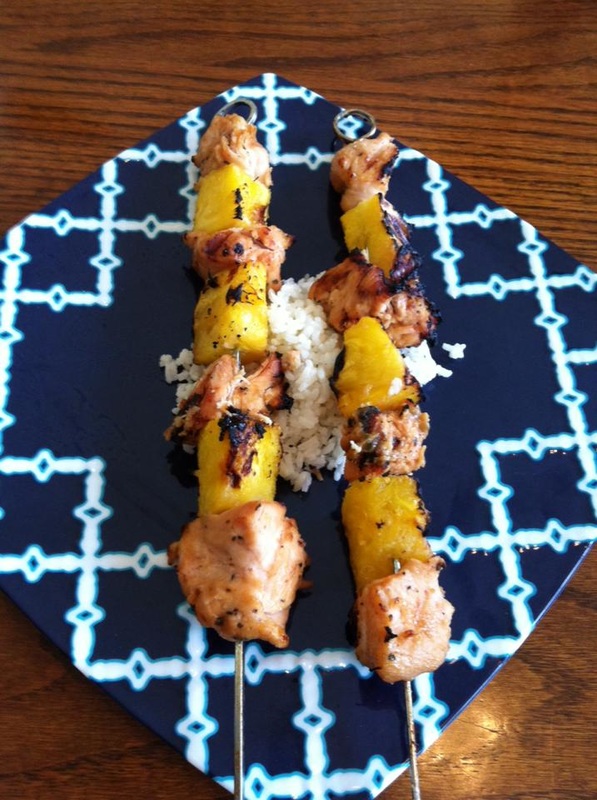
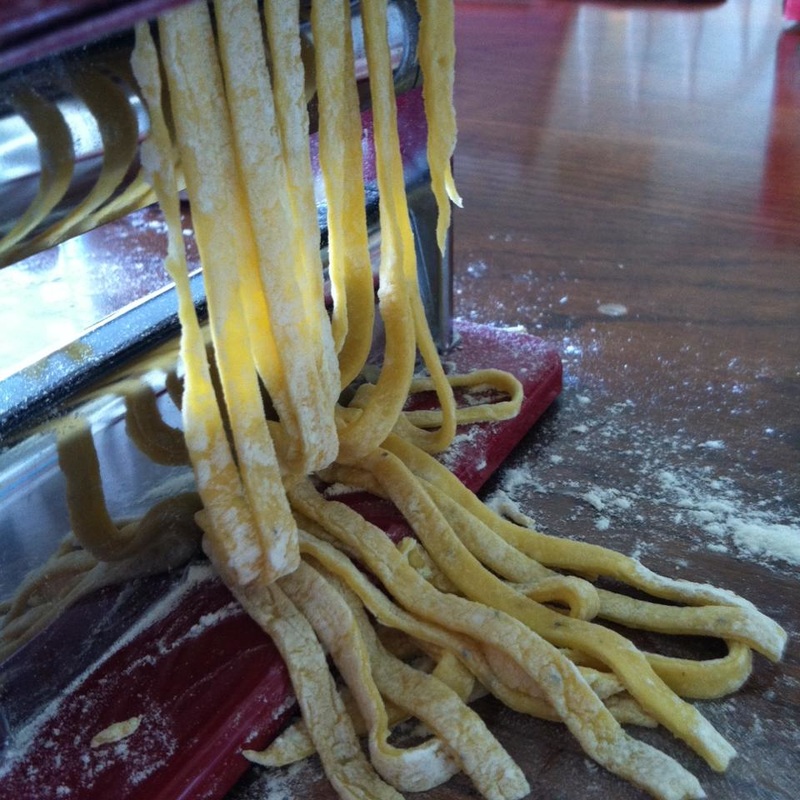
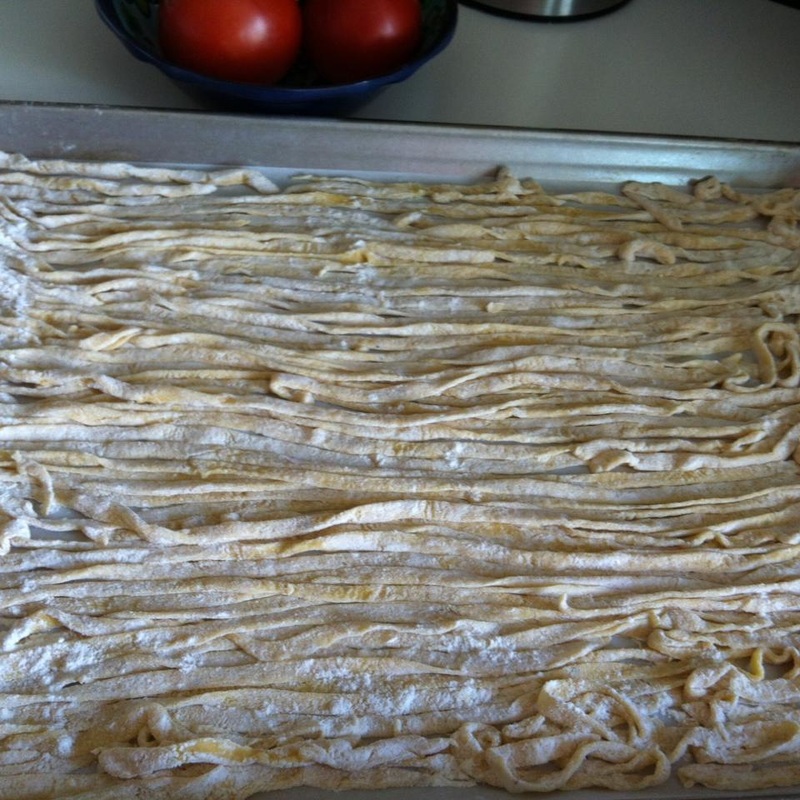
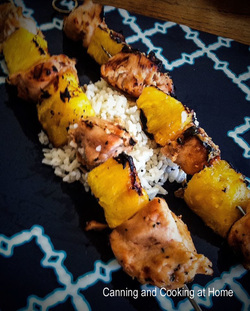 Thai Pineapple Peanut Chicken Satay (a Carlsbad Cravings Recipe) I love grilled pineapple! This recipe from Jen over at Carlsbad Cravings takes it one step beyond! I remember my Mom making a similar dish for my 'Sweet 16' party which was a Hawaiian Luau theme. Everyone raved about that party, and the food and this recipe made me feel nostalgic by taking me back all those years... over 30 years?! I love the addition of a marinade that turns into a peanut sauce/dip (I think that is some of the Thai inspiration in this recipe) It all works together and makes one fantastic dinner! The best part- you can cut up all your chicken and let that marinade and have your pineapple cut and read to go - all the night before, so it will be ready to grill the next day according to your schedule. ~Enjoy! Diane and a huge thank you to Jen for such a great recipe!! Thai Pineapple Peanut Chicken Satay Ingredients: 2 pounds chicken breast meat - cut into bite size pieces 1 fresh pineapple, cut into 1” pieces 3 tablespoons olive oil 1/3 cup coconut milk (can substitute evaporated milk with 1/4 tsp coconut extract) 1/4 teaspoon cornstarch or tapioca flour 1/3 cup peanut butter, crunchy preferred for this recipe Thai Peanut Pineapple Marinade/Sauce: 1/4 cup soy sauce 1/4 cup brown sugar, packed 1 tablespoons fish sauce 1 tablespoon lime juice 1-2 teaspoons sriracha red chili sauce 1 teaspoon dry basil 1 teaspoon ground garlic 1/2 teaspoon ground ginger 1/4 teaspoon black pepper Garnish (optional) crushed peanuts green onions toasted sesame Directions for Grilling or Broiling: The Marinade: the chicken. In a medium bowl, whisk Thai Peanut Pineapple Chicken Marinade/Sauce ingredients together. Take a 1/4 cup of this Marinade (refrigerate the rest for making the peanut sauce) plus 3 tablespoons olive oil and add with chicken to to a large Ziploc bag. Place the bag of the chicken in your refrigerator for at least 1 hour: or longer (the longer the better, can go overnight). Grill: When ready to cook, generously grease grill and heat to medium-high heat. Drain marinade from chicken and thread chicken and pineapple onto skewers. Grill on one side for about 5 minutes or until slightly charred. Carefully flip and grill the other side until chicken is cooked through and slightly charred. Broil: Line a baking sheet with aluminum foil and lightly spray with nonstick cooking spray. Add the skewers in a single layer and broil, turning every 5 minutes until cooked through, about 10- 15 minutes depending on thickness of chicken. The Sauce: Take the remaining reserved Thai Peanut Pineapple Marinade, add to a small saucepan. Whisk in cornstarch and coconut milk. Bring to a boil, reduce heat and simmer for 1 minute. Remove from heat and stir in peanut butter. Sauce should be thick, but spreadable. If sauce is too thick, whisk in some coconut milk or water to reach desired consistency. If too thin, return to a simmer until thickened. Taste and add more sriracha, lime, or brown sugar, if needed. Use Sauce as a Dip or Brush grilled kebabs before serving. Note: if using wooden skewers - soak in water at least 30 minutes in water before grilling to prevent burning skewers. Serve this dish with cooked rice. Recipe adapted from: Jen at Carlsbad Cravings "Thai Pineapple Peanut Chicken Satay" Photos by: Diane Baker for Canning and Cooking at Home 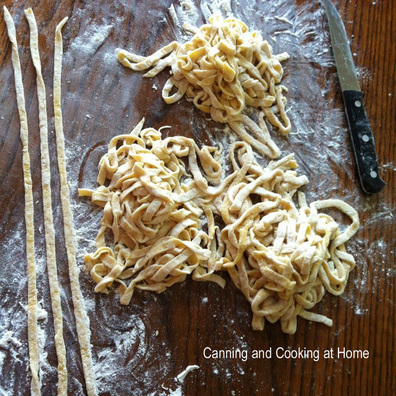 Homemade Fettuccine Oh Noodles! Yummy, slurp-y, soft, buttery, liquid induced, tomato soaked or creamy...its all good! Show me a 'food coma' by having me make and eat pasta! I love pasta (if that isn't clear!) No need to be fancy here either - making fresh pasta is your choice - go slow and make dough like "grandma" by hand, speed things along with a mixer and dough hook, or zip to the finish line using a food processor...I've tried them all and really don't have a preference...they all produced great pasta! You can also roll the dough by hand with a rolling pin and cut with a knife or pizza cutter, or squeeze through a pasta maker (which flattens the dough and lets you grab and stretch as you turn the crank) and let the pasta maker cut your noodle shapes too...its all up to you! I admit - it was super easy to throw ingredients in a food processor until a dough ball forms (a la Chef Viviani style) but, you still get your hands and surfaces covered with flour, its just an evil necessity in this process...flour keeps your noodles from sticking to each other, your hands, and the rollers, cutters. I will share my quick recipe - one I caught from Chef Viviani which uses a Cuisinart. ~Enjoy! Diane Homemade Pasta Ingredients: 3 eggs 2-3 cups all purpose flour (*add slow) 1/8 tsp salt & pepper each 1/2 tsp olive oil Place everything but, flour into Food Processor. Whirl for 3-8 seconds. Add in 1 1/2 cups of flour and pulse a few more seconds until a dough starts to form, add in more flour (1/2 cups at a time) and pulse until dough starts pulling together into a large ball, when dough is ready - it should NOT be sticky to the touch (if it is, you need to keep incorporating more flour) Once dough is soft to touch and non-stick, set out onto a floured working surface. knead dough just enough to form into a long rectangle. Cut the rectangle in half and run each half thru pasta maker - one at a time. Most pasta makers have roller settings (the largest setting meaning the rollers are the farthest apart) I make 3 passes with my dough when making Fettuccine before moving the now 'long pressed sheet of dough' through the pasta cutter part of my machine...Once cut, I bundle loosely and sprinkle with more flour so there is no sticking together! When all done, I lay finished noodles flat in a straight line on a parchment lined baking sheet, sprinkled with flour until ready to cook (I leave out in open air until cook time, as long as its no more then 4 hours away.) Prepare your favorite sauce and boil your noodles in salted water: approximate times for cooking pasta in boiling, lightly salted water: Fresh pasta, no drying or freezing; 2 to 3 minutes Fresh pasta, air dried; 4 to 7 minutes ..."Be sure to have your sauce, toppings, salads, and sides ready at the table before you drop the pasta into the water... Cooked pasta waits for no one..." Yields: enough to compliment one commercial sized jar of tomato sauce. Recipe by: Chef Viviani Photos by: Diane Baker for Canning and Cooking at Home 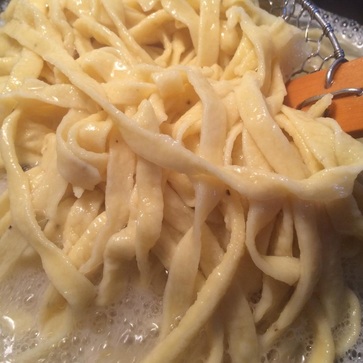 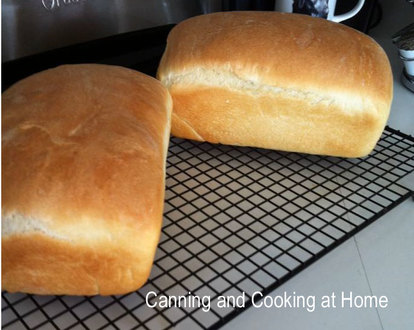 There is something to be said about Homemade Bread. I love the way everything comes together to form a perfect loaf. The way the dough smells and as this bread bakes, it sends out the most grin producing smile...you can SMELL it's going to be great! This recipe makes two loaves and YAY for that!! I sliced up one loaf for toasting and sandwiches and save the other loaf for thicker grilled cheese sandwich slices and 'texas toast' style french toast for Sunday Brunch... YUM! ~Enjoy! Diane 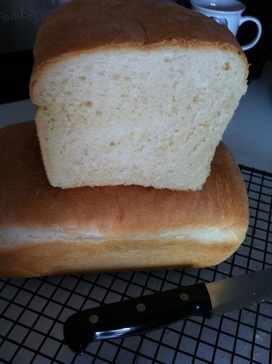 Basic Homemade White Bread
{Super Soft} Ingredients: 1 package (1/4 ounce) active dry yeast (or approx. 1 Tbs) 2-1/4 cups warm water (water temp. according to your yeast) 3 Tbs sugar 1 Tbs salt 2 Tbs canola oil 6-1/4 to 6-3/4 cups all-purpose flour (depending on humidity) Directions: In a bowl, dissolve a pinch of sugar in warm water (I check my water temp with an instant read thermometer) add in yeast. Place 3 cups of the flour, sugar, salt and oil into Mixing Bowl. Beat with dough hook until combined/smooth. Stir in enough remaining flour to form a soft dough - the humidity level with depend on how much you add in total. I keep an eye on my mixing bowl, if after 3 minutes or so I see flour still on the bottom of the bowl, I add a touch more water, if I see a filmy, flour paste (wet) I add a touch more flour...after any additions I make, I let the dough have time to catch up and mix. Once the bowl is "clean around the bottom two-thirds of bowl with no trace of flour or water" I let the dough knead for another 2 minutes (about 4-6 minutes total knead time with my Kitchen Aide Mixer and Dough Hook) Turn the dough into a lightly greased bowl (I coat my large stainless mixing bowl with Olive Oil), turning the dough ball once to grease the top. Cover and let rise in a warm place until doubled, about 1-1/2 hours. Punch dough down. Turn onto a lightly floured surface; divide dough in half. Shape each into a loaf. Place in two greased 9-in. x 5-in. loaf pans. Cover and let rise until doubled, about 30-45 minutes. Bake at 375° for 30-35 minutes or until golden brown and bread sounds hollow when tapped. Remove from pans to wire racks to cool. Yields: 2 loaves Recipe adapted from: Sandra Anderson for Taste of Home Photos by: Diane Baker for Canning and Cooking at Home 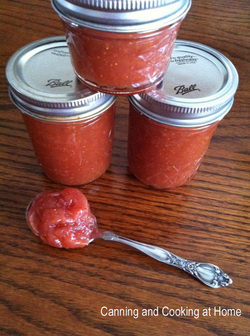 Spiced Fig Jam Why make jam out of figs? Well, first off - it's tasty but, it also has such a multitude of uses. One being that if it needs just a little more thickening - you can thicken upon opening and use as a "fig newton" filling. My husband loves swirling some into his hot oatmeal with cinnamon. You can even spoon over cottage cheese with some pear for a tasty treat. Any way you use it - even if just as a spread on toast or over cheeses for a dinner party appetizer, it's sure to please! I used Brown Turkey Figs for this recipe because I hadn't done my full research. I didn't know that Black Mission Figs are the sweetest and would provide the most flavorful jam but, this jam I made - it still great - the figs have a delicious, subtle flavor of peach and surrounded with star anise and ginger flavors, it shines. I use the entire Fig in this jam (only removing the stem section.) ~Enjoy! Diane Spiced Fig Jam Ingredients: 5 lbs fresh, ripe Figs, (2 Quarts chopped) 3/4 cup water 6 cups White Granulated Sugar, divided *I used some honey in place of sugar 1 box powdered pectin, sure-jel (pink box) 6 Star Anise *you can use 3-4 cinnamon sticks if preferred, instead. 1 tsp fresh ginger, grated *more or less, as preferred 1/4 cup Lemon Juice Directions: Clean Figs, cut off stems, and cut in half, place into large pot. Warm pot and let figs start to release their juices, bring pot up to medium-high heat and add water with white sugar. Stir and let sugar dissolve, about 10 minutes. Add in star anise (I place my anise in a spice ball/bag for easy removal later) and ginger and let the pot simmer for about 30 minutes, stirring often, this lets the star anise steep and the figs cook down a bit. Taste your mixture at this point and make any spice or sugar 'taste adjustments'. Once to your liking, remove spice ball with anise and set aside, remove pot from heat and use an immersion blender to break down any remaining large pieces of fig. Once all large chunks are broken down, return pot to heat and add back in the spice ball with anise to continue flavoring the jam. Mix 1/4 cup sugar and pectin together in a bowl, and slowly mix into jam in pot while raising the heat on the stove to High. You want to bring the mixture up to at least 210 on a candy thermometer and let boil hard for at least one minute (a boil where the bubbles do not stop when stirring.) Remove pot from heat and ladle hot jam into prepared, sterile jars. Water-bath Can for shelf stability. You can refrigerate for immediate use or freeze for use later. Waterbath 1/4" head-space, 5 minutes or according to your altitude: Instructions from NCHFP Photos by: Diane Baker for Canning and Cooking at Home  Figs in pot with sugar & honey |