 Ham n' Cheese Quiche
Ingredients: 1/2 Pie Crust (yes, I used pre-made) 5 large eggs 1 1/2 cups ham, diced/cooked 1/2 cup 2% milk* 1/2 cup heavy cream* 1/4 cup shredded mozzarella 1 cup shredded cheese sharp cheddar* salt & pepper, to taste 1/4 cup diced onion, cooked (optional) 1 small tomato (optional) Directions: Prepare the pie crust (you can make homemade or use pre-made pie crust) Preheat oven to 350F degrees. While the pie crust is pre-baking, whisk together the eggs, ham, milk, onion, cheeses until combined. Sprinkle with salt and pepper. When pie crust is ready - Pour the egg mixture into crust. If desired, sprinkle the top lightly with more pepper. (slice and add optional tomato slices on top) Bake the quiche until it is golden brown on top and the center is no longer jiggly. Depending on your oven, this will take anywhere between 45 minutes - 1 hour. Mine took 50 minutes. Use a pie shield to prevent the pie crust from over browning, if desired. I do turn my broiler on low and let the quiche brown a bit more (approx 2 mins) Allow to cool for 3 minutes before slicing and serving. This quiche makes great leftovers! Store tightly covered in the refrigerator for up to 4 days. Baked quiche freezes very well, up to 2 months. *1 Cup Whole milk is heavily preferred for creamiest texture, though your favorite milk may be used instead - keeping in mind the creamy texture will be compromised. (I used half 2% and half heavy cream) Recipe & Photos by: Diane Baker for Canning and Cooking at Home
0 Comments
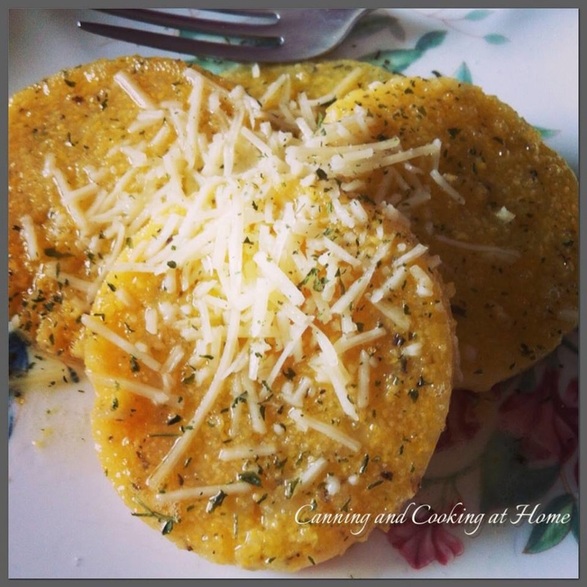 Creamy Polenta Cakes
Ingredients: 1 cup milk 2 cups water Pinch cayenne pepper 1 bay leaf Kosher salt 1 cup polenta 4 sage leaves, finely chopped 1/4 cup mascarpone Extra-virgin olive oil 4 tablespoons grated Parmigiana *parsley for garnish Directions: In a saucepan combine the milk, water, bay and cayenne. Bring the mixture to a boil over low heat and season generously with salt. Once the liquid is at a boil and is seasoned appropriately, sprinkle in the polenta whisking constantly. When the polenta is combined switch over to a wooden spoon and stir frequently until the polenta has become thick. Taste the polenta to see if it has cooked through. If it still feels mealy and grainy, add some more milk or water and cook it to a thick consistency. Repeat this process, as needed, until the polenta feels smooth to taste, about 30 minutes. Remove the bay leaf and stir in the chopped sage and mascarpone. Line a 7 by 7-inch square pan with plastic wrap. Pour the polenta into the prepared pan. Cover the top with more plastic smoothed onto the surface of the polenta. Chill in the refrigerator until needed. All of this can be done ahead of time. When ready to use, remove the polenta from the pan and cut into desired shapes (I made mine into rounds). Coat a nonstick saute pan with olive oil and bring to medium-high heat. Once the pan is hot and starting to smoke just a little, add the polenta shapes. Cook the polenta on both sides and finish by sprinkling with a little bit grated Parmigiana and parsley. Transfer to a serving platter and serve while hot. Recipe by: Chef Anne Burrell Photo by: Diane Baker for Canning and Cooking at Home 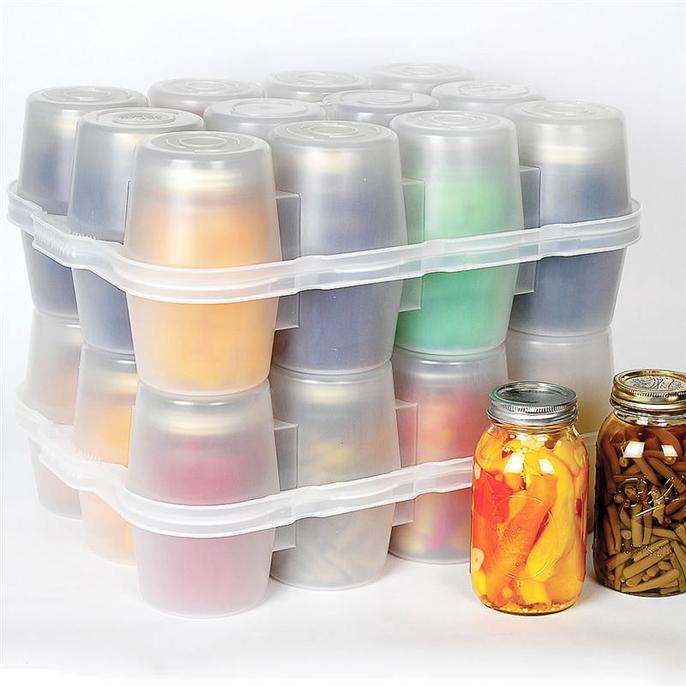 JarBOX Give Away WE will draw TWO WINNERS at RANDOM!! Canning means lots of jars! Jars that are empty and Jars that are filled. We take the time to nurture our garden, pick our crops at their peak and can them into something delicious. Why not keep your hard work, time and effort - safe. I am talking about JarBOX. I ran across a few of these magical 'totes' at a local store and they intrigued me. They are washable, stack-able, lock-able for transport and might I add - sturdy! One of the number one reasons for what I call 'canners heartbreak' is jar breakage (bumping jars together). Have you ever stored your processed jars in a cardboard container only to not realize one jar might have leaked or dripped and you go to pick up that container only to have it drop everything onto the floor - breaking all the jars?! Not good. JarBOX 'cells' contain each jar into a singular space. JarBOX keeps each jar separated from touching each other. I am so impressed with this product that I contacted Jeri and asked if we could possibly work together on a JarBOX Give Away. She so generously said yes! (yippee!) I think watching her YouTube video about JarBOX really shows you what JarBOX can do and all its versatile uses! Traveling, Camping, Moving, Storing are all made easier with JarBoX. A brilliant addition is that they are also perfect for Earthquake prone areas. Even if you only need to store your unfilled jars, JarBOX keeps them clean, dry and bug free! I can't tell you all how much I truly appreciate the hard work that went into inventing this product - and so excited about all its uses too! Most importantly, very honored to be able to team with JarBOX and offer all my "friend/fans/likes" of my Facebook page and my Website the opportunity to WIN some of their product!!!!!!! http://www.jarbox.com/ EACH WINNER WINS - TWO QUART CAPACITY JarBOXes We will draw TWO WINNERS!! ONE FROM MY FACEBOOK PAGE ONE FROM THIS WEBSITE **** TO ENTER FOR WEBSITE ENTRY: Please COMMENT ON THIS POST ABOUT HOW YOU WOULD USE JARBOX this enters you for ONE random drawing on APRIL 23rd, 2015 Make sure to also visit: MY FACEBOOK PAGE to enter for your SECOND chance to Win! *entries open to residents of the contiguous United States only.  Jeri (pictured above) - the Inventor of JarBOX
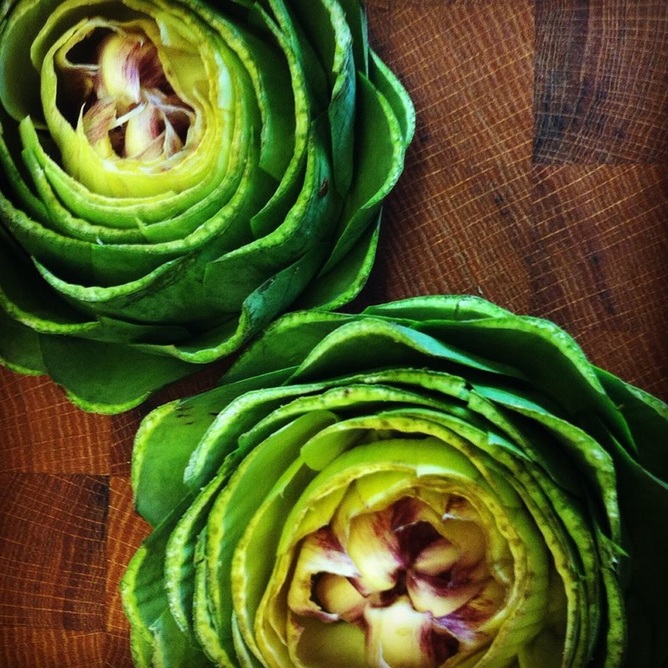 Fear not the (Globe) Artichoke!! If there is one vegetable that I think most are afraid of, it's the artichoke. I think it doesn't help that larger, more mature artichokes are armed with thorns to keep you at bay (after all, they are a thistle!) Have no fear - I will list the steps you need to take to venture into steaming your first artichokes! So, grab your steamer basket, some lemon, water, salt and we'll make this super simple. As you grow to love them like we do here in my household, you will learn to stuff these beauties and turn them into wonderful appetizers or first courses...from simple to fancy - the artichoke is fun to eat too! Let's face it - the largest artichoke carries maybe 70 calories but, the melted butter you dip them in, pushes that over the edge. You can make a lemon infused yogurt dipping sauce that cuts down on those calories but, WHO are we kidding? I love the hot melted butter dripping all over those leaves and the artichoke bottom! Ok...enough of me babbling on, let's get cooking...((photo series shown at bottom of my post)) Buying/Picking: Choose un-blemished artichokes, make sure the underneath has a clean stem and no holes in the leaves (indicating a possible worm, yuck!) There ARE grocers that do not know how to tell if a choke is good too - they will almost let them rot on their own store shelves so, buyer beware!! Some say when squeezed the choke should 'squeak' a bit - indicating a younger, fresher choke. They should also be heavy for their size. I just make sure the entire globe is unblemished and free of any discoloration, rot or dryness. Keep in mind, some chokes do have a purple hue by nature of their variety (which does not indicate rot.) Preparing: Have a lot to clean and prepare? Then make sure to grab some lemons! We will be making acidified water to keep your chokes GREEN (I don't bother with this step unless I'm making them for a dinner party...) I clean my chokes well under running water - then take one choke in hand, cut the stem down so that the choke sets on a flat surface without toppling over. Remove the very bottom outer set of leaves (3-5 at most are usually around the stem base.) Now take a sharp knife and cut off an entire 1/4 to 1/3 or the top of the choke (you wouldn't be eating that anyway) This leaves you with a nice clean open top, and possibly 2-3 lower rows of leaves that need the thorns clipped off - I use my kitchen shears and quickly zip off the thorn-tops of those leaves as well...If you want to keep your chokes green - this is when you cut a lemon in half and rub around the entire choke (making sure to hit the cut parts with the lemon, place prepared choke into a large bowl of ice water that has 4 Tbs of lemon added to it and move onto the next choke.) Steaming: I have a large pot that has a steamer basket at the top, some have steamer baskets that rest on the bottom of a pot, either is fine. Fill pot with a good 3-5 inches of water, add 1 Tbs salt to water *some add a splash of lemon here too, I don't. Take one choke and open up slightly (loosen up the choke to accept steam) and place upside down into pot (stem end facing you). Steam approx 25-35 mins. (make sure to check water level in pot too! you don't want the pot to dry out without you noticing! which is why I love my steamer basket being at the top of my pot, I can fill my pot almost one-third full with water and let the steam do its thing) Chokes are ready for eating when you can insert a sharp knife easily into the stems. Eating: I prefer the outside/in method. I eat the outer ring of leaves first, working my way into the center. Pluck off a leaf, dip into your sauce and scrape the underside of thee leaf over your teeth, the "meat" of the choke is actually only about 1/8th of the size of the entire leaf!! As you work your way in, the bottom with the choke meat gets lighter in density and easier to skim your teeth over. Near the center, most times its possible to eat the entire bottom portion of the leaf. Beware of Fuzz: LOL. Okay, I'm warning you NOW that "cousin It" resides inside every choke unless its a mini choke (which can be eaten whole) The layer of fuzzy white/gray 'hair' lays right over the "artichoke bottom"...think of it as digging through a cracker jack box for the prize LOL...but, instead of popcorn, its un-edible...fuzz...fur...easily scraped off with a spoon and a swift, steady hand. Once that layer is removed, you can now consume what some feel is the "prize" - the heart or bottom...I cut mine up into 6-8 pieces and dunk into butter... Some people DO remove the "inside" of the choke down to cutting out the hair/fuzz before steaming, I do not. All Photos by: Diane Baker for Canning and Cooking at Home 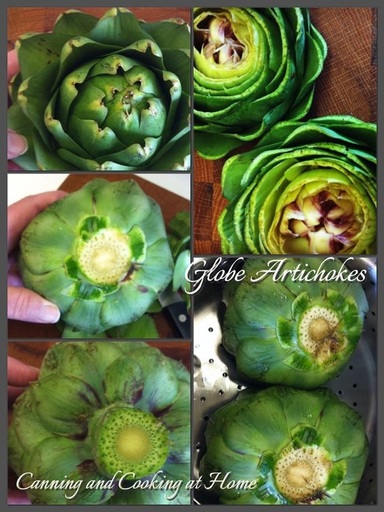 pick, clean, steam, eat! 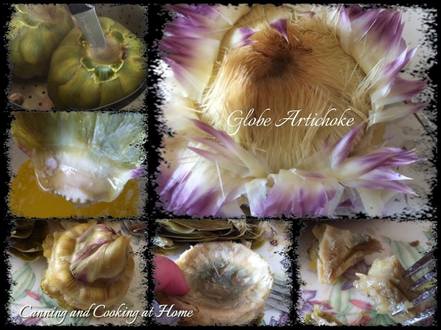 steamed, eat, de-furr, eat...YUM 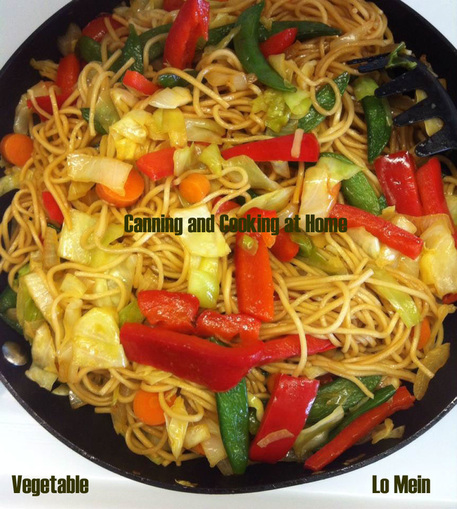 Vegetable Lo Mein
Ingredients: 10 oz Lo Mein Noodles 1/2 head cabbage, shredded 1 large red bell pepper, cut into strips 1 large onion, cut into strips 3 large carrots, sliced 1-2 cups snow peas olive oil *to lightly coat cooked noodles and for wok. Sauce: (make triple this amount *to taste) 2 tablespoons soy sauce (or more, to taste) 2 teaspoons sugar 1 teaspoon sesame oil 1/2 teaspoon ground ginger 1/2 teaspoon Sriracha (or more or less, to taste) 1/2 teaspoon Red Hot Chili Oil (more or less, to taste Directions: Cook lo mein noodles, drain, drizzle with a touch of oil (set aside). In large non stick wok or pan, I placed half a head of shredded cabbage, one large red bell pepper, one large onion, 3 large carrots, 1-2 cups snow peas, stir fry on high in a light amount of oil, until cabbage has wilted. Make sauce (I triple the amount of sauce, 1/3 goes in with veggies, 1/3 gets tossed with noodles and 1/3 used if needed near end)... once all veggies are wilted, add noodles back in and stir to combine, serve hot. Recipe & Photo by: Diane Baker for Canning and Cooking at Home |

