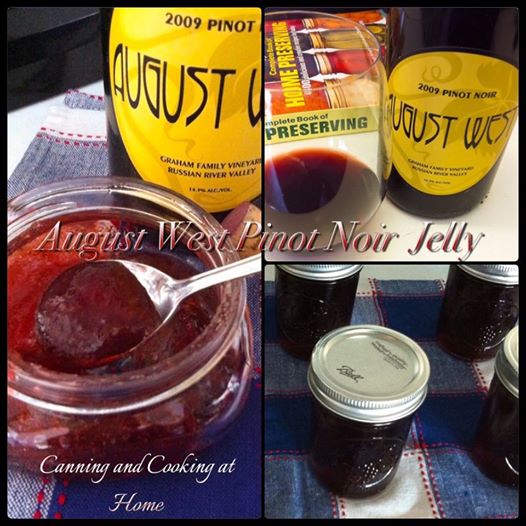
 Red Wine Jelly
I made this yesterday and I am really impressed that the great taste of this wine still shines through after processing into Jelly!! I love that you can use any red wine so, I chose a wonderful Pinot Noir. Great to make and add to gift baskets with cheeses, other wine jellies and cheese knives, a gift that is sure to Wow! Enjoy ~ Diane (August West Graham Family Pinot Noir Jelly) Ingredients: 3 1/4 Cups Dry Red Wine (*I used: August West 2009 Graham Family Pinot Noir) 1/2 Cup Lemon Juice 1 Package (1.75oz powdered fruit pectin *I used: Sure-Jell *no sugar needed in pink box pectin) 4 1/2 Cups granulated sugar Directions: Wash your jars and rings in hot, soapy water and set jars on a cookie sheet in oven to keep warm (I set oven to 175) Place lids in a small sauce pan and simmer 'low' on stovetop while everything is being prepared. At this time, also set your canner with water and rack onto stovetop to bring to a boil. In a large, deep stainless steel pot combine wine and lemon juice. Whisk in pectin until dissolved. Stirring frequently, bring to a boil. Add all sugar at one time and return to a full roiling boil, stirring constantly, for 2 mins or until your candy thermometer reaches 220. Remove from heat and skim off any foam, if needed. Pour hot jelly into hot jars leaving 1/4" head space, wipe rims and apply lids and rings (snug, fingertip-tight) Place in canner with at least one inch of water covering tops of jars, process for 10 minutes in Boiling Water Bath or according to local regs. (I have to add 5 mins for my altitude) Once timing is complete, turn heat off stove, remove lid from canner and let sit for 5 mins, remove jars to a protected, draft free surface and let cool for 24 hours. After 24 hours, remove rings, make sure lids are sealed and store properly. Makes approx Six - 8oz jars Recipe Adapted from: Ball Complete Book of Home Preserving/Red Wine Jelly Photos by: Diane Baker for Canning and Cooking at Home
0 Comments
 My magical canning gloves! a great addition to my canning line up!!I had the honor of being contacted early this month by Dan from "High Five Naturals" to test out and give my input on his companies new product. I thought a blog review was in order on this one!! The easiest 'oven mitt' I've ever owned that also withstands extreme heat yet has so many versatile uses. These felt more nimble to use and I felt more secure in picking up items like hot canning jars out of my boiling water bath and pressure canner. I love that they are odor resistant (and mildew resistant too!) I rinse mine off in soapy water and off I can go again onto another project! These gloves are made by High Five Naturals and let me tell you - I will no longer burn my hands preparing corn (from the cob) for canning too! I can grab the cobs right out of the boiling water and place them into the ice bath for processing. I found that I can hold large items more securely with these on, I always set my just cleaned canning jars in the oven to keep HOT while preparing items that will be canned - reaching in and grabbing a HOT jar no longer requires an odd reach into the oven with a jar lifter or outdated oven mitts, or a kitchen towel - I just grab them with my 'High Fives' on and even better - I also place my hot jars directly into my canner with them on... If you click on "Read More" I've added some great information directly from High Five Naturals - a great product that should be added to your Canning line up!! Remember these are also multi-functional so many MORE great uses around the house but - for handling HOT foods and HOT jars with BOILING water around as you are CANNING - these are GREAT! - Enjoy! Diane
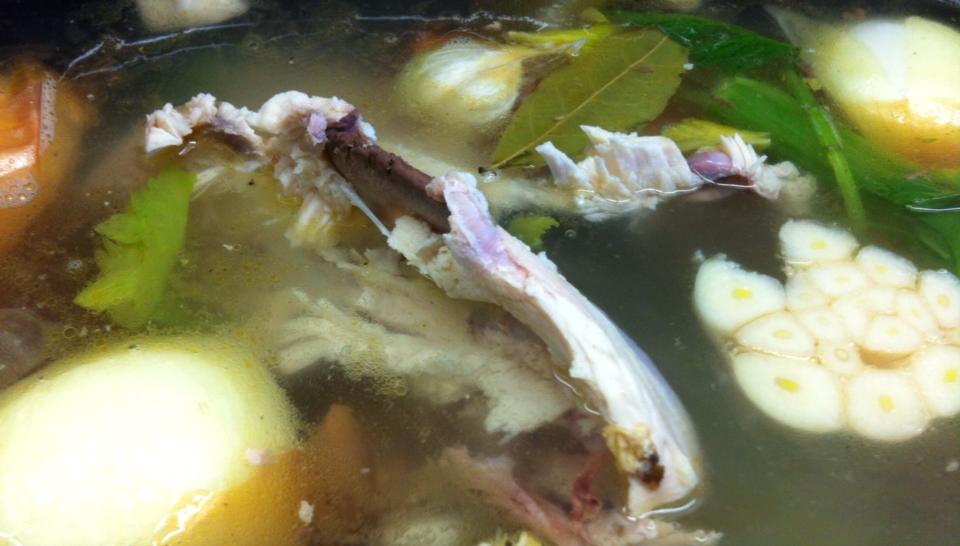 Why not! I'm not sure about you but, we love roasted and grilled chicken. I used to toss the carcass and never give it a second thought - until lately!! It so easy to make Homemade Stocks and in your slow-cooker too!! The flavors are richer and most times the color is even deeper then any store bought stocks/broths. Who wouldn't want to know what went into their stock and control it so there aren't any added unwanted items like 'msg' try this - you'll like it! Enjoy - Diane Homemade Slow Cooker Chicken Stock 2 lbs Chicken Bones (carcass) 1 1/2 tsp salt *you can hold off adding until the end if you prefer and adjust to your taste 2 medium onions, rough chop 2 carrots, rough chop bulb of garlic, cut in half horizontally 3 celery ribs, rough chop boiling water to cover chicken carcass 1 Tbs Apple Cider Vinegar 1 Bay leaf 8-10 black peppercorns 3 spring fresh thyme Preheat oven to 450 degrees F. Combine chicken bones, onions, celery, and carrots in a large roasting pan; toss with oil and season lightly with salt and pepper. Roast until the bones and vegetables are a rich golden brown, about 30 to 40 minutes. Transfer the bones and vegetables to a large stockpot...or slow cooker (mine is a 6 Qt) cover with enough boiling water to just cover the chicken carcass, add in remaining ingredients, cook on LOW for 12-18 hours (your preference, taste after 12 hours) I pour my liquid that has been strained (strain through cheesecloth) into a fat separator and then place the resulting fat free liquid into a fridge safe container to use within 5 days (or pressure can or freeze stock for future use.) **rough chop meaning you don't peel the onion and you don't cut or take off any peelings from carrots and leave celery whole - with leafy greens too... ** the apple cider vinegar will not flavor your dish but, helps to leech out the minerals from the carcass while cooking - adding more nutrients to the final product. You can use white vinegar as well. Yields 2.5 to 3 Quarts of Stock. *note: with an hour left of cook time (when bones were just falling apart) I added a pinch of Rosemary added for flavor. If Canning - NCHFP Inst. on Pressure Can Meat Stocks/Broth: 10 lbs weighted canner/11 pounds dial gauge canner (or according to your altitude/local regs.) for: 2o minutes/pints 25 minutes/quarts. . Recipe & Photo by: Diane Baker for Canning and Cooking at Home 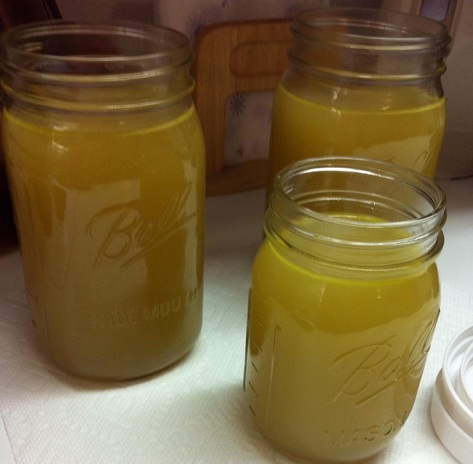 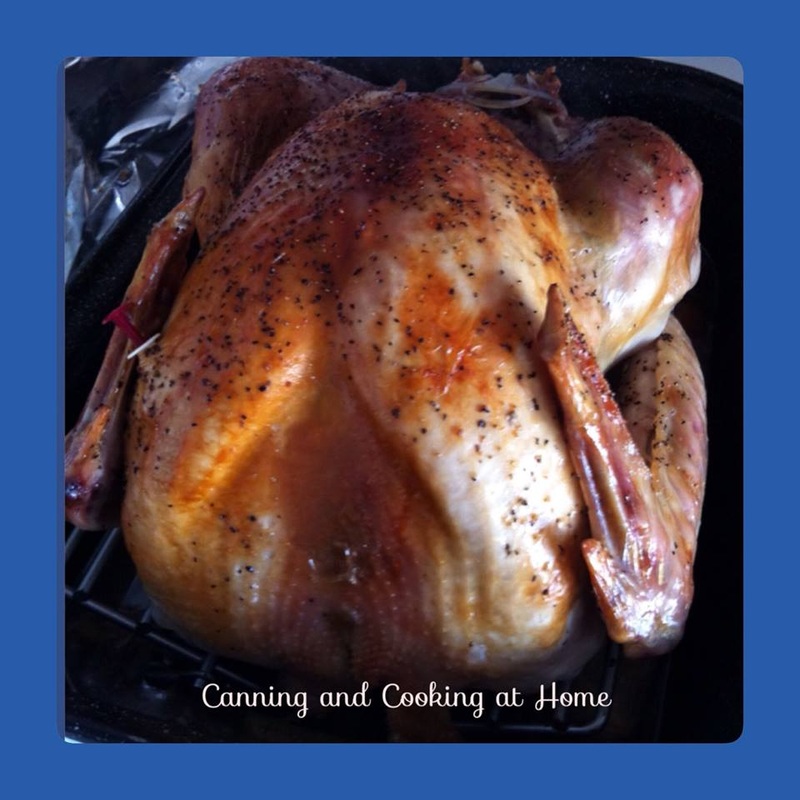 Bird! is the Word...and it's that time of year when everyone is trying to decide between fresh, frozen, organic, smoked, fried, brined, baked, or grilled....turkey! No matter what your choice, this recipe is the one I use and never fails to impress on taste. It's moist and flavor-filled. I also remove the neck and use that in making an extra pan of gravy, I place carrots, onion and celery in the pan with a bit of chicken broth, a bay leaf and the neck and let that simmer a good 45 mins and then strain liquid from solids and finish off making that second gravy with a roux of butter and flour in equal parts to the liquid I get...that way everyone has plenty of gravy and its great to add to Turkey Posole when making the "leftovers" from Thanksgiving day!! I do make the traditional 'pan gravy' from the turkey juices (after taking the fat out) and again a simple butter and flour roux is used there too. Enjoy - Diane
Oven-Roasted Turkey Ingredients: 1 tablespoon smoked paprika 1 1/2 teaspoons garlic powder 1 1/2 teaspoons onion powder 1 teaspoon dried thyme Kosher salt and freshly ground black pepper 1 14 -pound turkey, giblets removed, washed and dried melted butter, for drizzling Fresh thyme, for garnish Directions: Mix the smoked paprika, garlic powder, onion powder, dried thyme, 1 tablespoon salt and 1 1/2 teaspoons black pepper in a bowl. Sprinkle some of the spice rub inside the cavity of the turkey. Separate the skin from the breast meat with your fingers, starting at the top of the breast and sliding to the right and left, then working down. Massage some of the rub onto the meat under the skin. Sprinkle the remaining rub on the turkey's skin. Place the turkey on a sheet tray and cover with plastic wrap. Refrigerate overnight or up to 24 hours so the flavors can marry. Set a rack at the lowest position in the oven and preheat to 325 degrees F. Remove the turkey from the refrigerator to bring to room temperature. Tie the legs together and tuck the wing tips under. Place the turkey in a roasting pan. Drizzle the outside of the turkey with a few tablespoons of butter and sprinkle with salt and pepper. Roast the turkey - covered - about 3 hours, or until a thermometer inserted into the thickest part of the thigh registers 165 degrees F. Transfer the turkey to a platter, cover loosely with foil and let rest 30 minutes before carving. I do baste with pan juices and remove the cover when 30 mins if left in the cooking time. Recipe Adapted From: Patrick & Gina Neeley Photo by: Diane Baker for Canning and Cooking at Home 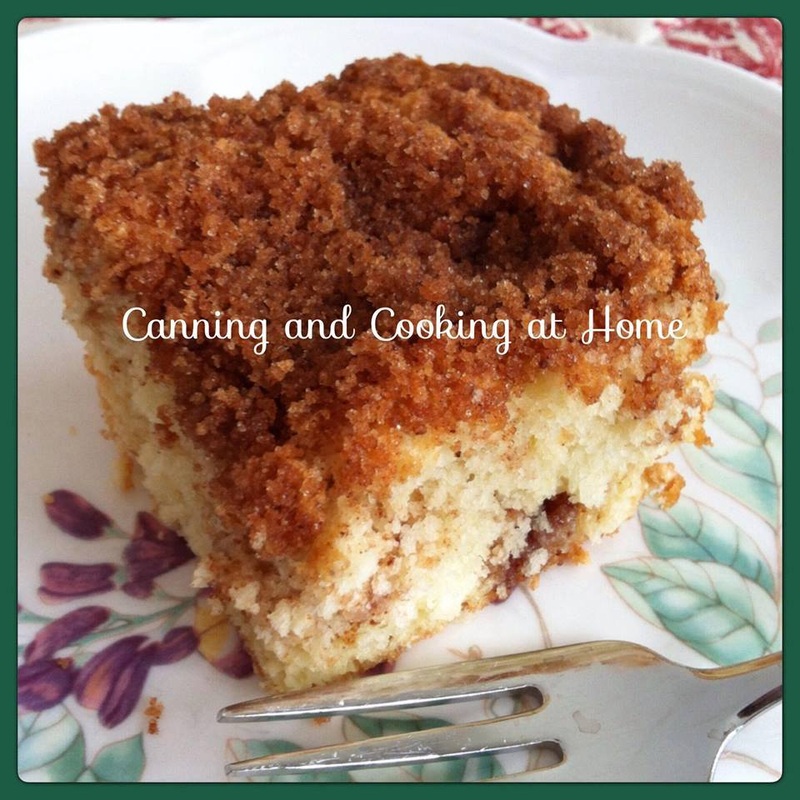 I love nothing better in the morning then a buttery slice of heaven (cinnamon coffee cake) with my first cup of coffee. I usually make sure I have everything ready to go in the morning so I can whip this up and pop it in the oven - the smells are just the perfect 'wake up' call for the rest of the family. This is quick and easy. Enjoy - Diane Cinnamon Coffee Cake Ingredients: 1 1/2 cups all-purpose flour 1 1/2 teaspoons baking powder 6 tablespoons white sugar 1/2 teaspoon salt 1/3 cup shortening 1/2 cup milk 1 egg 1/2 teaspoon vanilla extract 2 tablespoons butter, melted 1/2 cup brown sugar 2 tablespoons all-purpose flour 1/2 teaspoon ground cinnamon Directions: Preheat oven to 425 degrees. Grease and flour a 9 inch square pan. In a large bowl mix together the flour, baking powder, sugar and salt. Cut in the shortening with a pastry blender to the size of small peas. In a separate small bowl, beat the egg well, then stir in the milk and vanilla. Add the egg-milk mixture to the flour mixture all at once. Stir carefully until just blended. Pour batter into prepared pan and spread evenly. Drizzle top with melted butter. In a small bowl mix together brown sugar, 2 tablespoons flour and 1/2 teaspoon cinnamon. Sprinkle the cinnamon topping onto batter. Bake in the preheated oven for 15 to 20 minutes, or until a toothpick inserted into the center of the cake comes out clean. Recipe by: Stephanie Photo by: Diane Baker for Canning and Cooking at Home |

